Співпраця
МИСТЕЦТВО
КРАСА ТА ЗДОРОВ'Я
РЕМЕСЛО
КУЛЬТУРА ТА ІСТОРІЯ
РОЗВАГИ
СЕРЕДОВИЩЕ
ЇЖА ТА НАПІЇ
ЗБОРНА ІНЖЕНЕРІЯ
НАУК
СПОРТ
ТЕХНОЛОГІЯ
НОСИМО
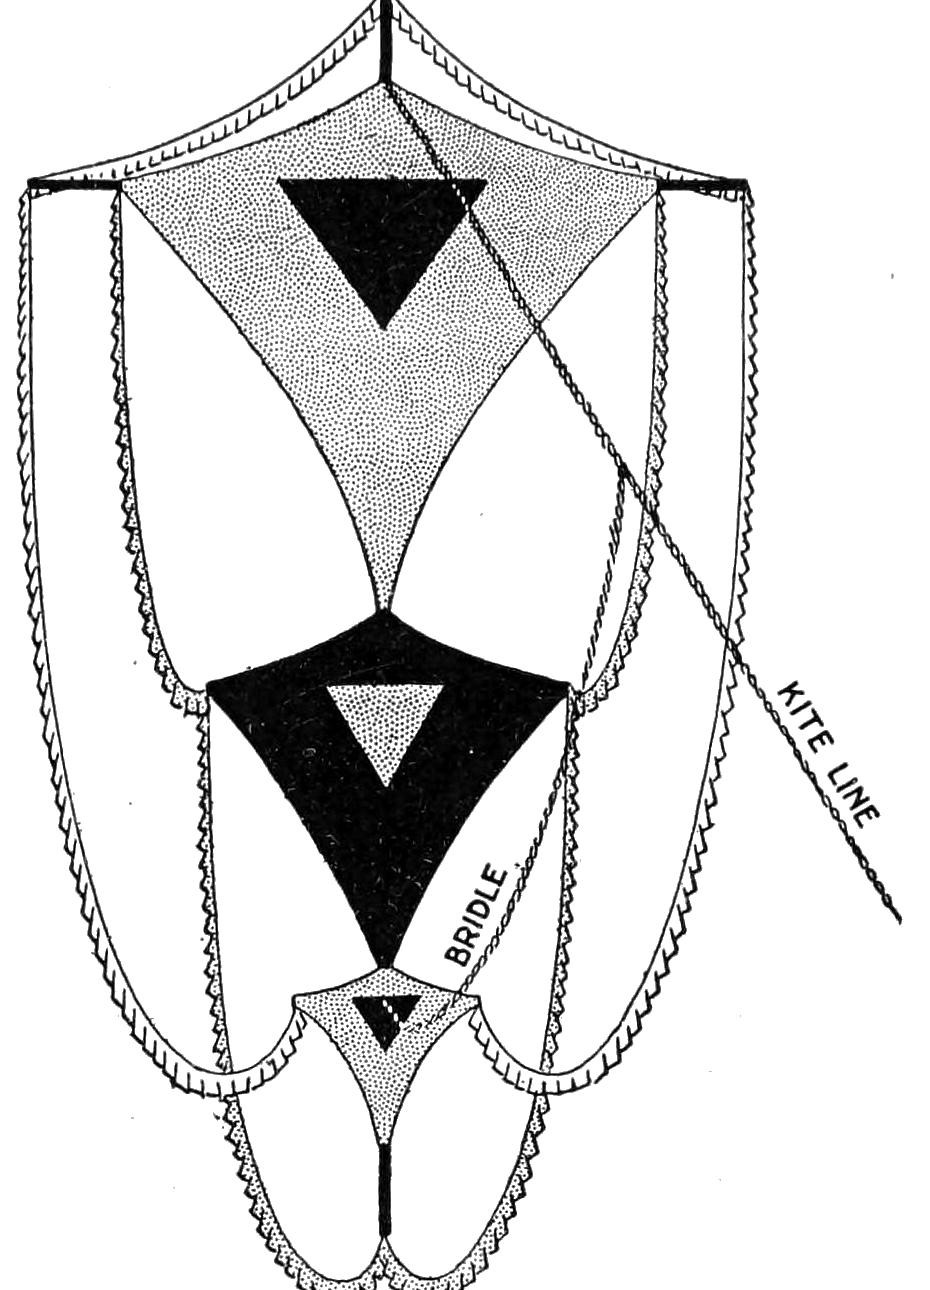


Festooned Kite: Three Tailless Kites on One 7 ft Spruce Spine With Tissue-Paper Fringes (Boy Mechanic, 1919)
C. M. Miller's compound kite from The Boy Mechanic, Book 3 (1919): three tailless kites, 3 ft, 2 ft and 1 ft wide, strung on one 7 ft spruce spine, covered in tissue paper and hung with fringed tissue festoons from the ends of the sticks. An 87 in bridle sets it to the wind.
Середній
About 1 day
Інструкції
1
1
Spine stations and string lengths
Spine stations and string lengths
Завантаження блокнота Jupyter…
2
2
Read The Boy Mechanic, Book 3
Read The Boy Mechanic, Book 3
"More than one kite on the same framework is known as a compound kite. The one illustrated consists of three tailless kites on one long stick, called the spine."
3
3
Cut the sticks
Cut the sticks
Cut the spine of straight-grained spruce (or pine or bass) without a twist, 7 ft long by 1/4 by 1/2 in; if the wood breaks easily make it 3/4 in wide, or 3/8 in thick. Cut the bows 4 ft by 1/4 by 1/2 in, 2 ft by 1/4 by 3/8 in, and 1 ft by 1/4 by 1/4 in. A twisted spine keeps the three kites out of one plane and makes the kite unsteady.
Матеріали для цього кроку:
 Хвойний брусок (рейка)4 штук
Необхідні інструменти ({count})
 Ручна пилка
 Ручний рубанок
 Рулетка
 Олівець
4
4
Lash on the bows
Lash on the bows
Lash the upper bow 13 in from the top of the spine, its ends 6 in past the kite for the festoons; then the centre bow 5 in below D and the lower bow as in the drawing (6, 7, 29, 5, 19, 2, 10 and 6 in down the spine). Lash, do not nail: wind diagonally both left and right round the two sticks, then wind between them round the other windings to draw everything tight.
Матеріали для цього кроку:
 Нитка для повітряного змія1 штука
Необхідні інструменти ({count})
РулеткаОлівець Ножиці
5
5
String the outlines
String the outlines
Drill small holes (or notch with a knife or saw) in the spine 6 in from the top at A, 6 in from each end of the upper bow at B and C, and 29 in below the upper bow at D. Tie the outline at A and pass it through C, D and B back to A; draw it tight without springing spine or bow. Check that AC equals AB and CD equals BD, shift the string until they do, and wind each point (E) so it cannot slip. String the centre and lower kites the same way.
Матеріали для цього кроку:
Нитка для повітряного змія1 штукаНеобхідні інструменти ({count})
 Ручний дриль
 Сталевий складаний ніжРулетка
6
6
Cover and fringe
Cover and fringe
Cut the tissue about 1 in larger all round than each kite, turn over about half the allowance and paste it, leaving the cover loose. French tissue comes in fine colours and is stronger than common tissue; Chinese rice paper is strongest but only natural colour. For the festoons cut tissue strips 2-1/2 in wide, paste 1/2 in of one long edge over a string, and slit the loose edge every 1 in. Hang the festoons from the stick ends in easy curves, not tight, keeping both sides balanced.
Матеріали для цього кроку:
 Цигарковий папір (кольоровий)5 аркушів
 Клейстер із пшеничного борошна1 штукаНитка для повітряного змія1 штука
Необхідні інструменти ({count})
Ножиці Пензель для клею
 Лінійка
7
7
Bow the kites and bridle
Bow the kites and bridle
Tie a string from end to end of the upper and centre bows on the back and spring in short brace sticks to bend them, as usual for tailless kites. Tie the 87 in bridle at A and to the spine at F, and attach the kite line 30 in from A, leaving 57 in to F.
Матеріали для цього кроку:
Нитка для повітряного змія1 штукаХвойний брусок (рейка)1 штукаНеобхідні інструменти ({count})
Сталевий складаний ніжРулетка8
8
Flying and troubleshooting
Flying and troubleshooting
Festooned kite flying.
Flow
Loading...
9
9
History and honest limits
History and honest limits
From "How to Make Combined Kites, Part II: A Festooned Kite" by C. M. Miller, in **The Boy Mechanic, Book 3**, Popular Mechanics, 1919 (Project Gutenberg 71856; checked on the archive.org scan boymechanic0003unse, pp. 155-156). He does not name the string, the paste or the kite line. The tools and metric figures are ours.
Матеріали
4- 4 штукЗаповнювач
- Заповнювач
- 5 аркушівЗаповнювач
- Заповнювач
Необхідні інструменти
9- Заповнювач
- Заповнювач
- 1 vendor sell this, none ship to you yetЗаповнювач
- 1 vendor sell this, none ship to you yetЗаповнювач
- Заповнювач
- Заповнювач
- Заповнювач
- Заповнювач
- Заповнювач
За цим кресленням виготовляють
Пов'язані креслення
Ці креслення діляться знаннями — техніки, матеріали або принципи

CC0 Суспільне надбання
Це креслення випущено під ліцензією CC0. Ви можете вільно копіювати, змінювати, поширювати та використовувати цю роботу для будь-яких цілей без запиту дозволу.
Підтримайте мейкера, купуючи продукти через його креслення, де він отримує Комісію мейкера встановлену вендорами, або створіть нову ітерацію цього креслення та включіть його як зв'язок у власне креслення для розподілу доходу.