Співпраця
МИСТЕЦТВО
КРАСА ТА ЗДОРОВ'Я
РЕМЕСЛО
КУЛЬТУРА ТА ІСТОРІЯ
РОЗВАГИ
СЕРЕДОВИЩЕ
ЇЖА ТА НАПІЇ
ЗБОРНА ІНЖЕНЕРІЯ
НАУК
СПОРТ
ТЕХНОЛОГІЯ
НОСИМО
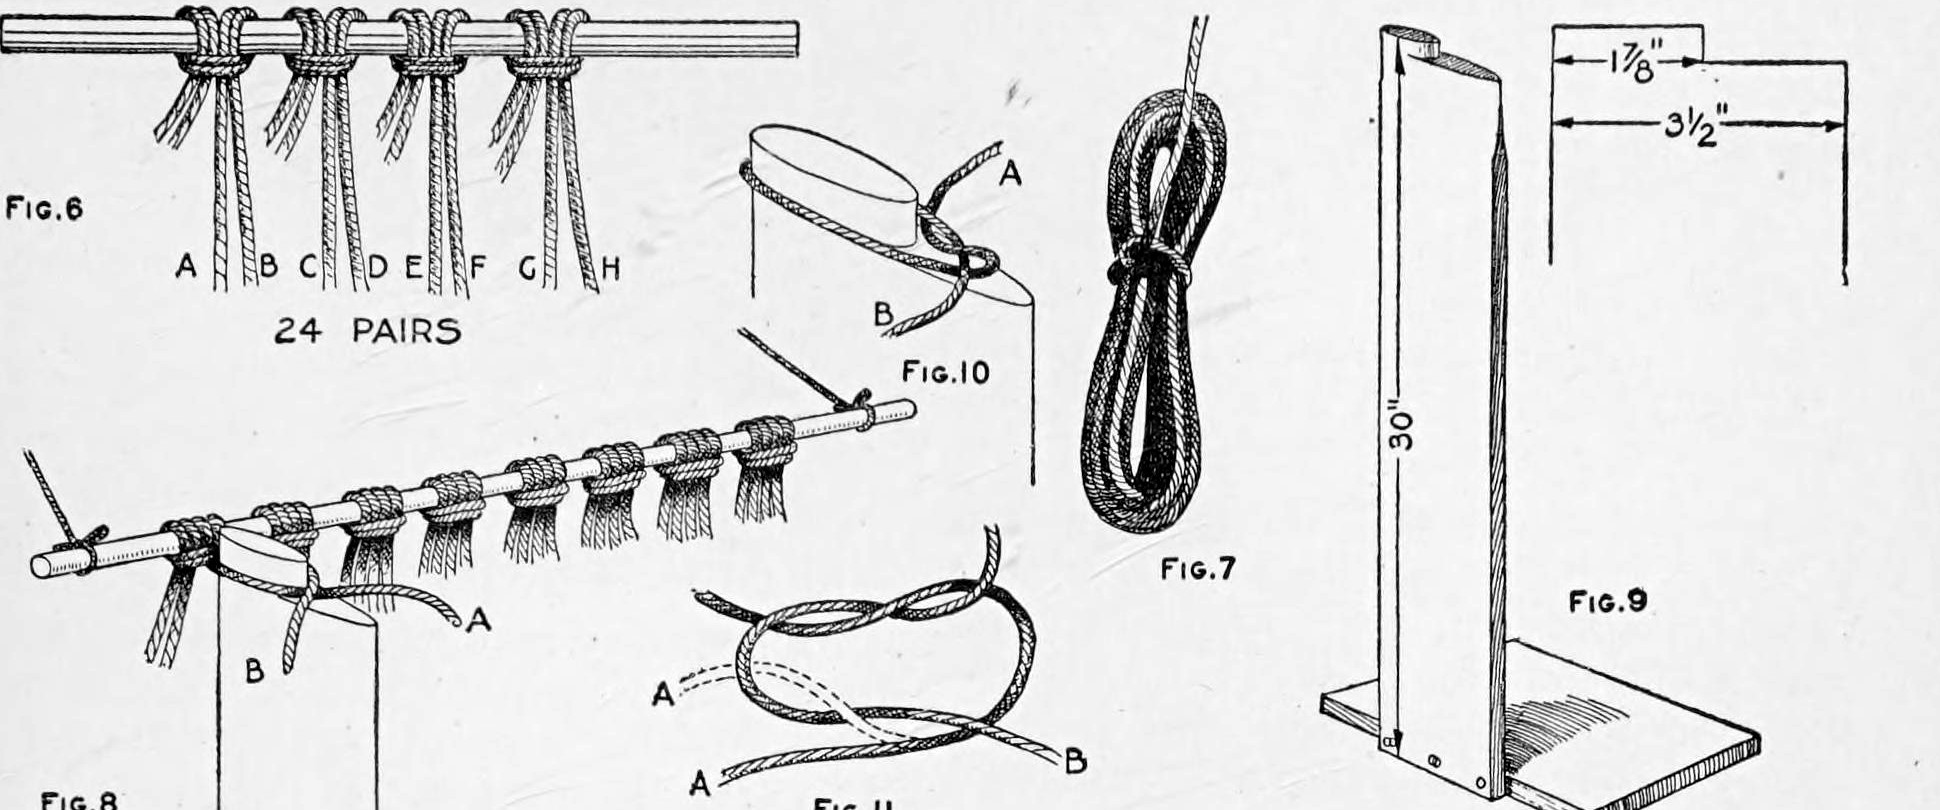


Knotted Twine Hammock: 48 Seine-Twine Cords Tied From a Centre Rod Over a Two-Size Mesh Post (Boy Mechanic, 1919)
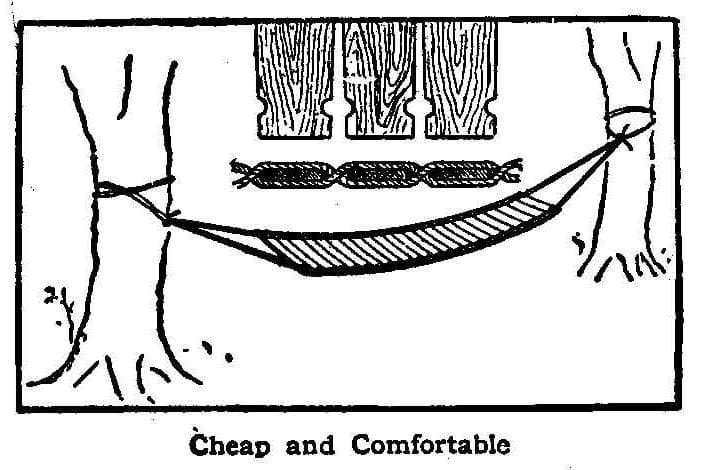
Charles M. Miller's knotted hammock from The Boy Mechanic, Book 3 (1919): 24 pairs of 18 ft seine-twine cords looped over a centre rod and knotted toward each end with flat reef (or overhand, or Solomon's) knots over a 30 in mesh post, then gathered into a 2-1/2 in galvanized ring at each end and bound.
Середній
Several days
Інструкції
1
1
Cord budget
Cord budget
Завантаження блокнота Jupyter…
2
2
Read The Boy Mechanic, Book 3
Read The Boy Mechanic, Book 3
"The flat reef knot is small, is easily tied and will not slip."
3
3
Make the mesh post and ring board
Make the mesh post and ring board
Make a mesh post 30 in high on a base you can rest a foot on, its top cut to two sizes: 1-7/8 in across for the first row of meshes and 3-1/2 in for all others (Fig. 9). Make a ring board 30 in long, 3 in or more wide and 1 in thick, with three nails driven slanting (Fig. 14).
Матеріали для цього кроку:
 Дошка з твердої деревини1 штука
 Соснова дошка1 штука
 Цвяхи4 штук
Необхідні інструменти ({count})
 Ручна пилка
 Ручний рубанок
 Молоток
 Рулетка
4
4
Cut and hang the cords
Cut and hang the cords
Cut 48 cords of medium-hard 24-ply seine twine, each 18 ft long, and loop them in 24 pairs over a centre rod (an old broom handle) anchored to a wall (Figs. 6, 8). Loop the opposite halves up out of the way. Wind each working cord into a small bundle secured with a half hitch, leaving about 3 ft free (Fig. 7).
Матеріали для цього кроку:
 Сітков'язальна нитка48 cord
 Мітла1 штука
Необхідні інструменти ({count})
Рулетка Ножиці
5
5
Knot the body
Knot the body
Set the post's small top between the first pair, A and B, and tie them with a flat reef knot: B over A, A tucked behind; B over again and A tucked under, drawn very hard (Figs. 8, 10, 11). Move along tying each pair, to the 24th (Y, Z). On the way back use the large top and tie neighbouring pairs together (Y with X, W with V ...). Alternate the rows to within 2-1/2 ft of the end. Then move the rod into the second row and knot the other half the same way. An overhand or Solomon's knot may be used instead (Figs. 1, 3, 12).
Матеріали для цього кроку:
Сітков'язальна нитка1 штукаНеобхідні інструменти ({count})
 Мірна паличка для вічка
6
6
Fit the rings and bind
Fit the rings and bind
Put the centre rod in the last row of meshes and set it on the ring board with a 2-1/2 in galvanized ring tied by a string to the end nail, 2 ft from the rod. Tie the cords to the ring in pairs with flat reef knots, one cord under and one over its side. Turn the ends back along the cords and wind them about 1-1/2 in with an extra cord, starting with a loop and a flat reef knot and looping each turn through its own winding; finish with a double loop and draw the end back under the turns with an awl (Fig. 15). Do the other end the same way.
Матеріали для цього кроку:
 Металеве кільце2 штукСітков'язальна нитка1 штука
Необхідні інструменти ({count})
 ШилоНожиці
7
7
Finishing and troubleshooting
Finishing and troubleshooting
Hammock troubleshooting.
Flow
Loading...
8
8
History and honest limits
History and honest limits
From "How to Make Hammocks, Part I: A Twine Hammock" by Charles M. Miller, in **The Boy Mechanic, Book 3**, Popular Mechanics, 1919 (Project Gutenberg 71856; checked on the archive.org scan boymechanic0003unse, pp. 277-280). He gives no size for the mesh post's base or the winding cord. The tools and metric figures are ours.
Матеріали
6- 1 штукаЗаповнювач
- 1 штукаЗаповнювач
- 4 штукЗаповнювач
- 2 штукЗаповнювач
- 1 штукаЗаповнювач
- 2 штукЗаповнювач
За цим кресленням виготовляють
Пов'язані креслення
Ці креслення діляться знаннями — техніки, матеріали або принципи

CC0 Суспільне надбання
Це креслення випущено під ліцензією CC0. Ви можете вільно копіювати, змінювати, поширювати та використовувати цю роботу для будь-яких цілей без запиту дозволу.
Підтримайте мейкера, купуючи продукти через його креслення, де він отримує Комісію мейкера встановлену вендорами, або створіть нову ітерацію цього креслення та включіть його як зв'язок у власне креслення для розподілу доходу.