
Співпраця
МИСТЕЦТВО
КРАСА ТА ЗДОРОВ'Я
РЕМЕСЛО
КУЛЬТУРА ТА ІСТОРІЯ
РОЗВАГИ
СЕРЕДОВИЩЕ
ЇЖА ТА НАПІЇ
ЗБОРНА ІНЖЕНЕРІЯ
НАУК
СПОРТ
ТЕХНОЛОГІЯ
НОСИМО
V-Slide Tubing Cutter: Two Slide Halves Held on the Ways by One Spring Clip, a Reamer on the Frame (Thewes, 1938)
Forge

Створено

Forge

13. листопад 2026NO
12
0
0
0
0

V-Slide Tubing Cutter: Two Slide Halves Held on the Ways by One Spring Clip, a Reamer on the Frame (Thewes, 1938)

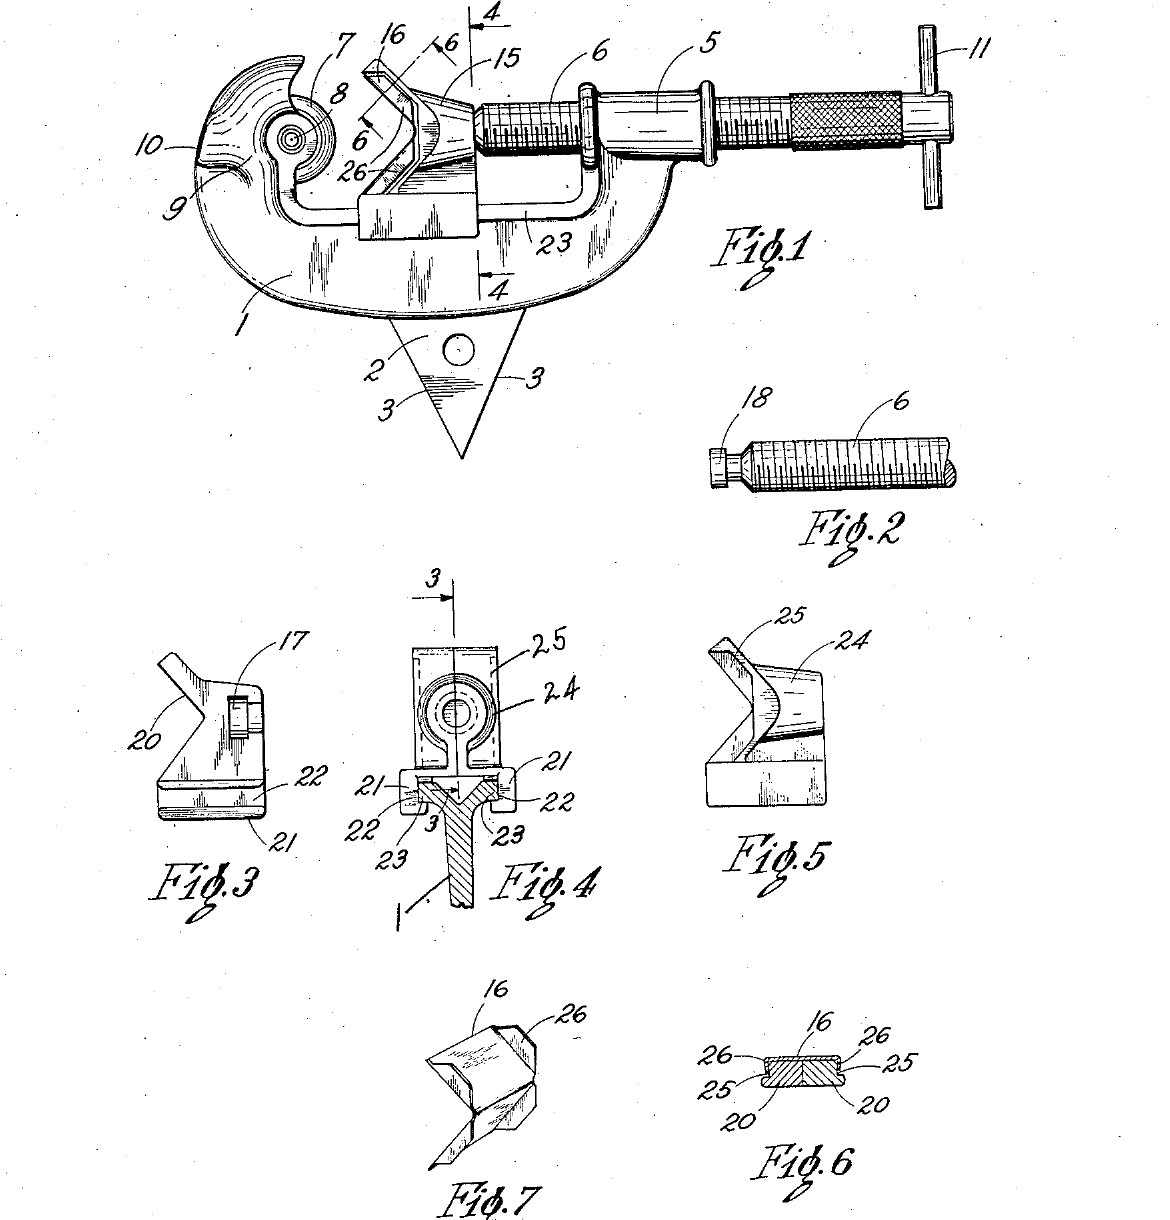
William O. Thewes of North Ridgeville, Ohio, received US 2,130,934, dated 20 September 1938 and assigned to The Ridge Tool Company, for a cutter for thin copper and brass tubing. A C-frame carries a cutting wheel at one end and a feed screw at the other. The screw pushes a V-slide that holds the tube against the wheel. The slide is two halves on ways along the frame, held together by one V-shaped spring clip, which is also the face the tube bears on. A triangular reamer on the side of the frame cleans the cut end, and the frame is its handle. We saw the frame from steel plate and pin the reamer in. His parts were die cast. All sizes are ours.
Середній
About 3 days

Інструкції

1

Where the tube sits

Завантаження блокнота Jupyter…
2

Read US 2,130,934

"With my improved cutter the ways or guides are integral with the frame and are uninterrupted throughout the length of the frame, and the slide is held in close sliding engagement on the ways without the use of bolts or rivets."
3

Print the template

Frame, slide half, end section, reamer and clip blank at 1:1 on A4, with the 8 and 28 mm tubes drawn in. print at 100 % (check the 50 mm bar).
Файл дизайнуPDFCC0 - Free
4

Saw out the frame

Glue the frame outline on 16 mm plate. Drill a row of holes inside the C, saw to them, and file to the line. Saw the 7 mm wheel slot down through the wheel post with two cuts, break out the middle and file it flat. Drill the 5 mm wheel pin and 4 mm tie pin holes across the slot. Drill 8.5 mm along the screw axis through the other post and tap it M10.

Матеріали для цього кроку:

Лист маловуглецевої сталіЛист маловуглецевої сталі1 штука

Необхідні інструменти ({count})

Ножівка по металуНожівка по металу
Набір напилківНабір напилків
Свердлильний верстатСвердлильний верстат
Машинні лещатаМашинні лещата
Набір сверделНабір свердел
Набір мітчиків і плашокНабір мітчиків і плашок
КернерКернер
РисувалкаРисувалка
Слюсарні лещатаСлюсарні лещата
Мастильно-охолоджувальна оливаМастильно-охолоджувальна олива
5

File the ways

Along the bottom bar, between the posts, file a groove 2 mm deep and 4 mm high in both faces, 3 mm below the top edge. This leaves a T-shaped rib along the top: the ways. Keep it straight and the same all along, so the slide runs smoothly from end to end.

Необхідні інструменти ({count})

Набір напилківНабір напилків

Набір надфілівНабір надфілів
Слюсарні лещатаСлюсарні лещата
Цифровий штангенциркуль 6 дюймівЦифровий штангенциркуль 6 дюймів
6

Turn the cutting wheel

Chuck a tool steel bar and face it. Turn the end to 20 mm across for 10 mm, centre drill and drill a 5 mm hole 10 mm deep, and turn the edge to a 50 degree vee, 25 degrees each side, sharp in the middle of the 6 mm width. Part it off 6 mm long and take the burr off the hole.

Матеріали для цього кроку:

Пруток інструментальної сталіПруток інструментальної сталі1 штука

Необхідні інструменти ({count})

Токарний верстат по металуТокарний верстат по металу
Трикулачковий токарний патронТрикулачковий токарний патрон
Токарний різецьТокарний різець
Відрізний різецьВідрізний різець
Набір центрувальних сверделНабір центрувальних свердел
Набір сверделНабір свердел
Цифровий штангенциркуль 6 дюймівЦифровий штангенциркуль 6 дюймів
Захисні окуляриЗахисні окуляри
7

Make the reamer

Saw a triangle with 22 mm sides from 3 mm flat tool steel and drill its 4 mm hole. Grind each edge to a 60 degree bevel from both sides, so all three edges cut. Saw a 3 mm wide slot, 22 mm long and 8 mm deep, in the middle of the frame's bottom edge, 50 mm from the wheel end, and drill the 4 mm pin hole across it.

Матеріали для цього кроку:

Штаба з інструментальної сталіШтаба з інструментальної сталі1 штука

Необхідні інструменти ({count})

Ножівка по металуНожівка по металу
Настільний точильний станокНастільний точильний станок
Свердлильний верстатСвердлильний верстат
Набір сверделНабір свердел
Набір напилківНабір напилків
Захисні окуляриЗахисні окуляри
8

Harden and temper

Heat the wheel and the reamer to a cherry red, until a magnet no longer sticks, and quench it in water, moving it about. Rub it bright with a stone, warm it on a piece of steel plate over the fire, and quench again as soon as it turns a light straw colour.

Необхідні інструменти ({count})

ГорноГорно
Ковальські кліщіКовальські кліщі
Невеликий магнітНевеликий магніт
Гартівна діжкаГартівна діжка
ВодаВода
Точильний каміньТочильний камінь
Зварювальні рукавиціЗварювальні рукавиці
Захисні окуляриЗахисні окуляри
9

Make the slide halves

Saw two pieces of 10 mm plate to the slide outline, one the mirror of the other, and file the V. On the inner face of each, saw and file a pocket for half the screw head and a slot for its neck. Saw and file a step along the bottom edge of each half so its lip fits the groove under the ways (end section on the template). File a shallow notch in the outer face of each half, beside the V, for the clip's tongues.

Матеріали для цього кроку:

Лист маловуглецевої сталіЛист маловуглецевої сталі1 штука

Необхідні інструменти ({count})

Ножівка по металуНожівка по металу
Набір напилківНабір напилків
Набір надфілівНабір надфілів
Слюсарні лещатаСлюсарні лещата
Цифровий штангенциркуль 6 дюймівЦифровий штангенциркуль 6 дюймів
РисувалкаРисувалка
10

Bend the V clip

Cut the clip blank from 0.5 mm spring steel strip. Bend the four tongues up at right angles, then fold the blank to 90 degrees on the dashed line, over the slide's V.

Матеріали для цього кроку:

Смуга пружинної сталіСмуга пружинної сталі1 штука

Необхідні інструменти ({count})

Ножівка по металуНожівка по металу
Набір напилківНабір напилків
Слюсарні лещатаСлюсарні лещата
Слюсарний молоток із кульковим бойкомСлюсарний молоток із кульковим бойком
11

Make the feed screw

Cut 120 mm of M10 threaded rod. Chuck it and turn the end to a 9 mm head 4 mm long on a 6 mm neck 3 mm long. Drill a 6 mm hole across the other end and push a 70 mm piece of 6 mm rod through it for the T-handle. Peen it both sides so it stays put.

Матеріали для цього кроку:

Шпилька різьбоваШпилька різьбова1 штука
Круглий пруток із маловуглецевої сталіКруглий пруток із маловуглецевої сталі1 штука

Необхідні інструменти ({count})

Токарний верстат по металуТокарний верстат по металу
Трикулачковий токарний патронТрикулачковий токарний патрон
Токарний різецьТокарний різець
Відрізний різецьВідрізний різець
Свердлильний верстатСвердлильний верстат
Набір сверделНабір свердел
Слюсарний молоток із кульковим бойкомСлюсарний молоток із кульковим бойком
Ножівка по металуНожівка по металу
12

Assemble

Fit the wheel in its slot with the 5 mm pin, and the 4 mm tie pin above it, peened. Tap the reamer into its slot and pin it. Screw the feed screw through the boss. Put the halves on the ways from the sides, closing them round the screw head, and spring the clip over their V so its tongues snap into the notches. Oil the ways and the screw.

Матеріали для цього кроку:

Сталевий штифтСталевий штифт3 штук

Необхідні інструменти ({count})

Слюсарний молоток із кульковим бойкомСлюсарний молоток із кульковим бойком
КернерКернер
Слюсарні лещатаСлюсарні лещата
Мастильно-охолоджувальна оливаМастильно-охолоджувальна олива
13

Cut a copper tube

Mark a copper tube and hold it in a vice with soft jaws, or by hand for small tubes. Open the screw, drop the cutter over the tube, and screw the slide in until the wheel just touches. Turn the cutter once round, give the screw about a quarter turn, and go on until the tube parts. The wheel should run in its own groove; the end should be square and not squeezed oval. Clean the inside of the end with a deburring tool.

Матеріали для цього кроку:

Мідна трубаМідна труба1 штука

Необхідні інструменти ({count})

Слюсарні лещатаСлюсарні лещата

Знімач задирокЗнімач задирок
Цифровий штангенциркуль 6 дюймівЦифровий штангенциркуль 6 дюймів
14

Ream the end

Hold the frame like a T-handle, put the reamer's point in the cut end, and turn it a few times to take off the fin the wheel has turned in.

Необхідні інструменти ({count})

Слюсарні лещатаСлюсарні лещата
15

Troubleshooting

Tubing cutter troubleshooting.

Flow

Loading...
16

History and honest limits

**William O. Thewes** of North Ridgeville, Ohio, US 2,130,934, dated 20 September 1938, filed 4 November 1935, assigned to The Ridge Tool Company. Earlier slides needed notched ways, which weaken the frame, or bolts that come loose; he claimed "a V block reciprocable on the guideway and comprising two sections, and a face plate clamping said sections together". A later certificate corrects "same" to "frame" and "base" to "boss". His frame and slide were die cast and the reamer cast into the frame; ours are sawn from plate and the reamer is pinned. The patent gives no sizes; all of ours are ours.

Матеріали

8

Необхідні інструменти

28

Файли дизайну

1

За цим кресленням виготовляють

CC0 Суспільне надбання

Це креслення випущено під ліцензією CC0. Ви можете вільно копіювати, змінювати, поширювати та використовувати цю роботу для будь-яких цілей без запиту дозволу.

Підтримайте мейкера, купуючи продукти через його креслення, де він отримує Комісію мейкера встановлену вендорами, або створіть нову ітерацію цього креслення та включіть його як зв'язок у власне креслення для розподілу доходу.

Обговорення

(0)

Увійти щоб приєднатися до обговорення

Завантаження коментарів...