Collaboration
ART
BEAUTY & WELLNESS
CRAFT
CULTURE & HISTORY
ENTERTAINMENT
ENVIRONMENT
FOOD & DRINKS
REVERSE ENGINEERING
SCIENCES
SPORTS
TECHNOLOGY
WEARABLES
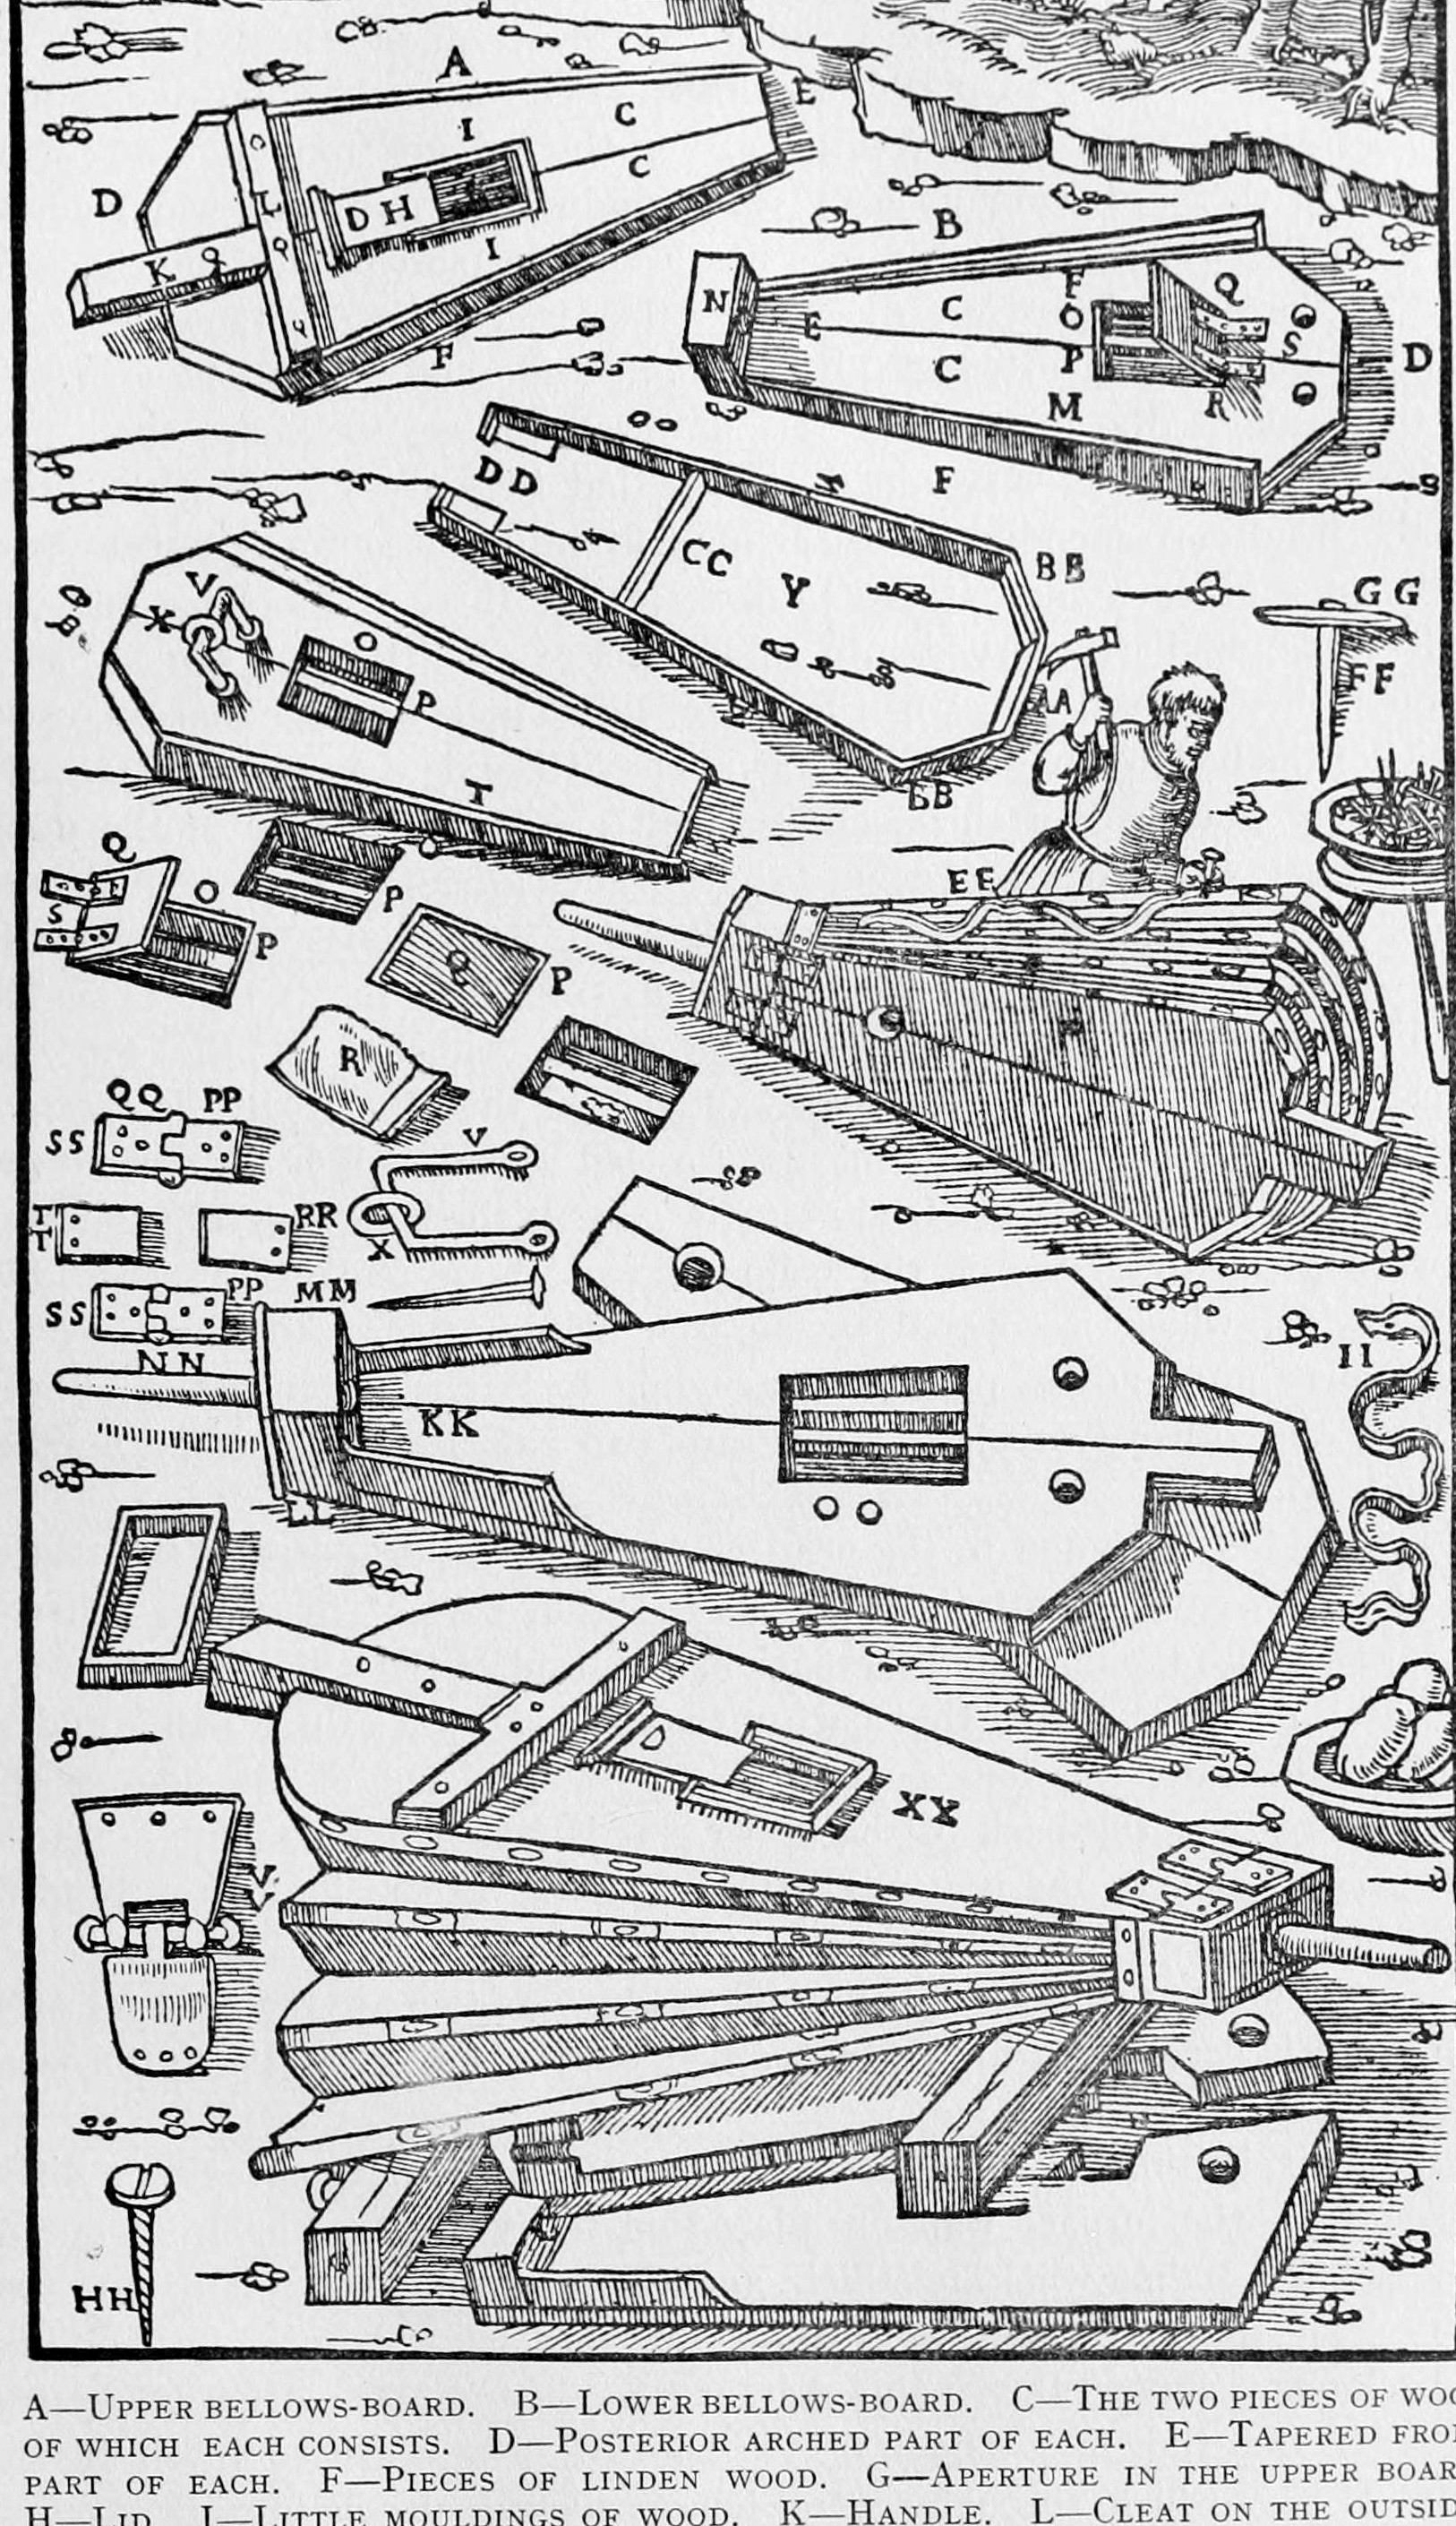


Great Bellows of the Smelting Works: Pine Boards, Linden Bows, Ox-Hide and Iron Nozzle (Agricola, 1556)
The large blast bellows of a 16th-century smelting works, every part measured, from Agricola's De Re Metallica, Book IX (1556): two tapered boards of glued pine edged with linden, about 1.7 m long, two linden bows, two ox-hides nailed on with T-headed nails, a goatskin flap valve in the lower board, and a glued head carrying a 3 ft iron nozzle.
Advanced
About 2 weeks
Instructions
1
1
Roman units in metric
Roman units in metric
Loading Jupyter Notebook...
2
2
Read De Re Metallica, Book IX
Read De Re Metallica, Book IX
"Each bellows consists of a body and a head. The body is composed of two 'boards', two bows, and two hides."
3
3
Make the upper board
Make the upper board
Glue two pieces of pine into a board a palm thick, 5 ft 3 palms long, 2-1/2 ft wide at the back (sides a little curved) and a cubit wide at the front, tapering to the head. Glue on linden edge strips, 7 digits wide at the back and 1-1/2 at the front, to take the nails. Cut an aperture 6 by 4 digits in the middle, 1 ft 3 palms from the head, with a sliding lid 2 palms 1 digit square and 3 digits thick running in mouldings a palm wide and 3 digits thick (or bore 2-3 round holes with plugs). Glue and peg a handle 7 palms or longer (2 palms wide, 1 thick on the board; rounded and 7 digits thick beyond), with a 2 ft cleat 2 palms wide and a palm thick over it and another 2 ft cleat underneath, 3 palms from the end.
Materials for this step:
 Pine Board2 pieces
 Basswood Sheet1 piece
 Hide Glue1 piece
 Dowel Rod1 piece
Tools needed:
 Hand Saw
 Hand Plane
 Chisels
 Brace and Bit
 Bar Clamp
4
4
Make the lower board and flap valve
Make the lower board and flap valve
Make the lower board the same way and a cubit longer (the extra length is part of the head). About a cubit from the back, centred, cut an air-hole a foot long and 3 palms wide, leaving a rib a palm long and 1/3 digit wide across it. Make the flap a foot 3 digits by 3 palms 3 digits of thin board covered with goatskin, hair toward the ground, hinged with a doubled strip of leather a palm wide nailed to it and tied through two holes 7 digits apart. A foot beyond, fix a slightly elliptical iron ring 2 palms by 1 on a staple, 3 palms from the back, for the wooden bolt that holds the board to its frame (or use two iron screws).
Materials for this step:
Pine Board2 piecesBasswood Sheet1 pieceHide Glue1 piece Raw Goatskin1 piece
 Leather Thong1 piece
 Metal Ring1 piece
 Nails1 piece
Tools needed:
Hand SawChiselsBrace and Bit Hammer
5
5
Make the bows
Make the bows
Make each bow as long as the upper board from four pieces of linden 3 digits thick: two long pieces 7 digits wide at the back and 2-1/2 at the front, a back piece 2 palms wide, its ends a little over a digit thick, bent to meet the long pieces, mortised, bored and pegged with glued pegs. Mortise in a crossbar a cubit from the head, a foot long without tenons and a palm 2 digits wide. Glue and peg two small pieces, 3 palms 2 digits long, a palm high and a digit thick, at the head to keep the bow ends off the air passage.
Materials for this step:
Basswood Sheet2 piecesHide Glue1 pieceDowel Rod1 pieceTools needed:
Hand SawChiselsBrace and Bit Wooden Mallet
6
6
Make the head and nozzle
Make the head and nozzle
Glue the upper head board, a cubit long and 1-1/2 palms thick, onto the lower board's extension (a palm and a digit thick). Shape it a cubit wide at the back, 2 digits narrower 3 palms forward, then round the front to 2 palms 2 digits across and bind it with an iron ring 3 digits wide. Bore it for the nozzle: a pipe of thin iron plate 3 ft long, 3 digits across in front and a palm high by 2 palms wide at the back.
Materials for this step:
Pine Board1 pieceHide Glue1 piece Iron Sheet (Hammered)1 pieceMetal Ring1 piece
Tools needed:
Hand SawBrace and Bit Forge
 AnvilHammer
7
7
Hide the bellows
Hide the bellows
Use ox-hide (far better than horse), two hides each 3-1/2 ft wide at the back. Lay a long leather thong along each board and bow and nail the hide through it with T-shaped iron nails 5 digits long, horns 2-1/2 digits long and half a digit wide, the horn of one nail almost touching the next along the boards; on each bow two nails in the back piece and four in each long piece, ten in all. Pine strips nailed over the hide on the long pieces guard against tearing; iron screws through strips over the hide hold even better.
Materials for this step:
 Vegetable Tanned Leather2 piecesLeather Thong1 pieceNails1 piece
Tools needed:
Hammer Leather Knife
 Scissors
8
8
Troubleshooting
Troubleshooting
Bellows troubleshooting.
Flow
Loading...
9
9
History and honest limits
History and honest limits
From Georgius Agricola, **De Re Metallica** (1556), Book IX, translated by Herbert C. and Lou H. Hoover, 1912 (checked on the archive.org scan georgiusagricola00agri, pp. 362-365). The frame and the machinery that work the bellows are not covered here. The metric conversions (digit ~1.85 cm, palm ~7.4 cm, Roman foot ~29.6 cm, cubit ~44.4 cm) and the tools are ours.
Materials
10- 2 piecesPlaceholder
- 2 piecesPlaceholder
- 1 piecePlaceholder
- 1 piecePlaceholder
- 1 piecePlaceholder
- 2 piecesPlaceholder
- 1 piecePlaceholder
- 2 piecesPlaceholder
- 1 piecePlaceholder
- 2 piecesPlaceholder
This blueprint makes
Related Blueprints
These blueprints share knowledge with this one — techniques, materials, or principles that connect them in the learning graph.
CC0 Public Domain
This blueprint is released under CC0. You are free to copy, modify, distribute, and use this work for any purpose, without asking permission.
Support the Maker by purchasing products through their Blueprint where they earn a Maker Commission set by Vendors, or create a new iteration of this Blueprint and include it as a connection in your own Blueprint to share revenue.