Collaboration
ART
BEAUTY & WELLNESS
CRAFT
CULTURE & HISTORY
ENTERTAINMENT
ENVIRONMENT
FOOD & DRINKS
REVERSE ENGINEERING
SCIENCES
SPORTS
TECHNOLOGY
WEARABLES
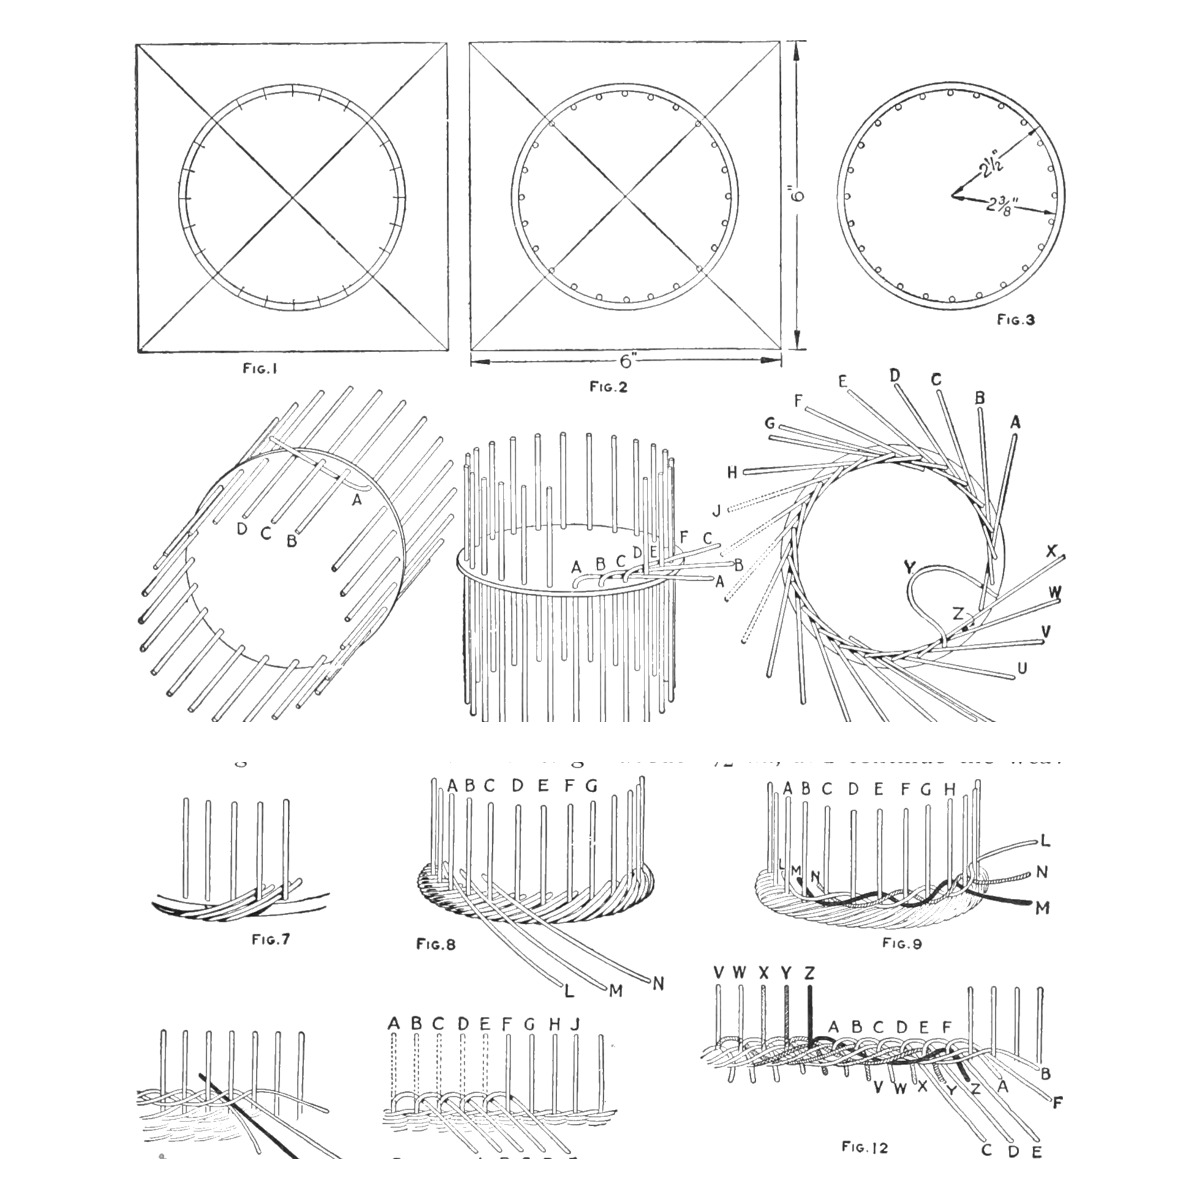


Reed Basket on a Wood Bottom: 24 Spokes, Rolled Edge, Triple Weave and Break-Down Border (Boy Mechanic, 1915)
The first lesson of Chas. M. Miller's reed-furniture series in The Boy Mechanic, Book 2 (1915): a basket 5 in across and 3 in high, woven on a bored basswood bottom. The spoke ends are turned into a roll that hides the wooden edge, the side is triple-woven, and the top is finished with a break-down border.
Beginner
About 3 hours
Instructions
1
1
His sizes, and the spoke spacing
His sizes, and the spoke spacing
Loading Jupyter Notebook...
2
2
Read The Boy Mechanic, Book 2
Read The Boy Mechanic, Book 2
"The center is the most difficult part of the basket making, and it is best to begin with wood bottoms." The reeds placed vertically are called spokes, the horizontal ones weavers.
3
3
Make the bottom
Make the bottom
On a board about 6 in square, 1/4 in thick (basswood is best, pine or cedar will do), draw the diagonals and two circles from their crossing, 5 in and 4-3/4 in across. Step off 24 points on the inner circle with the compass set about 5/8 in apart, adjusting until they come out even. Bore 1/8 in holes just inside the inner circle at the points, then saw out the 5 in circle (bore first, or the disk may split).
Materials for this step:
 Pine Board1 piece
Tools needed:
 Compass
 Pencil
 Hand Drill
 Coping Saw
4
4
Set the spokes and roll the edge
Set the spokes and roll the edge
Push dry No. 4 reed spokes through the holes, about 5-1/2 in projecting below. Soak bottom and spokes about 15 minutes. Bend each spoke below the bottom down behind the two nearest spokes and out between the third and fourth; force the last two under the first two, making a pinwheel. Then bend them up across the edge of the wood, in front of three spokes and behind the fourth, inserting a short spoke about 4 in long in front of each first so the doubles cover the edge; press them flat and trim any that are too long.
Materials for this step:
 Rattan1 piece
Tools needed:
 20-Liter Bucket
 Leather Knife
 Chisels
5
5
Triple-weave the side
Triple-weave the side
Put in three soaked No. 3 reed weavers between spokes A-B, B-C and C-D. Each time take the weaver farthest behind in front of the two nearest spokes, behind the third and out in front of the next two. Use weavers no longer than 8 ft; when one runs out, press it back a little and push a new reed in about 1-1/2 in. Press every throw down, and weave to 3 in high.
Materials for this step:
Rattan1 pieceTools needed:
20-Liter BucketLeather Knife6
6
Make the border
Make the border
Break-down-tight border: bend spoke A behind B and out between B and C, B behind C, and so on to E; then lay the end of A over B to E, in front of F, behind G and out between G and H, and bring F down behind A's end; continue round, leaving the first ends loose so the last spokes can be worked under them. Or use the simple break-down: each spoke behind the next, in front of the one after, and behind the next, not out again.
Tools needed:
Leather Knife7
7
Finish
Finish
When dry, cut the long ends off close with a knife, without cutting a weaver. Singe off hairy fibres over a flame that will not smut. Do not leave reeds in water longer than needed, as they turn dark; dampen them often while weaving so they pack down closer. He also mentions bleaching with chloride of lime in water set in sunlight, but warns too much gives a whitish look; it is not part of this blueprint.
Tools needed:
Leather Knife Propane Torch
8
8
Troubleshooting
Troubleshooting
Reed basket troubleshooting.
Flow
Loading...
9
9
History and honest limits
History and honest limits
From "Reed Furniture: A Reed Basket" by Chas. M. Miller, in **The Boy Mechanic, Book 2**, Popular Mechanics, 1915 (Project Gutenberg 44585; checked on the archive.org scan boymechanicbook200chic2, pp. 257-260). Reed sizes are his trade numbers (No. 3, No. 4). Bleaching is described in his text but left out here. The tools and metric figures are ours.
This blueprint makes

Related Blueprints
These blueprints share knowledge with this one — techniques, materials, or principles that connect them in the learning graph.
CC0 Public Domain
This blueprint is released under CC0. You are free to copy, modify, distribute, and use this work for any purpose, without asking permission.
Support the Maker by purchasing products through their Blueprint where they earn a Maker Commission set by Vendors, or create a new iteration of this Blueprint and include it as a connection in your own Blueprint to share revenue.