ART
BEAUTY & WELLNESS
CRAFT
CULTURE & HISTORY
ENTERTAINMENT
ENVIRONMENT
FOOD & DRINKS
REVERSE ENGINEERING
SCIENCES
SPORTS
TECHNOLOGY
WEARABLES
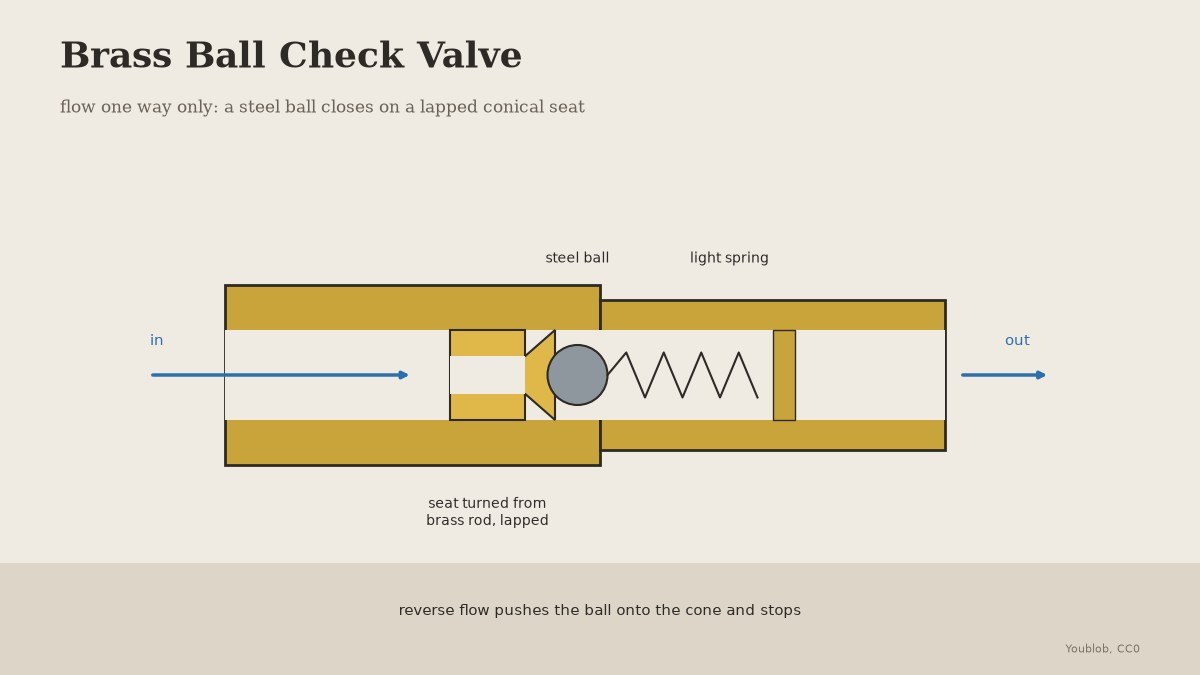


Brass Ball Check Valve: a Steel Ball on a Lapped Conical Seat
A check valve lets water or air through one way only. In a ball check valve a ball closes on a conical seat, pushed there by reverse flow or by a light spring (Wikipedia, Check valve). This one is built from two brass fittings, a seat turned from brass rod, a steel ball and a spring. The build is ours.
The picture: our drawing.
Intermediate
Half a day
Instructions
1
1
Turn the seat
Turn the seat
Turn a short plug of brass rod to a press fit in the bore of the first fitting. Drill it through, a little smaller than the ball, and countersink the outlet end to a cone that the ball sits in.
Materials for this step:
 Brass Rod1 piece
Tools needed:
 Metal Lathe
 Lathe Chuck 3-Jaw
 Lathe Cutting Tool
 Drill Bit Set
 Countersink Bit Set
 Cutting Oil
 Digital Caliper 6-Inch
 Safety Glasses
2
2
Lap the seat
Lap the seat
Put a trace of lapping compound in the cone, set the ball in it and turn it round under light pressure until the seat shows a bright, unbroken ring. Clean off every trace of compound.
Tools needed:
 Lapping Compound
 Bench Vise
3
3
Assemble
Assemble
Press the seat into the first fitting with the cone facing downstream. Drop in the ball, then a light spring that just holds it on the seat, and screw on the second fitting so its end keeps the spring in place.
Materials for this step:
 Brass Fittings2 pieces
 Steel Ball Bearing1 piece
 Compression Spring Assortment1 piece
Tools needed:
Bench Vise Cross Peen Hammer
 Adjustable Spanner
4
4
Test it
Test it
Blow through the inlet: air should pass with a light push. Blow into the outlet: nothing should pass. Mark the flow direction on the body.
Tools needed:
Adjustable SpannerMaterials
4- 1 piecePlaceholder
- 2 piecesPlaceholder
- 1 piecePlaceholder
- Placeholder
Tools Required
12- Placeholder
- Placeholder
- Placeholder
- Placeholder
- Placeholder
- Placeholder
- Placeholder
- Placeholder
- Placeholder
- Placeholder
- Placeholder
- Placeholder
This blueprint makes
Related Blueprints
These blueprints share knowledge with this one — techniques, materials, or principles that connect them in the learning graph.

CC0 Public Domain
This blueprint is released under CC0. You are free to copy, modify, distribute, and use this work for any purpose, without asking permission.
Support the Maker by purchasing products through their Blueprint where they earn a Maker Commission set by Vendors, or create a new iteration of this Blueprint and include it as a connection in your own Blueprint to share revenue.