Collaboration
ART
BEAUTY & WELLNESS
CRAFT
CULTURE & HISTORY
ENTERTAINMENT
ENVIRONMENT
FOOD & DRINKS
REVERSE ENGINEERING
SCIENCES
SPORTS
TECHNOLOGY
WEARABLES
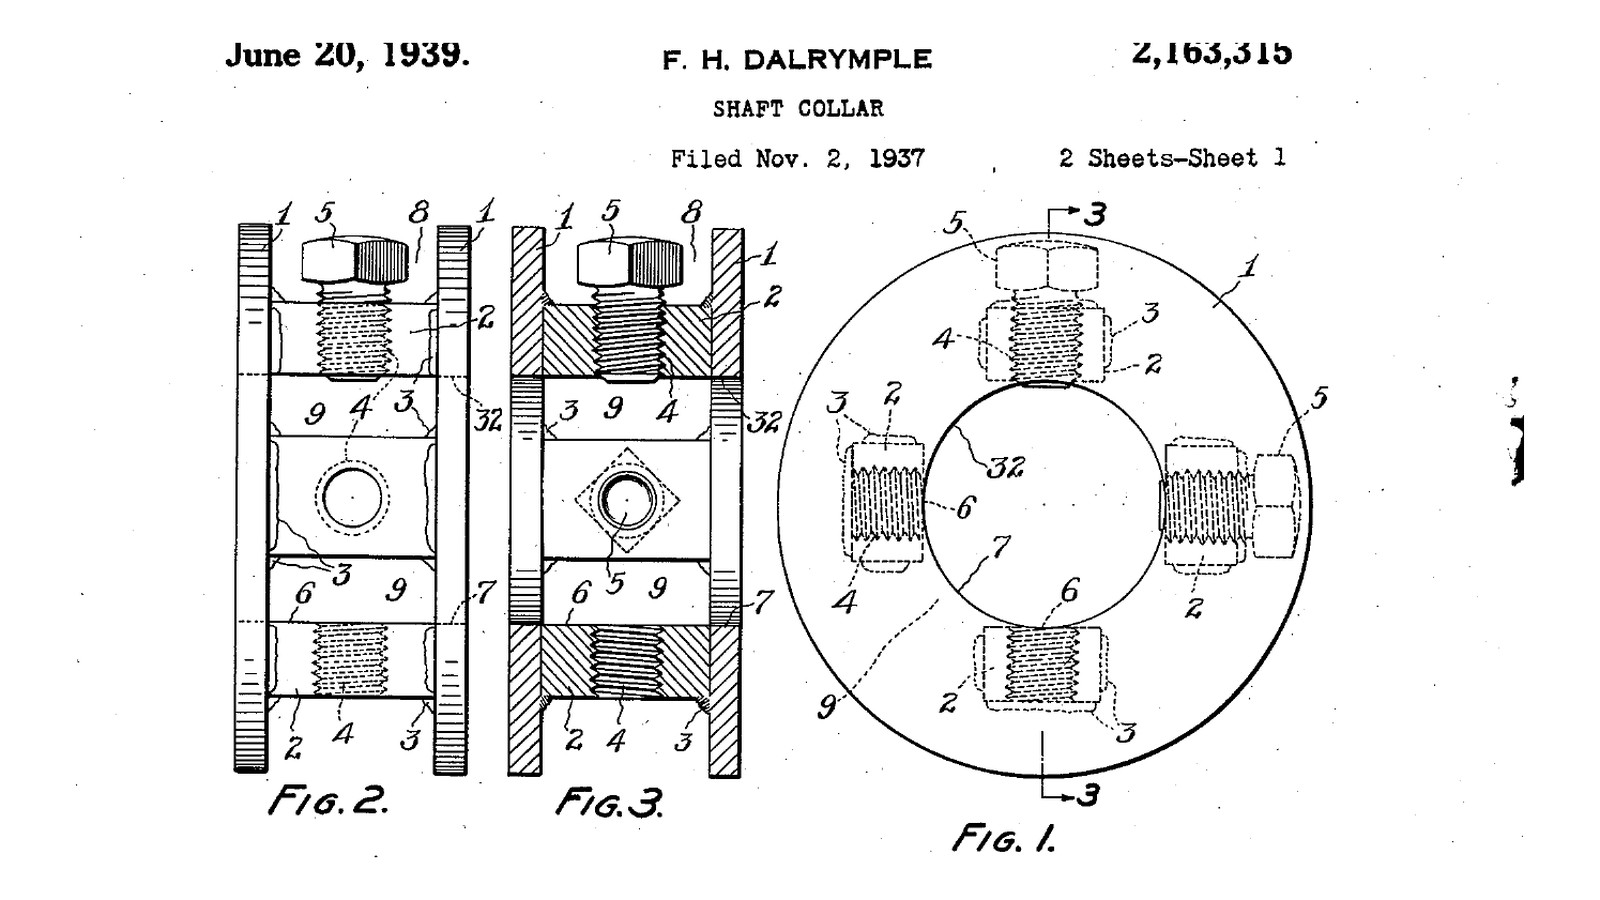


Built-Up Shaft Collar: Two Washers Welded to Four Nuts, a Set Screw in One Nut, No Machining (Dalrymple, 1939)
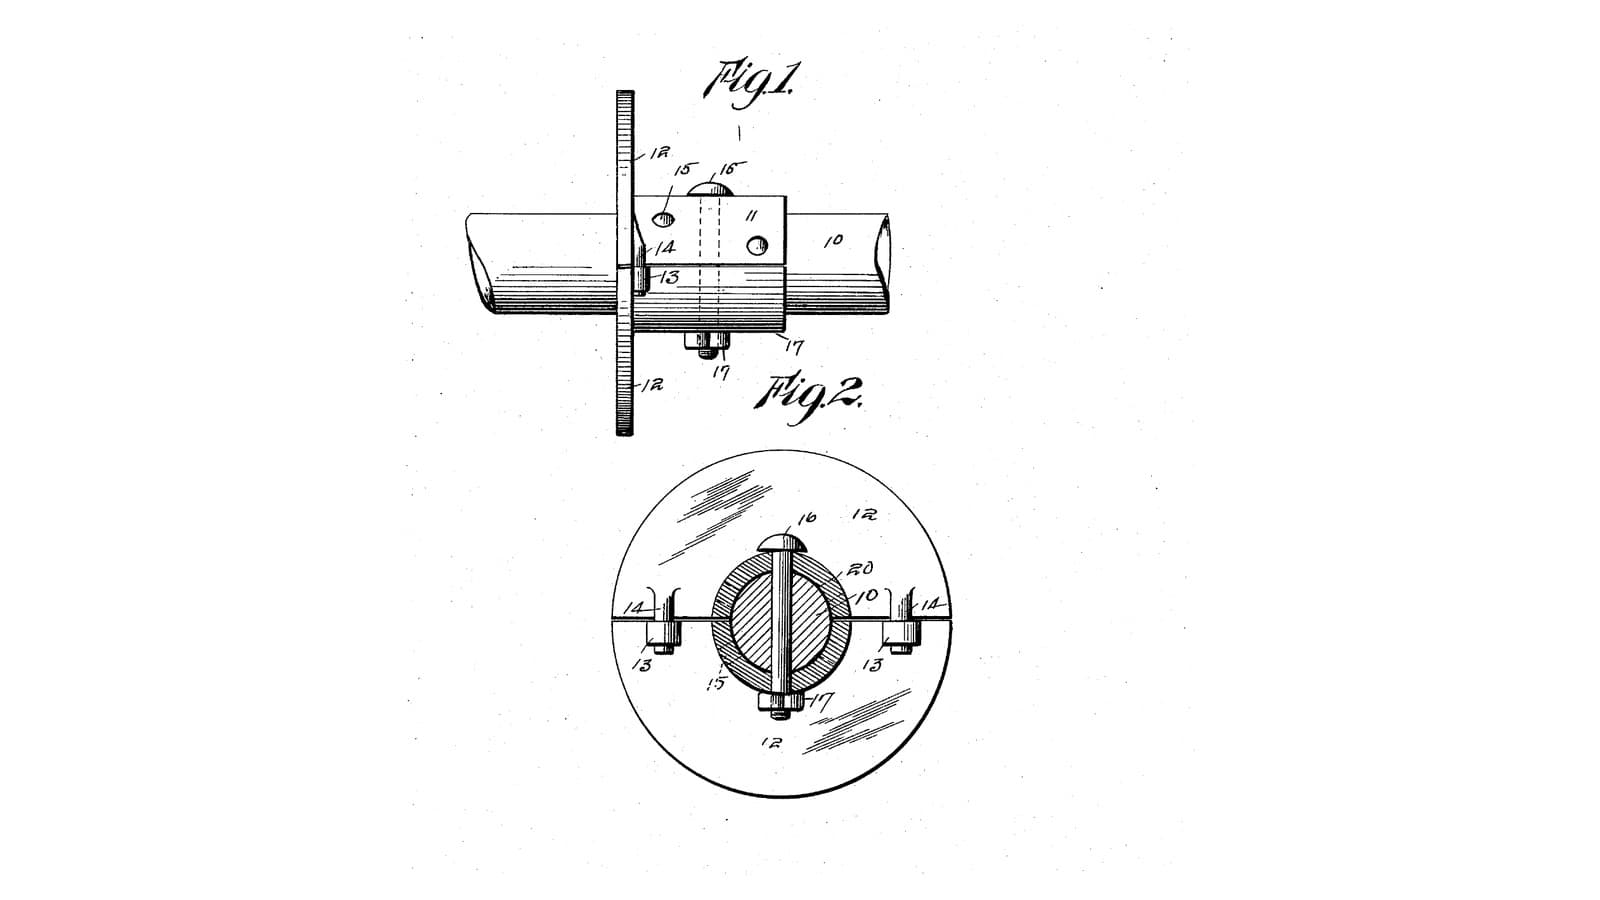
Ferdinand H. Dalrymple of Bedford, Ohio, received US 2,163,315, dated 20 June 1939, for a shaft collar "comprised of few parts which are readily obtainable as standard market articles". Two washers are held apart by nuts welded between them. The nuts' inner faces rest on the shaft, and a set screw in one nut's thread holds it. It needs no machining. He says it is stronger, lighter and cheaper than a cast collar, and breaks less readily under a hammer. It also touches the shaft only along lines, so it rusts to it less, and oil can be put in between the nuts.
The patent gives no sizes for this form; every size here is ours.
Beginner
About 1 hour
Instructions
1
1
Will it fit together?
Will it fit together?
Loading Jupyter Notebook...
2
2
Read US 2,163,315
Read US 2,163,315
"Preferably, I use as plates standard washers of suitable dimension, and I use as blocks standard nuts."
"Inasmuch as the space between the plates is not sufficient for the convenient manipulation of an ordinary wrench, I use socketed set screws for securing the collar to the shaft."
3
3
Set the parts up on a bar
Set the parts up on a bar
Use plain steel washers and nuts, not zinc-plated ones. Wire-brush them clean. Grip a 16 mm round bar upright in the vice. Slide one washer onto it, stand four M8 nuts on the washer round the bar at quarter turns, each with a flat down and its hole pointing at the bar's centre and its inner face against the bar. Put the second washer on top and squeeze the stack with the C-clamp; check with the square that the washers are parallel.
Materials for this step:
 Flat Washer2 pieces
 Hex Nut4 pieces
Tools needed:
 Mild Steel Round Bar
 Bench Vise
 C-Clamp
 Wire Brush Set
 Combination Square
 Digital Caliper 6-Inch
4
4
Weld the nuts to the washers
Weld the nuts to the washers
Wearing the helmet and gloves, tack each nut to both washers with a short fillet weld at its outer corner, keeping the arc away from the bar. Let it cool, lift the collar off the bar, and run a fillet along both ends of every nut on both washers. Chip and wire-brush the slag. Run the set screw in and out of one nut to clear any spatter from its thread, and file the bore ends smooth.
Materials for this step:
 Welding Electrode4 pieces
Tools needed:
 Arc Welder
 Auto-Darkening Welding Helmet
 Welding GlovesWire Brush Set
 Angle Grinder
 File Set
 Safety Glasses
5
5
The collar in 3D
The collar in 3D
FreeCAD model, our sizes: the two 50 mm washers, the four M8 nuts between them at quarter turns, their inner faces on a 16 mm shaft, and the socket set screw in one nut. The welds are not modelled.
6
6
Fit it on the shaft
Fit it on the shaft
Run an M8 x 8 cup point socket set screw into one nut from outside. Slide the collar onto the shaft to its place and tighten the screw with the hex key between the washers. Try to slide and turn it; it must not move.
Materials for this step:
 Cup Point Set Screw1 piece
Tools needed:
 Hex Key Set
7
7
Troubleshooting
Troubleshooting
Built-up collar troubleshooting.
Flow
Loading...
8
8
History and honest limits
History and honest limits
**Ferdinand H. Dalrymple** of Bedford, Ohio, US 2,163,315, dated 20 June 1939, filed 2 November 1937. He claimed "opposed spaced plane plates formed with coaxial bores for the reception of a shaft, transverse spaced internally-threaded blocks welded to the opposed faces of the plates and serving as the sole means for holding the plates in relatively fixed positions, and set screws engaging the blocks". His Figs. 8 and 9 use standard square nuts and socketed set screws; we use hex nuts, as his Figs. 1-5 allow "standard nuts". His patent also shows special blocks, flanged plates, three-plate and split forms; we build the simplest. He gives no sizes for this form; every size here is ours.
Materials
4- 2 piecesPlaceholder
- 4 piecesPlaceholder
- 4 piecesPlaceholder
- 1 piecePlaceholder
Tools Required
13- Placeholder
- Placeholder
- Placeholder
- Placeholder
- Placeholder
- Placeholder
- Placeholder
- Placeholder
- Placeholder
- 1 vendor sell this, none ship to you yetPlaceholder
- Placeholder
- Placeholder
- Placeholder
Design Files
1This blueprint makes
Related Blueprints
These blueprints share knowledge with this one — techniques, materials, or principles that connect them in the learning graph.
CC0 Public Domain
This blueprint is released under CC0. You are free to copy, modify, distribute, and use this work for any purpose, without asking permission.
Support the Maker by purchasing products through their Blueprint where they earn a Maker Commission set by Vendors, or create a new iteration of this Blueprint and include it as a connection in your own Blueprint to share revenue.