Collaboration
ART
BEAUTY & WELLNESS
CRAFT
CULTURE & HISTORY
ENTERTAINMENT
ENVIRONMENT
FOOD & DRINKS
REVERSE ENGINEERING
SCIENCES
SPORTS
TECHNOLOGY
WEARABLES
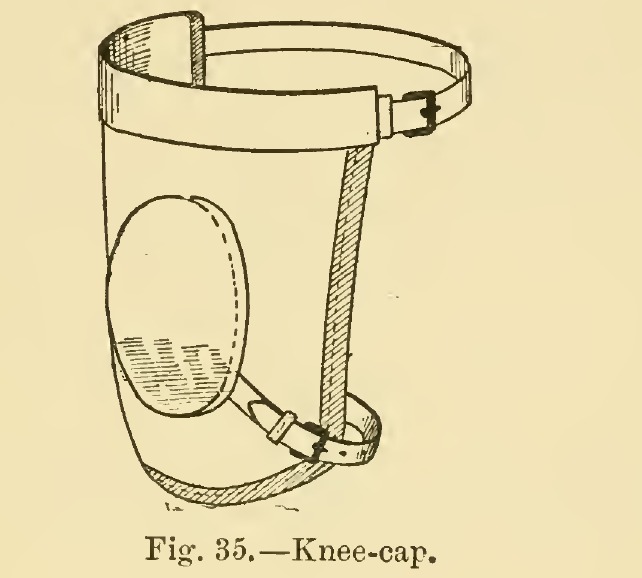


Horse Knee-Cap: Cupped Leather Block, Cloth Shield and Flock-Stuffed Chamois Roll (Hasluck, Saddlery, 1904)
A knee-cap protects a horse's knee from knocks and falls. This one is from Paul N. Hasluck's Saddlery (1904): a leather block beaten into a cup, set on a cloth or leather shield, a flock-stuffed chamois roll along the top strap, and a strap below the knee. Every size is his.
He notes it is often better to buy the pads, but shows how to make them.
Intermediate
About 1 day
Instructions
1
1
Cutting list
Cutting list
Loading Jupyter Notebook...
2
2
Read Saddlery, ch. X
Read Saddlery, ch. X
"Knee-caps are of felt, fawn rugging, kersey cloth, union, buff leather, black rubber, etc."
3
3
Beat the knee block
Beat the knee block
With no press, damp some half-curried leather and beat it, as a shoemaker beats boot soles, until it takes a hollow cup shape. Let it dry, then cut it to a wide oval about 5 in by 4 in.
Materials for this step:
 Vegetable Tanned Leather1 piece
 Fresh Water1 piece
Tools needed:
 Hammer
 Lap Iron
 Leather Knife
4
4
Cut and bind the shield
Cut and bind the shield
Make the cloth, kersey or leather about 8 in at the top and 9 in deep, and round the bottom. Bind all of it except the straight top with patent binding or cloth; buff leather need not be bound.
Materials for this step:
 Wool Felt Sheet1 piece
 Edge Binding Strip1 piece
 Linen Thread1 piece
 Beeswax1 piece
Tools needed:
 Scissors
 Tape Measure
 Awl
 Two Harness Needles
5
5
Fit the block
Fit the block
Put the leather block on the centre with a piece of shaped cardboard under it, paste the two together and press the cloth down into the hollow. Stitch the block to the cloth about 1-1/4 in from the top and 1-1/2 in from the bottom.
Materials for this step:
 Pasteboard1 piece
 Wheat Paste1 pieceLinen Thread1 pieceBeeswax1 piece
Tools needed:
Leather KnifeAwlTwo Harness Needles6
6
Make the top strap
Make the top strap
Cut a piece of leather 1-1/8 in wide and 1 in longer at each end than the cloth at the top. Make a hole at each end 1 in from the point for a 5/8 in strap. Put a chape, buckle and loop in the hole at one end and a 5/8 in strap 9 in long in the other, and stitch both firmly.
Materials for this step:
 Harness Leather1 piece
 Brass Buckle with Tongue1 pieceLinen Thread1 pieceBeeswax1 piece
Tools needed:
Leather Knife Leather Hole PunchAwlTwo Harness Needles
7
7
Make the padded roll
Make the padded roll
Cut chamois the same length and width as the strap. With it hanging down in front of the knee-cap and the three edges together, stitch it all along through the top leather and the cloth. Turn the chamois over the top towards the bottom and stitch it along the bottom side of the top strap, rather slack. Make two rows of stitches across the centre, leaving an opening of about 1-1/2 in exactly in the centre. Stuff both parts of the roll from each end with flock, then close the ends by stitching chamois and top leather together.
Materials for this step:
 Chamois Leather1 piece
 Wool Flock1 pieceLinen Thread1 pieceBeeswax1 piece
Tools needed:
ScissorsAwlTwo Harness Needles8
8
Fit the bottom strap
Fit the bottom strap
Put a 5/8 in chape buckle and loop at the bottom of the block pad, slanting slightly downwards, with a strap 10 in long on the opposite side. For a pair, reverse the buckles so each is on the outside.
Materials for this step:
Harness Leather1 pieceBrass Buckle with Tongue1 pieceLinen Thread1 pieceBeeswax1 pieceTools needed:
Leather KnifeAwlTwo Harness Needles9
9
Troubleshooting
Troubleshooting
Knee-cap troubleshooting.
Flow
Loading...
10
10
History and honest limits
History and honest limits
From **Saddlery**, edited by Paul N. Hasluck, David McKay, 1904 (archive.org saddlery00hasl), chapter X, "Knee-caps and Miscellaneous Articles", pp. 81-84, Figs. 33-35; every fraction was read on the scan. He also suggests a better block cut with a tongue up under the top strap, and a fastening with two squares and a 5/8 in rubber ring; those are not shown here. The thread, the tools and the metric figures are ours.
Materials
12- 1 piecePlaceholder
- 1 piecePlaceholder
- 1 piecePlaceholder
- 1 piecePlaceholder
- 5 piecesPlaceholder
- 5 piecesPlaceholder
- 1 piecePlaceholder
- 1 piecePlaceholder
- 2 piecesPlaceholder
- 1 piecePlaceholder
- 1 piecePlaceholder
- 1 piecePlaceholder
This blueprint makes
Related Blueprints
These blueprints share knowledge with this one — techniques, materials, or principles that connect them in the learning graph.
CC0 Public Domain
This blueprint is released under CC0. You are free to copy, modify, distribute, and use this work for any purpose, without asking permission.
Support the Maker by purchasing products through their Blueprint where they earn a Maker Commission set by Vendors, or create a new iteration of this Blueprint and include it as a connection in your own Blueprint to share revenue.