Collaboration
ART
BEAUTY & WELLNESS
CRAFT
CULTURE & HISTORY
ENTERTAINMENT
ENVIRONMENT
FOOD & DRINKS
REVERSE ENGINEERING
SCIENCES
SPORTS
TECHNOLOGY
WEARABLES
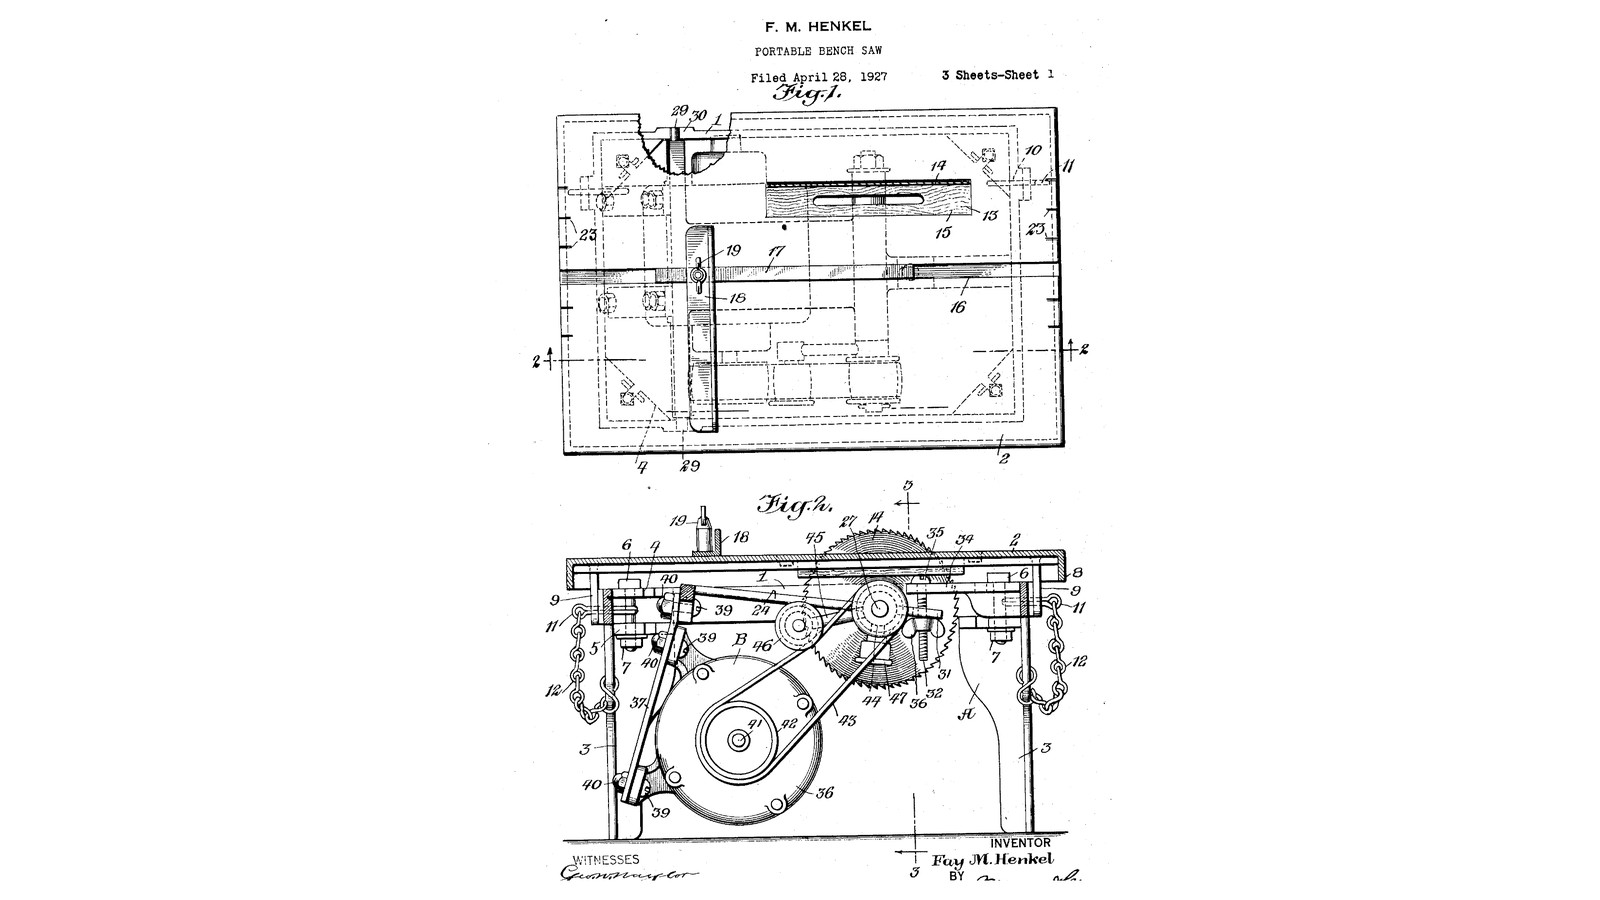


Portable Bench Saw: A Lift-Out Power Unit on Trunnions, Its Motor on Spring Bars, Under a Tilting Platform (Henkel, 1928)
Fay M. Henkel of New Rochelle, New York, received US 1,695,188, dated 11 December 1928, for a cheap, compact bench saw in two parts. The stand has a platform that tilts on hinge pins for angled cuts, with a sliding angle follower and a rip guide. The power unit drops into it on trunnions, and a wing nut on a hanging screw raises or lowers the saw. The motor sits on two spring bars that soak up its vibration and keep the belt tight. Lifted out, the power unit stands on the bars' cap nuts and runs an emery wheel.
The patent gives no sizes; every size here is ours, and our stand is wood and steel where his is cast.
Advanced
About 4 days
Instructions
1
1
Raising the saw and tilting the platform
Raising the saw and tilting the platform
Loading Jupyter Notebook...
2
2
Read US 1,695,188
Read US 1,695,188
"It will thus be seen that the power unit has a three-point bearing which maintains it against accidental displacement, or, in other words, prevents it from getting out of proper alinement."
3
3
The stand: frame 1 and legs 3
The stand: frame 1 and legs 3
Make a rectangular frame 460 x 360 mm of 25 x 90 mm hardwood, glued and screwed at the corners. Bolt a 250 mm pine leg 45 x 45 mm in each corner through a short length of steel angle screwed to frame and leg, as his corner plates 4 and lugs 5. Cut a notch 30 in the top of each long side, 60 mm from one end, 21 mm wide and 25 deep, for the trunnions. Screw a steel arm 34 across the other end with a 10.5 mm hole, and a lug 50 with an M10 tapped hole on the side away from the hinges.
Materials for this step:
 Hardwood Board2 pieces
 Pine Lumber1 piece
 Mild Steel Angle Iron1 piece
 Mild Steel Flat Bar1 piece
 Hex Bolt Assortment8 pieces
 Wood Screws24 pieces
 Wood Glue1 piece
Tools needed:
 Jigsaw
 Cordless Drill
 Drill Bit Set
 Bar Clamp
 Combination Square
 Tape Measure
 Hacksaw
 Tap and Die Set
 Tap Wrench
4
4
The platform 2
The platform 2
Cut 18 mm plywood 500 x 400 mm and glue a hardwood strip round its underside edges as the flange 8. Cut the opening 13 for the saw, 230 x 30 mm, and a hardwood block 15 to fill it. Rout a square groove 16 the length of the platform for the follower's bar. Screw two steel lugs 9 under one long edge, drilled to line up with holes 10 in the frame, and hinge it with steel pins held by split pins. Run an M10 tilt screw 49 up through lug 50, with a wing nut on its lower end as a handle, its top bearing under the platform.
Materials for this step:
 Plywood Sheet1 pieceHardwood Board1 pieceMild Steel Flat Bar1 piece
 Mild Steel Round Bar1 piece
 Split Pin2 pieces
 Threaded Rod1 piece
 Wing Nut1 pieceWood Screws16 piecesWood Glue1 piece
Tools needed:
Jigsaw Router
 Router Bit SetCordless DrillDrill Bit SetHacksawBar Clamp
5
5
The power unit's frame, arbor and trunnions
The power unit's frame, arbor and trunnions
Bolt two 40 x 6 mm steel flat bars 340 mm long into a frame 24 with spacers. Across one end fix a 20 mm round bar 28 whose ends stand out 25 mm each side as the trunnions 29. At the other end bolt two 30 mm flange bearings for the arbor 26, turned from 30 mm bar like the twin-saw table's, with a collar, a loose flange and an M20 thread for the blade's nut. Bolt a forked steel lug 31 on that end, its slot straddling the hanging screw.
Materials for this step:
Mild Steel Flat Bar1 pieceMild Steel Round Bar2 pieces Flange Bearing2 piecesHex Bolt Assortment10 pieces
 Hex Nut3 pieces
Tools needed:
Hacksaw Drill PressDrill Bit Set
 File Set
 Bench Vise
 Metal Lathe
 Lathe Chuck 3-Jaw
 Lathe Cutting Tool
 Digital Caliper 6-Inch
 Adjustable Spanner
 Safety Glasses
6
6
Spring bars, motor and belt
Spring bars, motor and belt
Bend two strips of spring steel 37, 30 x 3 mm, with a slight bend near one end, and bolt them under the cross bar 28 so they reach out beyond the trunnions. Bolt the motor 36 to them, with cap nuts 40 on the bolts' ends: these are its feet when the unit stands alone. Fit a V-belt pulley 42 on the motor and one 44 on the arbor, and the A-section belt 43. Pivot an arm 45 on the arbor's bearing with a weighted pulley 46 at its free end resting on the belt to take up the slack. Have the motor wired to a switch.
Materials for this step:
 Spring Steel Strip1 piece
 Electric Motor1 piece
 V-Belt Pulley (A-Section)3 pieces
 V-Belt (A-Section)1 pieceMild Steel Flat Bar1 pieceHex Bolt Assortment6 piecesHex Nut6 pieces
 Cup Point Set Screw3 pieces
 On/Off Switch1 piece
Tools needed:
Bench ViseDrill PressDrill Bit SetAdjustable Spanner Hex Key Set
7
7
Put the unit in and set the saw
Put the unit in and set the saw
Fit the 200 mm blade on the arbor. Hang an M10 screw 32 from arm 34 with its head 35 on top. Lower the power unit in, the trunnions into the notches 30 and the forked lug 31 round the screw, and run a wing nut 36 up under the lug. Turn the wing nut to raise the blade through the opening to the depth wanted.
Materials for this step:
 Circular Saw Blade Set1 pieceThreaded Rod1 pieceWing Nut1 piece
 Flat Washer2 pieces
Tools needed:
Adjustable Spanner8
8
Follower and rip guide
Follower and rip guide
Angle follower: a hardwood bar 17 sliding in the groove, with an angle fence 18 clamped at any angle by a wing nut 19. Rip guide 20: a hardwood bar across the platform held by two hook bolts 21 that hook under the flange 8, with wing nuts 22. Mark a scale 23 on the platform's ends to set it.
Materials for this step:
Hardwood Board1 pieceThreaded Rod1 pieceWing Nut3 piecesMild Steel Flat Bar1 pieceTools needed:
JigsawCordless DrillDrill Bit SetHacksawBench ViseTape Measure9
9
Try it, and as a grinder
Try it, and as a grinder
With the platform flat, check the blade is square to it with the square, rip a board along the guide and crosscut another against the follower. Tilt the platform with the tilt screw (and the block under it for steep angles) and check the angle with the protractor. Lift the power unit out, stand it on its cap nuts, swap the blade for the grinding wheel, swing the idler arm to the belt's other side, and run it.
Tools needed:
 Grinding WheelCombination Square
 ProtractorSafety Glasses
 Hearing Protection (Ear Defenders, SNR 30 dB)
10
10
Troubleshooting
Troubleshooting
Portable bench saw troubleshooting.
Flow
Loading...
11
11
History and honest limits
History and honest limits
**Fay M. Henkel** of New Rochelle, New York, US 1,695,188, dated 11 December 1928, filed 28 April 1927. He claimed a supporting unit with a platform and a power unit with a frame, "trunnions on the end of said frame, said supporting unit having recesses therein receiving the trunnions", a bearing and arbor, spring bars and a motor fixed to them, pulleys and a belt; and the spring bars' couplings serving as feet when the unit is removed. His frame, platform and legs are castings; ours are hardwood, plywood and steel. His bearing is a sleeve with a grease cup; ours are two greased flange bearings. He gives no sizes, motor or speeds; those are ours.
Materials
22- 2 piecesPlaceholder
- 1 piecePlaceholder
- 1 piecePlaceholder
- 1 piecePlaceholder
- 24 piecesPlaceholder
- 40 piecesPlaceholder
- 2 piecesPlaceholder
- 1 piecePlaceholder
- 2 piecesPlaceholder
- 2 piecesPlaceholder
- 1 piecePlaceholder
- 5 piecesPlaceholder
- 2 piecesPlaceholder
- 9 piecesPlaceholder
- 1 piecePlaceholder
- 1 piecePlaceholder
- 3 piecesPlaceholder
- 1 piecePlaceholder
- 3 piecesPlaceholder
- 1 piecePlaceholder
- 1 piecePlaceholder
- 2 piecesPlaceholder
Tools Required
24- 1 vendor sell this, none ship to you yetPlaceholder
- 1 vendor sell this, none ship to you yetPlaceholder
- Placeholder
- Placeholder
- Placeholder
- 1 vendor sell this, none ship to you yetPlaceholder
- Placeholder
- Placeholder
- Placeholder
- Placeholder
- 1 vendor sell this, none ship to you yetPlaceholder
- Placeholder
- Placeholder
- Placeholder
- Placeholder
- Placeholder
- Placeholder
- Placeholder
- Placeholder
- Placeholder
- Placeholder
- Placeholder
- Placeholder
This blueprint makes

Related Blueprints
These blueprints share knowledge with this one — techniques, materials, or principles that connect them in the learning graph.

CC0 Public Domain
This blueprint is released under CC0. You are free to copy, modify, distribute, and use this work for any purpose, without asking permission.
Support the Maker by purchasing products through their Blueprint where they earn a Maker Commission set by Vendors, or create a new iteration of this Blueprint and include it as a connection in your own Blueprint to share revenue.