Collaboration
ART
BEAUTY & WELLNESS
CRAFT
CULTURE & HISTORY
ENTERTAINMENT
ENVIRONMENT
FOOD & DRINKS
REVERSE ENGINEERING
SCIENCES
SPORTS
TECHNOLOGY
WEARABLES
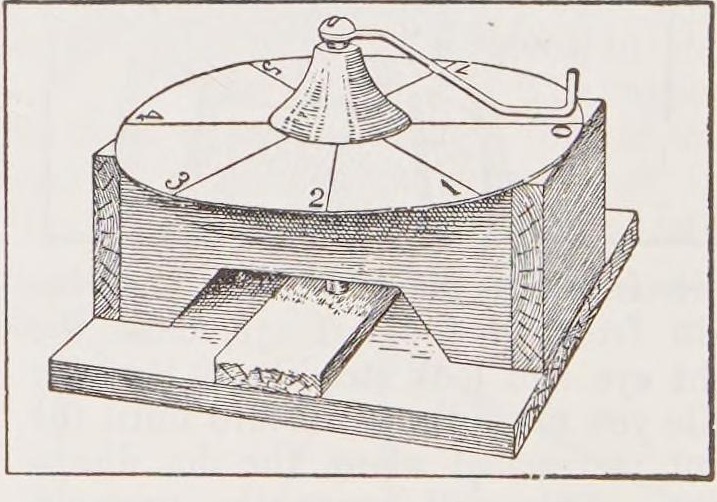


Home-Made Screw Micrometer: a Fine-Threaded Bolt and a Paper Dial (Boy Mechanic, 1913)
A simple micrometer for measuring thin things: a fine-threaded bolt turns through a nut set in a small wooden bench, a wire pointer soldered to its head sweeps a graduated pasteboard dial, and each turn moves the tip down by one thread.
Beginner
Two hours
Instructions
1
1
Reading the dial
Reading the dial
Loading Jupyter Notebook...
2
2
Read the Boy Mechanic
Read the Boy Mechanic
"A simple, fairly accurate, and easily made apparatus of the micrometer form may be constructed."
3
3
Choose the bolt
Choose the bolt
Get an iron or brass bolt about 1/4 in across and 2-1/2 in long with as fine a thread as possible, threaded nearly to the head, with its nut. Cut a screwdriver slot in the head.
Materials for this step:
 Machine Screws1 piece
 Hex Nut1 piece
Tools needed:
 Hacksaw
 Bench Vise
4
4
Make the bench
Make the bench
Clamp two square-cornered wood blocks (about 1 x 3/4 x 2-1/2 in) side by side and nail small pieces across the ends; together they are about 2 in wide. Bore a 1/4 in hole through the centre in the 2 in direction. Unclamp, set the nut into one block in line with the hole, then cut a piece out so the blocks form a little bench. Glue its legs to a thin board about 2-1/2 in square.
Materials for this step:
 Hardwood Board1 piece
 Nails1 piece
 Wood Glue1 piece
Tools needed:
 Hand Saw
 Brace and Bit
 Bar Clamp
 Chisels
 Hammer
5
5
Pointer and dial
Pointer and dial
Solder a stiff wire about 2 in long to the bolt head at right angles. Cut a disc of heavy pasteboard with a radius equal to the wire, divide its edge into equal spaces, and fix it on top of the bench. Screw the bolt down through the nut.
Materials for this step:
 Iron Wire1 piece
 Tin-Lead Solder1 piece
 Pasteboard1 piece
Tools needed:
 Soldering Iron
 Compass
6
6
Anvil
Anvil
Fix a small piece of wood on the base between the bench legs and glue a small piece of metal on it where the bolt meets it.
Materials for this step:
Hardwood Board1 pieceWood Glue1 piece7
7
Calibrate and measure
Calibrate and measure
Count the threads in one inch of the bolt on a rule: one turn moves the tip one thread. To measure, screw down onto the object, remove it, screw down to the base, and note how far the wire travels over the dial. Turns (with the part of a turn) divided by threads per inch = thickness in inches.
Tools needed:
 Ruler
8
8
Troubleshooting
Troubleshooting
Micrometer troubleshooting.
Flow
Loading...
9
9
History and honest limits
History and honest limits
From **The Boy Mechanic, Book 1** (Popular Mechanics, 1913), p. 130, credited to the Scientific American (checked on the archive.org scan boymechanic0000unse_n5a8). The 1/4-20 bolt and 50-division dial are our example.
Materials
8- 1 piecePlaceholder
- 1 piecePlaceholder
- 1 piecePlaceholder
- 1 piecePlaceholder
- 2 piecesPlaceholder
- 1 piecePlaceholder
- 1 piecePlaceholder
- 1 piecePlaceholder
This blueprint makes

CC0 Public Domain
This blueprint is released under CC0. You are free to copy, modify, distribute, and use this work for any purpose, without asking permission.
Support the Maker by purchasing products through their Blueprint where they earn a Maker Commission set by Vendors, or create a new iteration of this Blueprint and include it as a connection in your own Blueprint to share revenue.