ART
BEAUTY & WELLNESS
CRAFT
CULTURE & HISTORY
ENTERTAINMENT
ENVIRONMENT
FOOD & DRINKS
REVERSE ENGINEERING
SCIENCES
SPORTS
TECHNOLOGY
WEARABLES
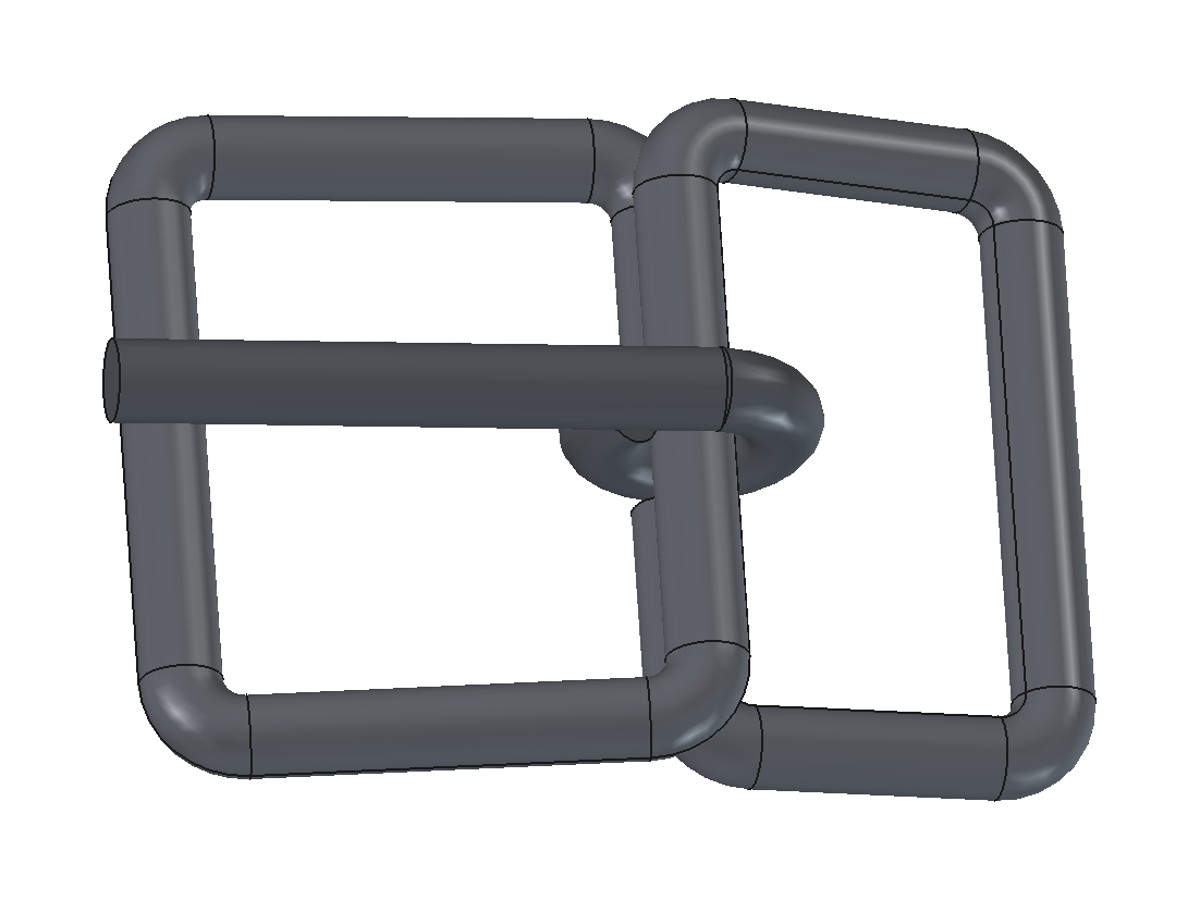


Iron Buckle with Tongue: One Bent Wire Forming Both Loops and the Tongue Bar (after Schleicher, 1907)
A strap buckle for harness and belts made from one piece of iron wire: bent into a tongue loop and a tuck loop that share the middle bar, the two ends tucked under the bar and soldered, and a wire tongue looped round the bar. William Schleicher patented this way of making a buckle in 1907. Sized for a 25 mm strap.
Beginner
About 1 hour
Instructions
1
1
A square buckle made at the forge
A square buckle made at the forge
A square buckle for a 1 in. strap made at the forge (Beau Beckett). Ours is bent cold from wire and soldered.
2
2
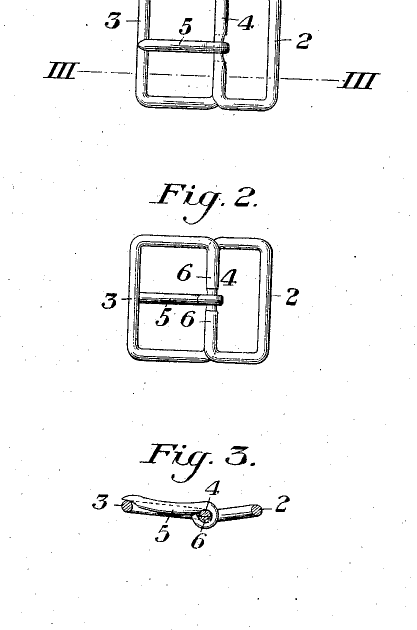
Schleicher's wire buckle, 1907
Schleicher's wire buckle, 1907
US 850,792: one piece of wire bent to form the tuck loop 2 and the tongue loop 3. The middle of the wire is the bar 4 between them, the pin for the tongue 5. The bar's underside is filed a little flat, the free ends 6 run back under it, and the frame is tinned, the ends soldered to the bar and the tongue put on.
3
3
Print the bending plan
Print the bending plan
The buckle at 1:1 with the bend marks A to H and the tongue. Print at 100 % and check the 50 x 10 mm box.
4
4
Cut and mark the wire
Cut and mark the wire
Cut 190 mm of 4 mm iron wire for the frame and 52 mm for the tongue. File the ends square and mark the frame wire at the eight bend marks from the plan.
Materials for this step:
 Iron Wire1 piece (4 mm, 250 mm)
Tools needed:
 Hacksaw
 Bench Vise
 Metal File
 Digital Caliper 6-Inch
5
5
Bend the frame
Bend the frame
Bend 90 degrees at each mark in order, A to H, all the same way round, checking the shape on the plan after each bend: A to D make the tongue loop and bring the wire back along the bar, E to H make the tuck loop. Bends A and H put the two ends under the bar. Bend each loop about 8 degrees down from the bar.
Tools needed:
Bench Vise Flat-Nose Pliers
 Round-nose Pliers
 Ball Peen Hammer
6
6
Fit the ends under the bar
Fit the ends under the bar
File about 0.6 mm off the underside of the bar so it is flat. Squeeze both ends up tight against it, leaving 6 mm of bare bar in the middle for the tongue.
Tools needed:
Metal FileFlat-Nose PliersBench Vise7
7
Tin and solder
Tin and solder
Clean the frame bright with emery and brush on flux for steel. Heat it with the torch and run solder over the whole frame to tin it, and into the joints between the ends and the bar so they are soldered to it. Let it cool, then wash off the flux.
Materials for this step:
 Solder Wire5 g
 Solder Flux2 g
Tools needed:
 Emery Paper
 Propane Torch
 Heat-Resistant Gloves
 Safety Glasses
8
8
Put on the tongue
Put on the tongue
File one end of the tongue wire to a rounded point. Wrap the other end once round the bare middle of the bar so it turns freely, with the tip resting just past the far side of the tongue loop.
Tools needed:
Round-nose PliersMetal FileBench Vise9
9
Troubleshooting
Troubleshooting
Buckle problems and fixes.
Flow
Loading...
10
10
History and honest limits
History and honest limits
William A. Schleicher, Cleveland, Ohio, for the Eberhard Manufacturing Company: US 850,792, "Wire Buckle", filed 14 June 1906, granted 16 April 1907. He does not give the wire size or loop sizes: ours are for a 25 mm strap. A wire buckle is lighter than a forged one; use a thicker wire and bigger loops for heavy draught harness. Not made by us yet.
Materials
3- 1 piece (4 mm, 250 mm)Placeholder
- 5 gPlaceholder
- 2 gPlaceholder
Tools Required
11- Placeholder
- Placeholder
- Placeholder
- Placeholder
- Placeholder
- Placeholder
- Placeholder
- Placeholder
- Placeholder
- Placeholder
- Placeholder
Design Files
1Connected Blueprint Materials
This blueprint makes

Related Blueprints
These blueprints share knowledge with this one — techniques, materials, or principles that connect them in the learning graph.
CC0 Public Domain
This blueprint is released under CC0. You are free to copy, modify, distribute, and use this work for any purpose, without asking permission.
Support the Maker by purchasing products through their Blueprint where they earn a Maker Commission set by Vendors, or create a new iteration of this Blueprint and include it as a connection in your own Blueprint to share revenue.