Collaboration
ART
BEAUTY & WELLNESS
CRAFT
CULTURE & HISTORY
ENTERTAINMENT
ENVIRONMENT
FOOD & DRINKS
REVERSE ENGINEERING
SCIENCES
SPORTS
TECHNOLOGY
WEARABLES
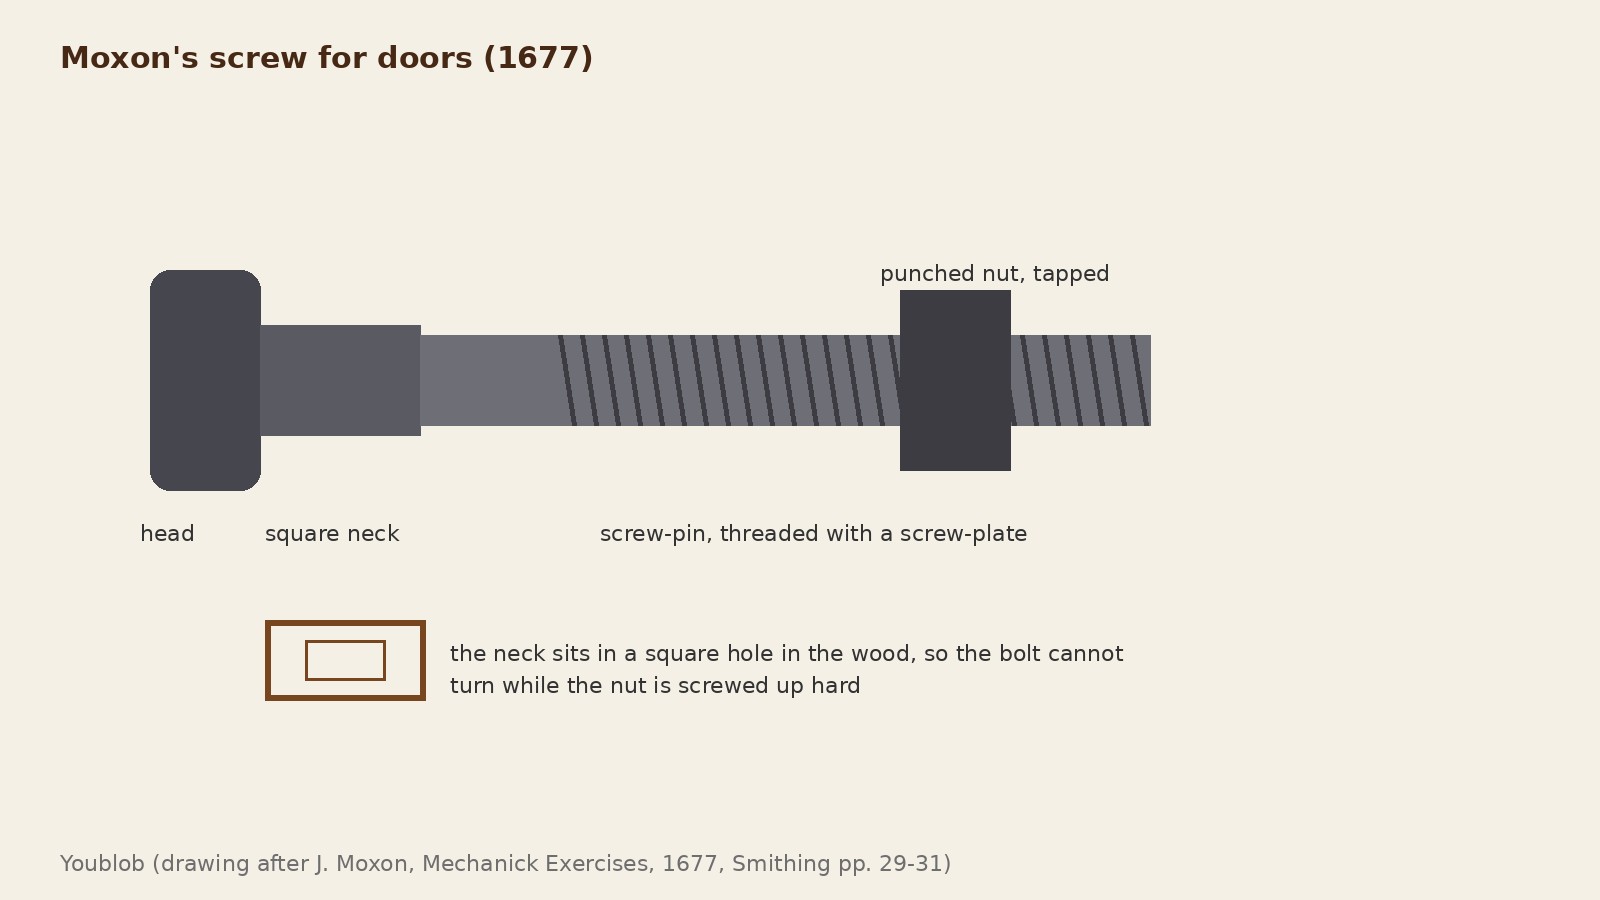


Forged Square-Neck Door Bolt and Nut, Threaded with a Screw-Plate (Moxon, 1677)
Joseph Moxon's 1677 way to make the screw bolt for a door: a square iron bar forged down to a square neck and round pin, the head cut off with a chisel, the pin threaded with a screw-plate, and a punched iron nut threaded with a tap. The square neck sits in a square hole so the bolt cannot turn while the nut is tightened.
Intermediate
About an hour per bolt
Instructions
1
1
Choosing the hole
Choosing the hole
Loading Jupyter Notebook...
2
2
Read Mechanick Exercises
Read Mechanick Exercises
"The Shank of the Screw for Doors and many other purposes must be Forged square near the Head, because it must be let into a square hole that it may not twist about when the Nut is turned about hard upon the Screw-Pin."
3
3
Forge the square neck
Forge the square neck
Take a square iron bar as near the size of the head as you can. At a flame (white) heat lay the shank length flat on the near side of the anvil and hammer it down to thickness; do not strike over the edge or you cut the iron. Reheat, turn it, and hammer the other two sides close up to the head.
Materials for this step:
 Wrought Iron Bar1 piece
Tools needed:
 Blacksmith Forge
 Anvil
 Hammer
 Blacksmith Tongs
4
4
Round the pin, cut the head
Round the pin, cut the head
Hammer down the corners of the part meant for the thread and round it. Set the chisel at the head thickness, strike half through, turn and cut each side half through until it comes off. Square the shoulder: reheat, grip in square-nosed tongs, set the shank in the vice with the shoulder on the jaws, and hammer the head.
Tools needed:
Blacksmith Forge Hot Cut HardyBlacksmith Tongs
 Heavy Bench ViceHammer
5
5
Punch the nut
Punch the nut
Forge a nut blank from the bar. Harden the point of a steel punch of the hole's size (no tempering: the hot iron softens it). At a blood-red heat punch from one side until the far side bulges, turn it, set it flat, and punch through over the hole of a bolster. Dip the punch in water whenever it changes colour. Let forged work cool on the floor or hearth; never quench it.
Materials for this step:
Wrought Iron Bar1 pieceTools needed:
Blacksmith ForgeAnvil Hot PunchHammer
 Quench BucketBlacksmith Tongs
6
6
Thread the pin
Thread the pin
File the shank and head, file the pin round, and taper its end by the depth of the screw-plate's threads. Find the screw-plate hole the pin just slides through, turn the pin in it, and file off the marks it cuts: the pin is then true. Set the bolt head down in the vice, press the next smaller hole (groove diameter equal to the pin) hard down on it, and turn the plate evenly.
Tools needed:
 Files (Hand File)Heavy Bench Vice
 Tap and Die Set
7
7
Tap the nut
Tap the nut
Fit the tap to the round hole of the nut; it must match the pin (try it in the same screw-plate hole). Set the nut flat in the vice and turn the tap hard round by its handle, or by the square hole near the screw-plate handle, until it cuts the thread.
Tools needed:
Heavy Bench ViceTap and Die Set8
8
Troubleshooting
Troubleshooting
Screw bolt troubleshooting.
Flow
Loading...
9
9
History and honest limits
History and honest limits
From Joseph Moxon, **Mechanick Exercises, or the Doctrine of Handy-Works** (1677), Smithing, Numb. I pp. 10-11 and Numb. II pp. 29-31 (checked on the archive.org scan mechanickexercis00moxo). He gives no sizes or nut shape; the metric example and the tool heads are ours.
Materials
1- 1 piecePlaceholder
This blueprint makes

Related Blueprints
These blueprints share knowledge with this one — techniques, materials, or principles that connect them in the learning graph.
CC0 Public Domain
This blueprint is released under CC0. You are free to copy, modify, distribute, and use this work for any purpose, without asking permission.
Support the Maker by purchasing products through their Blueprint where they earn a Maker Commission set by Vendors, or create a new iteration of this Blueprint and include it as a connection in your own Blueprint to share revenue.