ART
BEAUTY & WELLNESS
CRAFT
CULTURE & HISTORY
ENTERTAINMENT
ENVIRONMENT
FOOD & DRINKS
REVERSE ENGINEERING
SCIENCES
SPORTS
TECHNOLOGY
WEARABLES
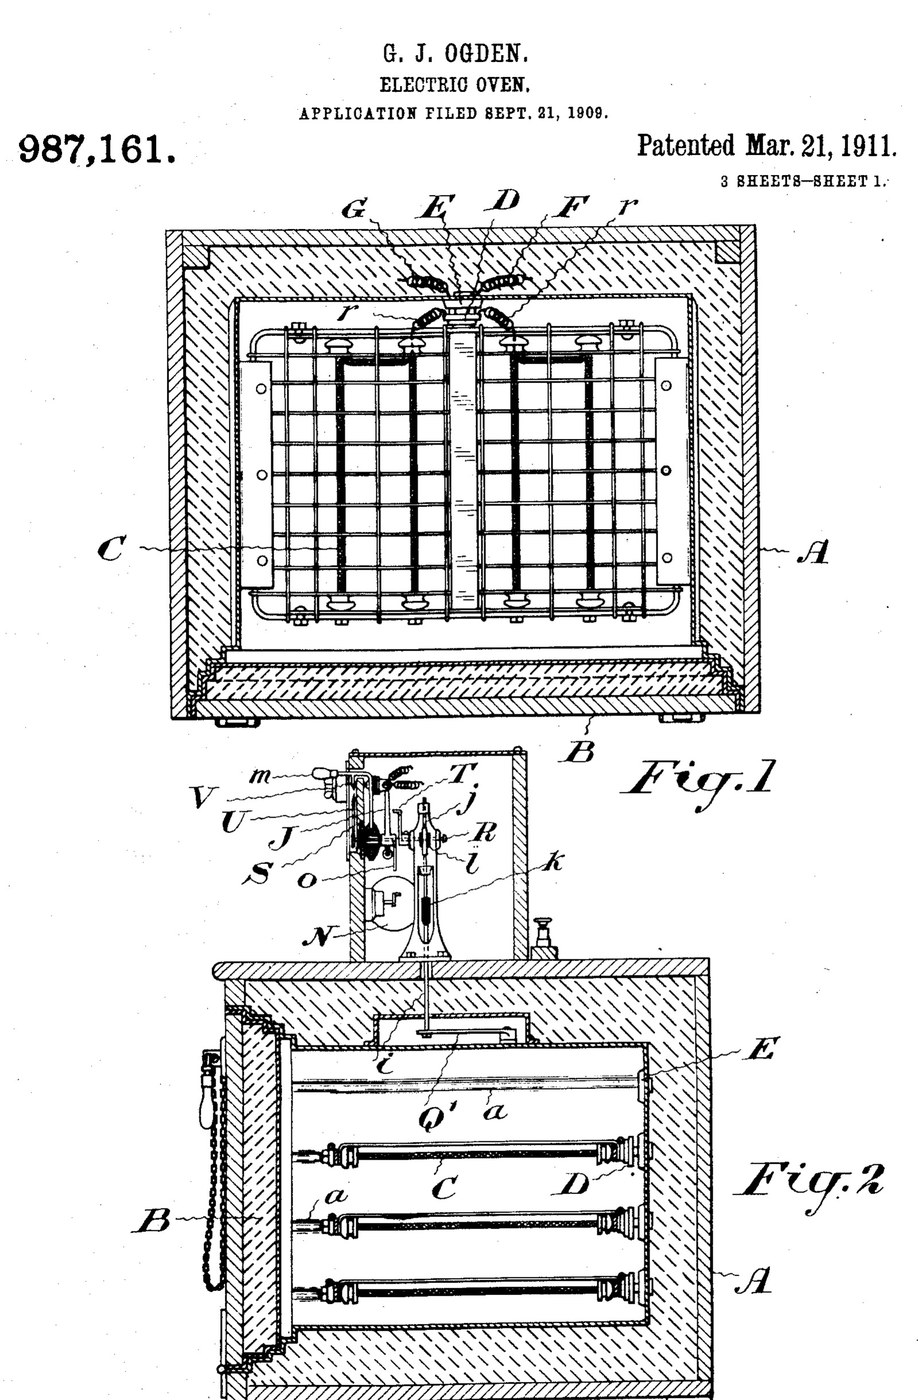


Oven: Insulated Electric Oven with Plug-In Grid Heaters and a Thermostat (Ogden, US 987,161, 1911)
An electric oven built to waste as little heat as possible: a double-walled, packed box with a packed door that seals like a strong-room door. Grid-shaped heating elements slide into grooves in the walls and plug into sockets at the back, and the food rests on them. A thermostat cuts the current when the set temperature is reached and switches it on again as the oven cools.
Result: an oven that bakes, roasts or dries at a set temperature with any number of heating grids.
Source: G. J. Ogden, US 987,161 (1911). Unknown: sizes, metals, packing and temperatures. Picture: the patent drawing.
Advanced
Unknown
Instructions
1
1
Build the insulated casing and door
Build the insulated casing and door
Make the oven chamber as a double-walled casing with packing between the walls, and grooves on the inner side walls to take the heating grids. Fit a door that closes like a fire-proof vault door, also packed, so the casing seals closely. Ours: mild steel sheet. Not given: sizes, the packing.
Materials for this step:
 Mild Steel Sheet1 inner and outer walls, door
 Unknown Insulating Material1 packing
Tools needed:
 Tin Snips
 Drill Press
 Unknown Dimensions
2
2
Make the plug-in heating grids
Make the plug-in heating grids
Make heating elements in the form of grids that slide into the grooves and on which the food can rest. Fix a porcelain plug to each, carrying spring fingers that push into a socket with matching spring fingers in the back wall. Wire the sockets so all the elements are in parallel; use as many as the temperature and amount of food need. Ours: nichrome wire. Not given: the element type.
Materials for this step:
 Nichrome Wire1 heating grids
 Unknown Material1 porcelain plugs and sockets
 Spring Steel Wire1 spring fingers
 Hook-Up Wire1 circuit wiring
Tools needed:
 Soldering Iron
3
3
Fit the thermostat control
Fit the thermostat control
Put a thermostat that bends with heat inside the oven, working a contact finger that plays between two contacts a few degrees above and below the set temperature. A switch-changing device, a small rotary motor, throws the main switch off and on as the finger touches one contact or the other. Mount a setting arm with a pointer over a scale marked in degrees, and a second pointer driven by the thermostat. Add a hand switch to turn the current on or off independently, and a lamp with its own switch to light the oven. Ours: a bimetal strip, toggle switches. Not given: temperatures.
Materials for this step:
 Bimetallic Strip1 thermostat
 Electric Motor1 switch-changing motor
 Toggle Switch3 main, hand and lamp switches
 Unknown Metal1 contacts, arm, scaleUnknown Material1 incandescent oven lamp
Tools needed:
Soldering Iron Thermometer
Materials
10- 1 inner and outer walls, doorPlaceholder
- 1 packingPlaceholder
- 1 heating gridsPlaceholder
- 1 incandescent oven lampPlaceholder
- 1 spring fingersPlaceholder
- Placeholder
- 1 thermostatPlaceholder
- 1 switch-changing motorPlaceholder
- Placeholder
- 1 contacts, arm, scalePlaceholder
Tools Required
5- Placeholder
- Placeholder
- Placeholder
- 2 vendors sell this, none ship to you yetPlaceholder
- Placeholder
Connected Blueprint Materials

This blueprint makes

CC0 Public Domain
This blueprint is released under CC0. You are free to copy, modify, distribute, and use this work for any purpose, without asking permission.
Support the Maker by purchasing products through their Blueprint where they earn a Maker Commission set by Vendors, or create a new iteration of this Blueprint and include it as a connection in your own Blueprint to share revenue.