ART
BEAUTY & WELLNESS
CRAFT
CULTURE & HISTORY
ENTERTAINMENT
ENVIRONMENT
FOOD & DRINKS
REVERSE ENGINEERING
SCIENCES
SPORTS
TECHNOLOGY
WEARABLES


Ratchet-Bar Egg Beater: Push a Rack, the Floats Spin Both Ways
Beating eggs in a closed beater keeps the air out, and a beater bolted to its vessel is slow to empty and clean.
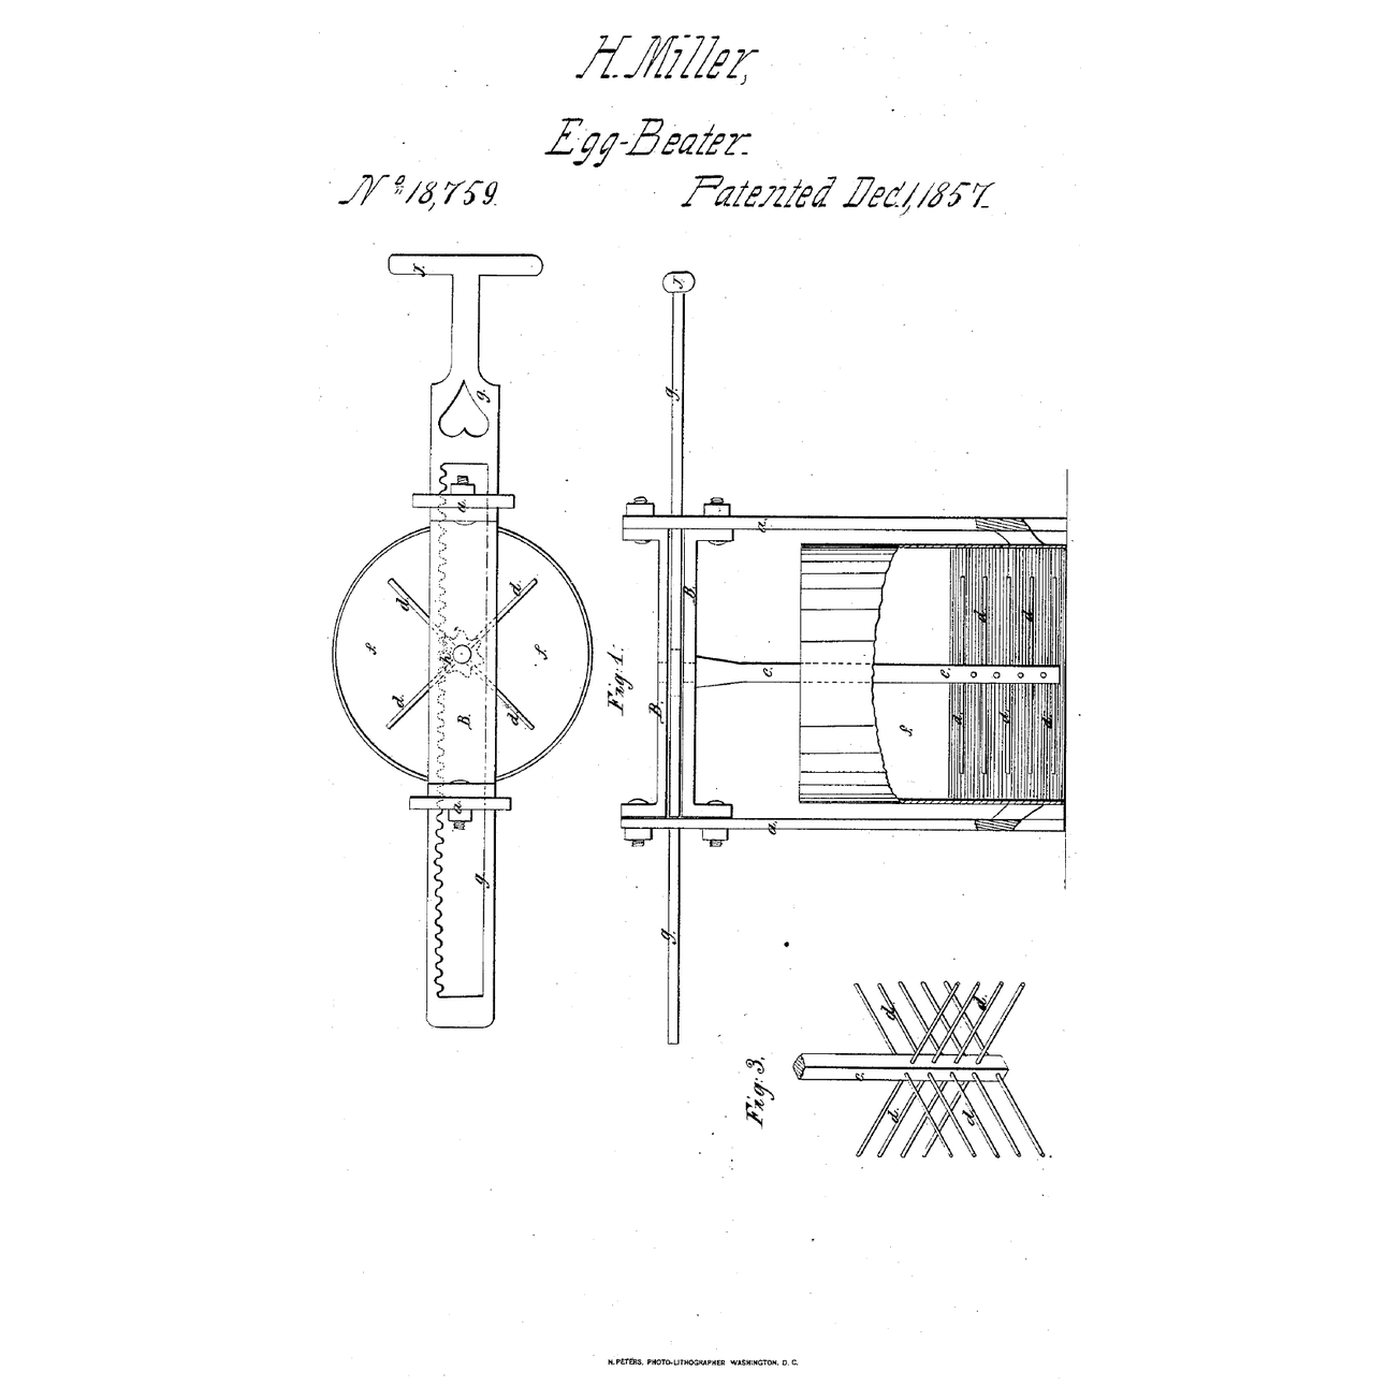
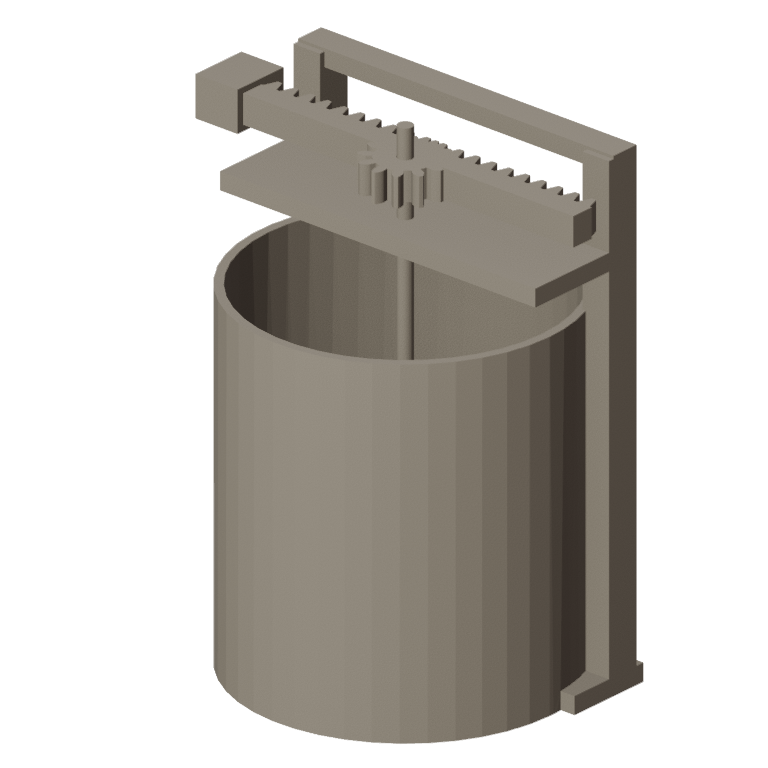
Harvey Miller of Cincinnati, Ohio, received US 18,759, dated 1 December 1857, for an egg beater: a frame whose standards clasp an open jar, a bar sliding through slots that gears into a pinion on a vertical spindle, and wire floats on the spindle that turn rapidly one way then the other as the bar is pushed to and fro; lifting the frame frees the jar.
This rung works out the turns per stroke, then prints the rack and pinion, builds the frame and floats, and times a beating.
Intermediate
About 5 hours, plus printing
Instructions
1
1
Turns per stroke
Turns per stroke
Loading Jupyter Notebook...
2
2
The rack and pinion it uses
The rack and pinion it uses
The embedded blueprint turns a straight push into rotation. Miller pushes the rack by hand and the pinion spins the floats.
3
3
Read US 18,759
Read US 18,759
"By this arrangement, if one hand be placed upon the upper bar B to hold the machine steady, while with the other hand upon the handle j, of the ratchet bar g, a reciprocating motion be given to the ratchet bar, then the spindle c, with its floats d, is set in rapid motion, alternately revolving in each direction."
4
4
Print the rack and pinion
Print the rack and pinion
Print the 12-tooth pinion (/uploads/blueprints/ratchet-bar-egg-beater-pinion.stl) and the 20-tooth rack (/uploads/blueprints/ratchet-bar-egg-beater-rack.stl). Print in PETG at 0.2 mm layers, 30 % infill, 4 walls.
Materials for this step:
 PETG Filament1 piece
Tools needed:
 FDM 3D Printer
5
5
Build the frame
Build the frame
Cut two 170 mm standards and two cross-bars from hardwood. Screw them into a gate that straddles the jar, cut 13 × 11 mm slots across the standards' tops for the rack, and give the feet a curve to fit the jar.
Materials for this step:
 Hardwood Block1 piece
 #8 x 1" Wood Screw1 piece
Tools needed:
 Coping Saw
 Files (Hand File)
 Cordless Drill
 Drill Bit Set
 Screwdriver Set
 Ruler
Ruler6
6
Make the spindle and floats
Make the spindle and floats
Cut 160 mm of 5 mm steel rod. Bend three loops of stainless wire 45 mm across and 50 mm high, bind their ends to the rod's lower end, and epoxy them. Press the pinion onto the top.
Materials for this step:
 Mild Steel Rod1 piece
 Stainless Steel Wire1 piece
 Two-Part Epoxy1 piece
Tools needed:
 Hacksaw
 Round-nose Pliers
 Flat-Nose Pliers
 Clear Safety Glasses
7
7
Assemble
Assemble
Hang the spindle from the lower cross-bar in a 5 mm hole, slide the rack through the slots so its teeth mesh with the pinion, and stand the gate over the bowl.
Materials for this step:
 Flat Washer1 piece
Tools needed:
Cordless DrillDrill Bit Set8
8
The patent drawing
The patent drawing
US 18,759 drawing sheet, public domain (expired patent).
9
9
Beat egg whites
Beat egg whites
Separate two egg whites into the bowl. Pump the rack at about two strokes a second and time how long until they hold stiff peaks.
Materials for this step:
 Egg2 pieces
Tools needed:
 Stainless Steel Mixing Bowl (Large)
 Stopwatch
10
10
A rack that jams, slips or a float that hits the bowl
A rack that jams, slips or a float that hits the bowl
Ratchet-bar egg beater troubleshooting.
Flow
Loading...
11
11
History and honest limits
History and honest limits
**Harvey Miller** of Cincinnati, Ohio, received US 18,759, dated 1 December 1857. His frame and parts were cast iron, the floats iron wire coated with tin, the jar porcelain or tin with no cover, so air has free access; neither shaft nor floats touch the vessel. He did not claim the ratchet bar or revolving beaters alone, only the frame with them in combination with the jar.
**Honest limits.** FDM prints hold food in their layer lines, so wash well and replace when worn. Printed PETG gears and a hardwood gate stand in for cast iron. Your times are the result.
Materials
8- 1 piecePlaceholder
- 1 piecePlaceholder
- 1 piecePlaceholder
- 1 piecePlaceholder
- 1 piecePlaceholder
- 1 piecePlaceholder
- 1 piecePlaceholder
- 2 piecesPlaceholder
Tools Required
13- Placeholder
- Placeholder
- Placeholder
- 1 vendor sell this, none ship to you yetPlaceholder
- Placeholder
- Placeholder
- Placeholder
- Placeholder
- Placeholder
- Placeholder
- Placeholder
- Placeholder
- Placeholder
Related Blueprints
These blueprints share knowledge with this one — techniques, materials, or principles that connect them in the learning graph.


CC0 Public Domain
This blueprint is released under CC0. You are free to copy, modify, distribute, and use this work for any purpose, without asking permission.
Support the Maker by purchasing products through their Blueprint where they earn a Maker Commission set by Vendors, or create a new iteration of this Blueprint and include it as a connection in your own Blueprint to share revenue.