Collaboration
ART
BEAUTY & WELLNESS
CRAFT
CULTURE & HISTORY
ENTERTAINMENT
ENVIRONMENT
FOOD & DRINKS
REVERSE ENGINEERING
SCIENCES
SPORTS
TECHNOLOGY
WEARABLES
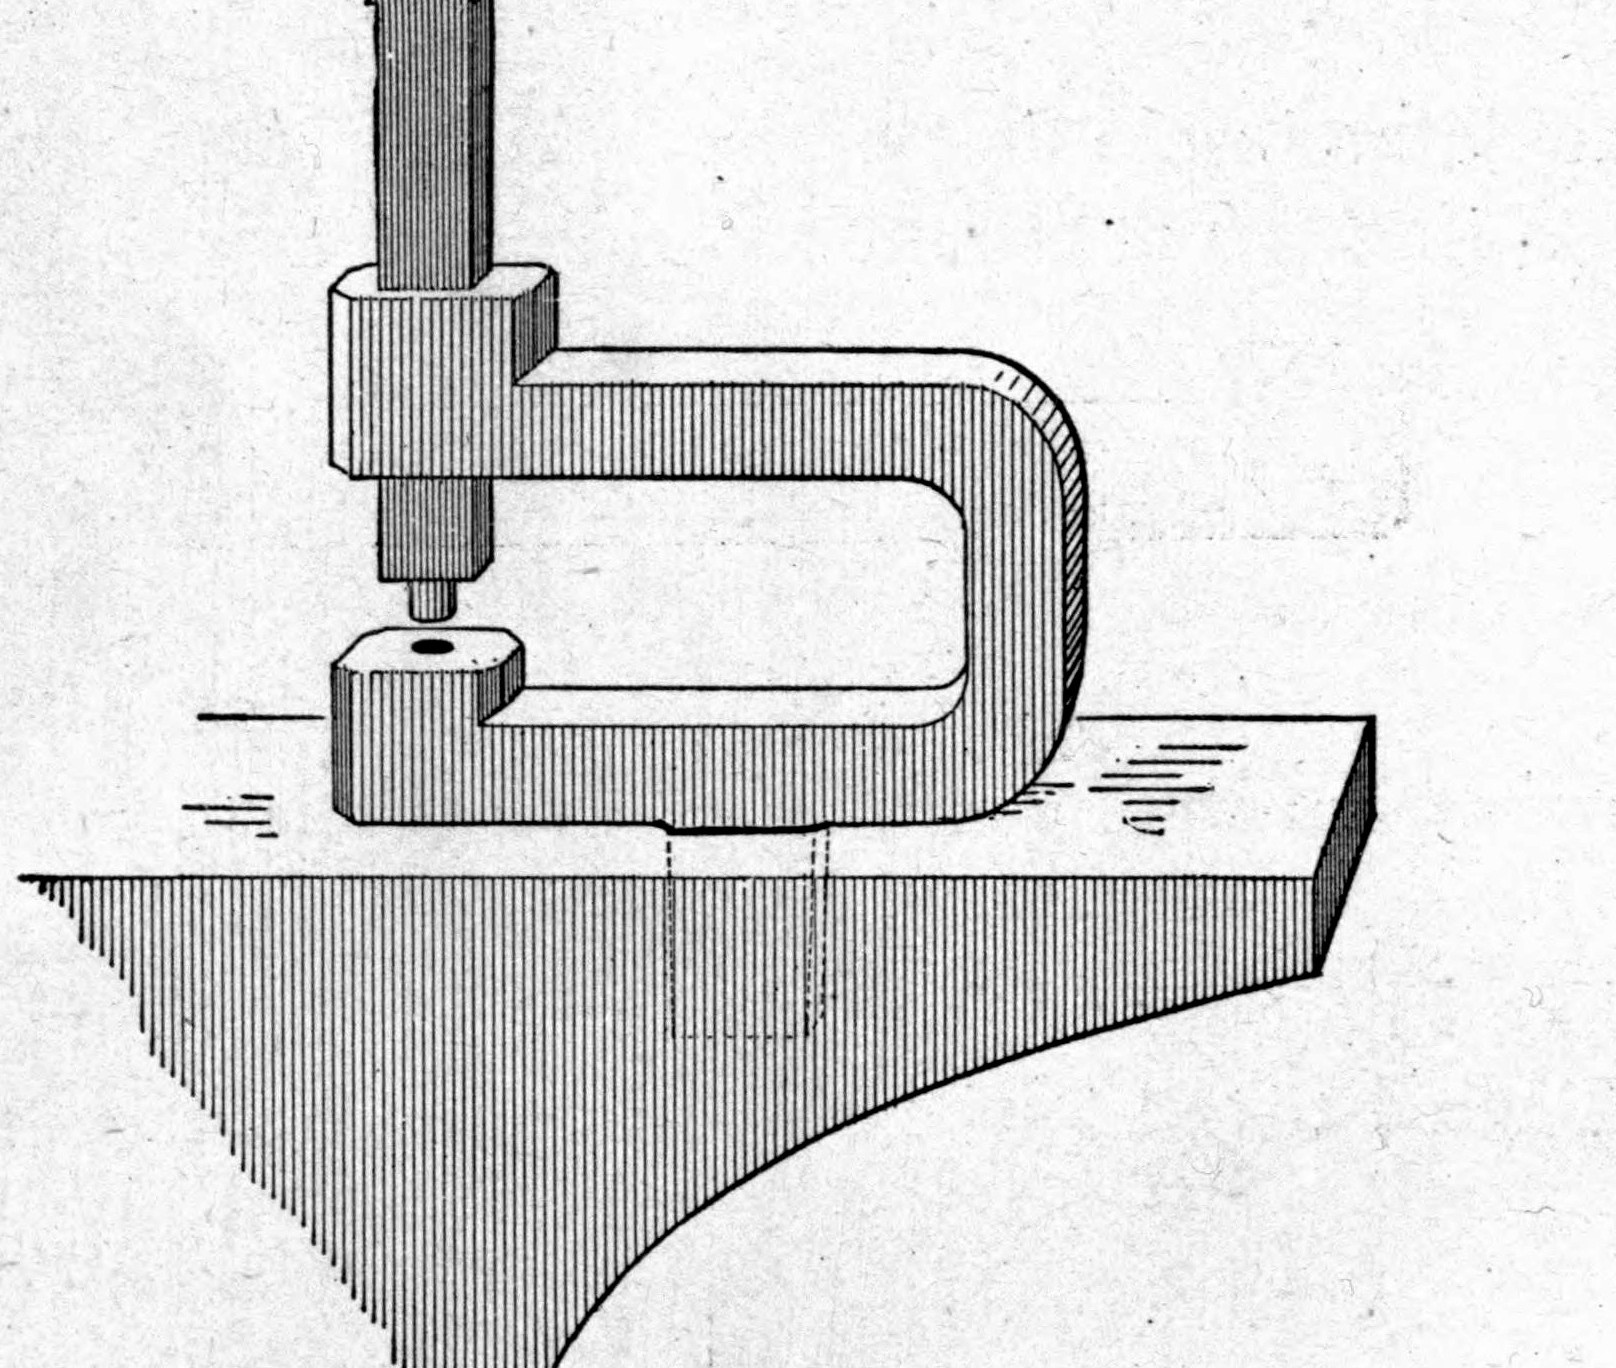


Anvil Hole Punch: Forged C-Frame With a Steel Die Block and Top Die, Set in the Hardy Hole (Richardson, 1889)
A blacksmith's anvil punch from Richardson's Practical Blacksmithing (1889): a bent C-frame of Swedish iron with a steel die block welded on, a square shank that drops into the anvil's hardy hole, and a cast-steel top die struck with a sledge. A set of six, 1/4 to 1 in, punches cold iron up to 5/16 or 3/8 in thick.
Advanced
About 1 day
Instructions
1
1
The set of six
The set of six
Loading Jupyter Notebook...
2
2
Read Practical Blacksmithing
Read Practical Blacksmithing
"I think every blacksmith should have a set of them."
3
3
Forge the frame and die block
Forge the frame and die block
Take Swedish iron 1-1/2 by 3/4 by 10 in, upset one end a little, and weld a square of good steel 1-1/2 by 1-1/2 in firmly on it. Punch a hole in the centre of the steel a little larger than the hole to be cut, driving from the iron side so the hole is largest at the bottom and the slugs drop out. Heat the other end, cut it half off 1-1/2 in from the end, bend it over and weld it, then punch and work out a perfectly true 3/4 in square hole (Fig. 68).
Materials for this step:
 Wrought Iron Bar1 piece
 Tool Steel Bar1 piece
Tools needed:
 Blacksmith Forge
 Anvil
 Hammer
 Forge Tongs
 Hot Punch
 Hot Chisel
 Sledgehammer
4
4
Weld on the shank
Weld on the shank
Weld an iron the size of your anvil's square hole on the bottom side, 2-1/2 in from the round hole (Fig. 69). File and dress the piece.
Materials for this step:
Wrought Iron Bar1 pieceTools needed:
Blacksmith ForgeAnvilHammer Files (Hand File)
5
5
Make the top die
Make the top die
Cut 6 in of 3/4 in square cast steel, draw it down and file one end to fit the round hole; for the 1/4 in punch make the round part 5/16 in long, larger for larger punches (Fig. 70).
Materials for this step:
Tool Steel Bar1 pieceTools needed:
Blacksmith ForgeAnvilHammerFiles (Hand File) Hacksaw
6
6
Bend, fit and temper
Bend, fit and temper
Heat the frame and bend it so the two holes line up; fit the top die and make sure it enters the hole perfectly true. Let it cool slowly, check the bottom die face and that the die works straight and easily, then temper as for any tool that cuts iron (Fig. 71).
Tools needed:
Blacksmith ForgeAnvilHammer Quench Bucket
7
7
Troubleshooting
Troubleshooting
Anvil punch troubleshooting.
Flow
Loading...
8
8
History and honest limits
History and honest limits
From M. T. Richardson (ed.), **Practical Blacksmithing**, vol. I (1889), "Making an Anvil Punch" by N. C. M. (checked on the archive.org scan practicalblacksm00richrich, pp. 126-128). He gives no temper colour; the tools and metric figures are ours.
Materials
2- 1 piecePlaceholder
- 1 piecePlaceholder
This blueprint makes

Related Blueprints
These blueprints share knowledge with this one — techniques, materials, or principles that connect them in the learning graph.
CC0 Public Domain
This blueprint is released under CC0. You are free to copy, modify, distribute, and use this work for any purpose, without asking permission.
Support the Maker by purchasing products through their Blueprint where they earn a Maker Commission set by Vendors, or create a new iteration of this Blueprint and include it as a connection in your own Blueprint to share revenue.