Collaboration
ART
BEAUTY & WELLNESS
CRAFT
CULTURE & HISTORY
ENTERTAINMENT
ENVIRONMENT
FOOD & DRINKS
REVERSE ENGINEERING
SCIENCES
SPORTS
TECHNOLOGY
WEARABLES
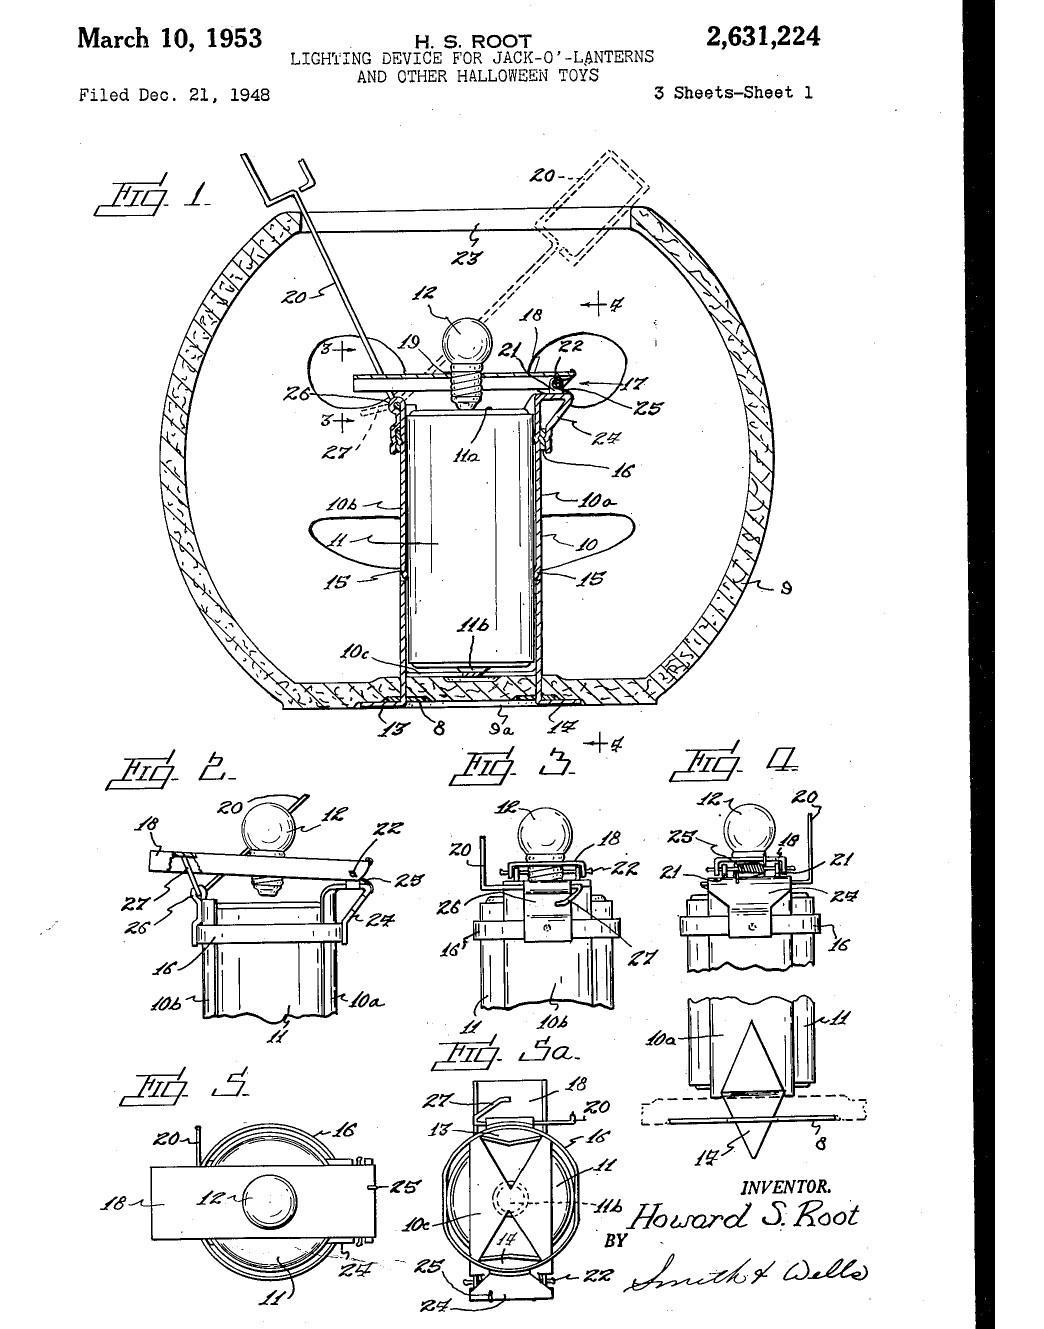


Jack-o'-Lantern Light: a Dry Cell in a Tin Clip and a Hinged Bulb Holder Instead of a Candle (Root, 1953)
Howard S. Root of Spokane received US 2,631,224, dated 10 March 1953, for a safe light for jack-o'-lanterns: "The most common device is an ordinary candle. That, however, is very dangerous." A springy tin clip holds a dry cell; a bulb screwed into a hinged tin support rests on the top of the cell, and the clip itself carries the current back from the bottom. A wire handle through the lid lifts the bulb to switch it off.
We bend it from tinplate and fit it in a carved pumpkin. All sizes are ours.
Beginner
About 2 hours
Instructions
1
1
Bracket blank
Bracket blank
Loading Jupyter Notebook...
2
2
Read US 2,631,224
Read US 2,631,224
"I provide an operating means for the light bulb support 18 of such a nature that the child can turn the light on and off at will, yet if the entire toy is carried by the operating handle, no harm is done to the device."
3
3
Bend the cell clip
Bend the cell clip
Cut the tinplate strip from the notebook. Bend it into a U round the cell, his container 10: the bottom is the cross bar 10c, the sides are legs 10a and 10b. Curve the legs a little across their width so the cell cannot slide out sideways, and snip and press in a small tongue on each leg (his 15) to grip it. Snip two pointed fingers at the bottom (his 13).
Materials for this step:
 Tinplate Sheet1 piece
Tools needed:
 Tin Snips
 Flat-Nose Pliers
4
4
Make the bulb support
Make the bulb support
Cut a tin plate a little longer than the cell is wide, his support 18. Punch a hole in the middle just big enough for the bulb's screw base to screw into (his threaded aperture 19; ours). Bend two small ears at the top of leg 10a (his 21) and roll the support's end round a wire pin (22) between them, so it hinges.
Materials for this step:
Tinplate Sheet1 piece Spring Steel Wire1 piece
Tools needed:
Tin Snips Center Punch
 Round-nose PliersFlat-Nose Pliers
5
5
Fit the spring and handle
Fit the spring and handle
Wind a few turns of spring wire on the hinge pin, one end hooked over the top of leg 10a and the other over the support, so it presses the support down (his spring 25). Bend a wire handle (his 20) long enough to come out of the top opening; pivot its lower end in a turned-over tab on leg 10b (26) and bend a short arm (27) under the free end of the support, so raising the handle lifts the bulb.
Materials for this step:
Spring Steel Wire1 pieceTools needed:
Round-nose PliersFlat-Nose Pliers Wire Cutters
6
6
Put in the cell and bulb
Put in the cell and bulb
Seat the cell with its centre terminal down on the cross bar, put a tin band (his 16) round the legs if they are loose, and screw the bulb into the support. Let the support down: the bulb's end terminal should touch the top of the cell and light, the current returning through the support, the hinge and the clip.
Materials for this step:
 Dry Cell1 piece
 Flashlight Bulb1 pieceTinplate Sheet1 piece
Tools needed:
Tin SnipsFlat-Nose Pliers7
7
Fit it in the pumpkin
Fit it in the pumpkin
Carve the pumpkin's face and cut the top opening (ours; his toys are hollow figures). Push the clip's fingers through the bottom of the pumpkin, put a washer over them outside, and bend them over it (his washer 8), so the light stands in the middle. Pass the handle up through the top opening.
Materials for this step:
 Pumpkin1 piece
 Flat Washer1 piece
Tools needed:
 Craft KnifeFlat-Nose Pliers
8
8
Use it
Use it
Lower the handle and the bulb lights; raise it and the light goes off. To change the cell, lift the support and take the cell out.
9
9
Troubleshooting
Troubleshooting
Jack-o'-lantern light troubleshooting.
Flow
Loading...
10
10
History and honest limits
History and honest limits
**Howard S. Root** of Spokane, Washington, US 2,631,224, dated 10 March 1953, filed 21 December 1948. He claimed "an illuminated figure toy comprising a hollow body having an opening in the top thereof", a conductive container for a dry cell, a hinged conductive bulb support, and spring means pressing the bulb's end terminal against the cell. He also shows other hinges, a magnet latch and a side handle (Figs. 6-13), not built here. He gives no sizes or materials: the tinplate, all sizes, the pumpkin and the cell and bulb are ours.
Materials
6- 3 piecesPlaceholder
- 2 piecesPlaceholder
- 1 piecePlaceholder
- 1 piecePlaceholder
- 1 piecePlaceholder
- 1 piecePlaceholder
This blueprint makes

Related Blueprints
These blueprints share knowledge with this one — techniques, materials, or principles that connect them in the learning graph.


CC0 Public Domain
This blueprint is released under CC0. You are free to copy, modify, distribute, and use this work for any purpose, without asking permission.
Support the Maker by purchasing products through their Blueprint where they earn a Maker Commission set by Vendors, or create a new iteration of this Blueprint and include it as a connection in your own Blueprint to share revenue.