ART
BEAUTY & WELLNESS
CRAFT
CULTURE & HISTORY
ENTERTAINMENT
ENVIRONMENT
FOOD & DRINKS
REVERSE ENGINEERING
SCIENCES
SPORTS
TECHNOLOGY
WEARABLES


The Sheet-of-Water Fountain Brush: Tapered Slots Part the Bristles
Water dribbled onto the back of a brush stays in the bristles and never reaches the surface being washed.
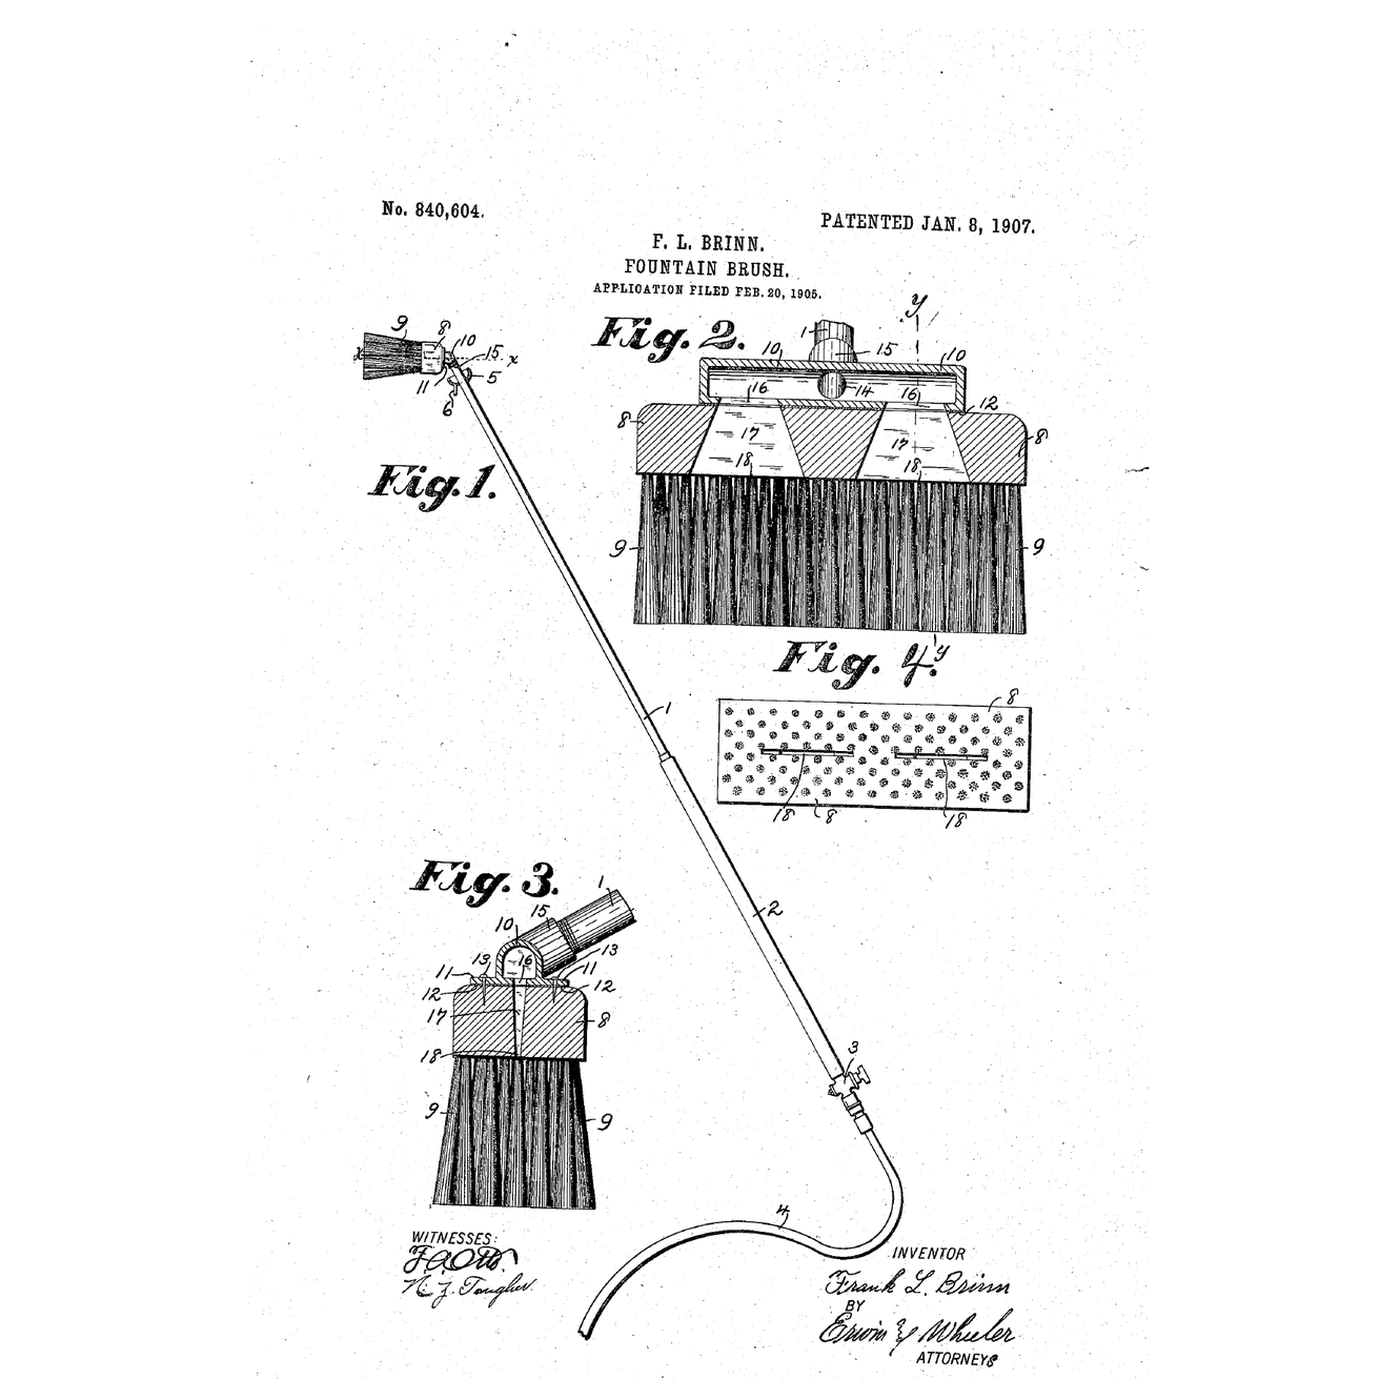
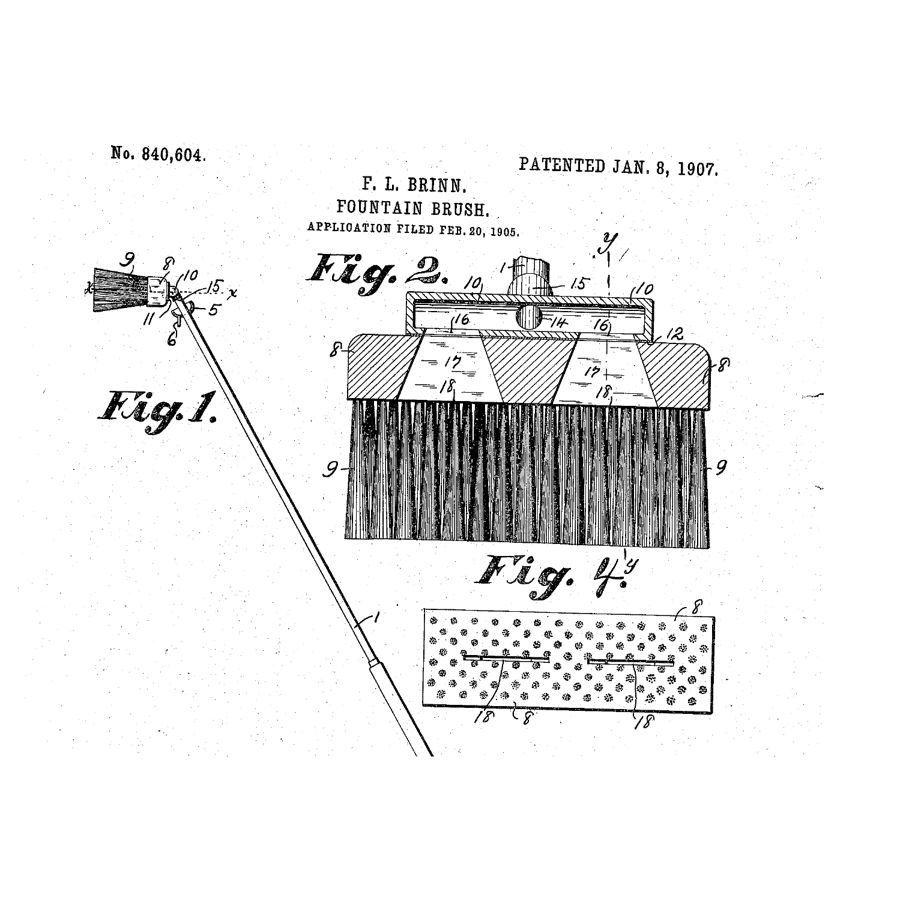
Frank L. Brinn of Milwaukee received US 840,604, patented 8 January 1907, for a fountain brush in which "the fluid may be delivered to the longitudinal central portion of the brush in a sheet, which when the fluid is turned on at full head will serve to separate the bristles and flush the surface to be washed": slots through the block narrow toward the bristles, fed from a cylinder on top through a tubular handle, with a cup on the handle to catch what runs down.
This rung works out how the taper speeds the sheet, then cuts the slots in a scrub brush, plumbs it and compares full flow with throttled flow.
Intermediate
About 4 hours
Instructions
1
1
Sheet speed from the slot
Sheet speed from the slot
Loading Jupyter Notebook...
2
2
Water through a brush's back before it
Water through a brush's back before it
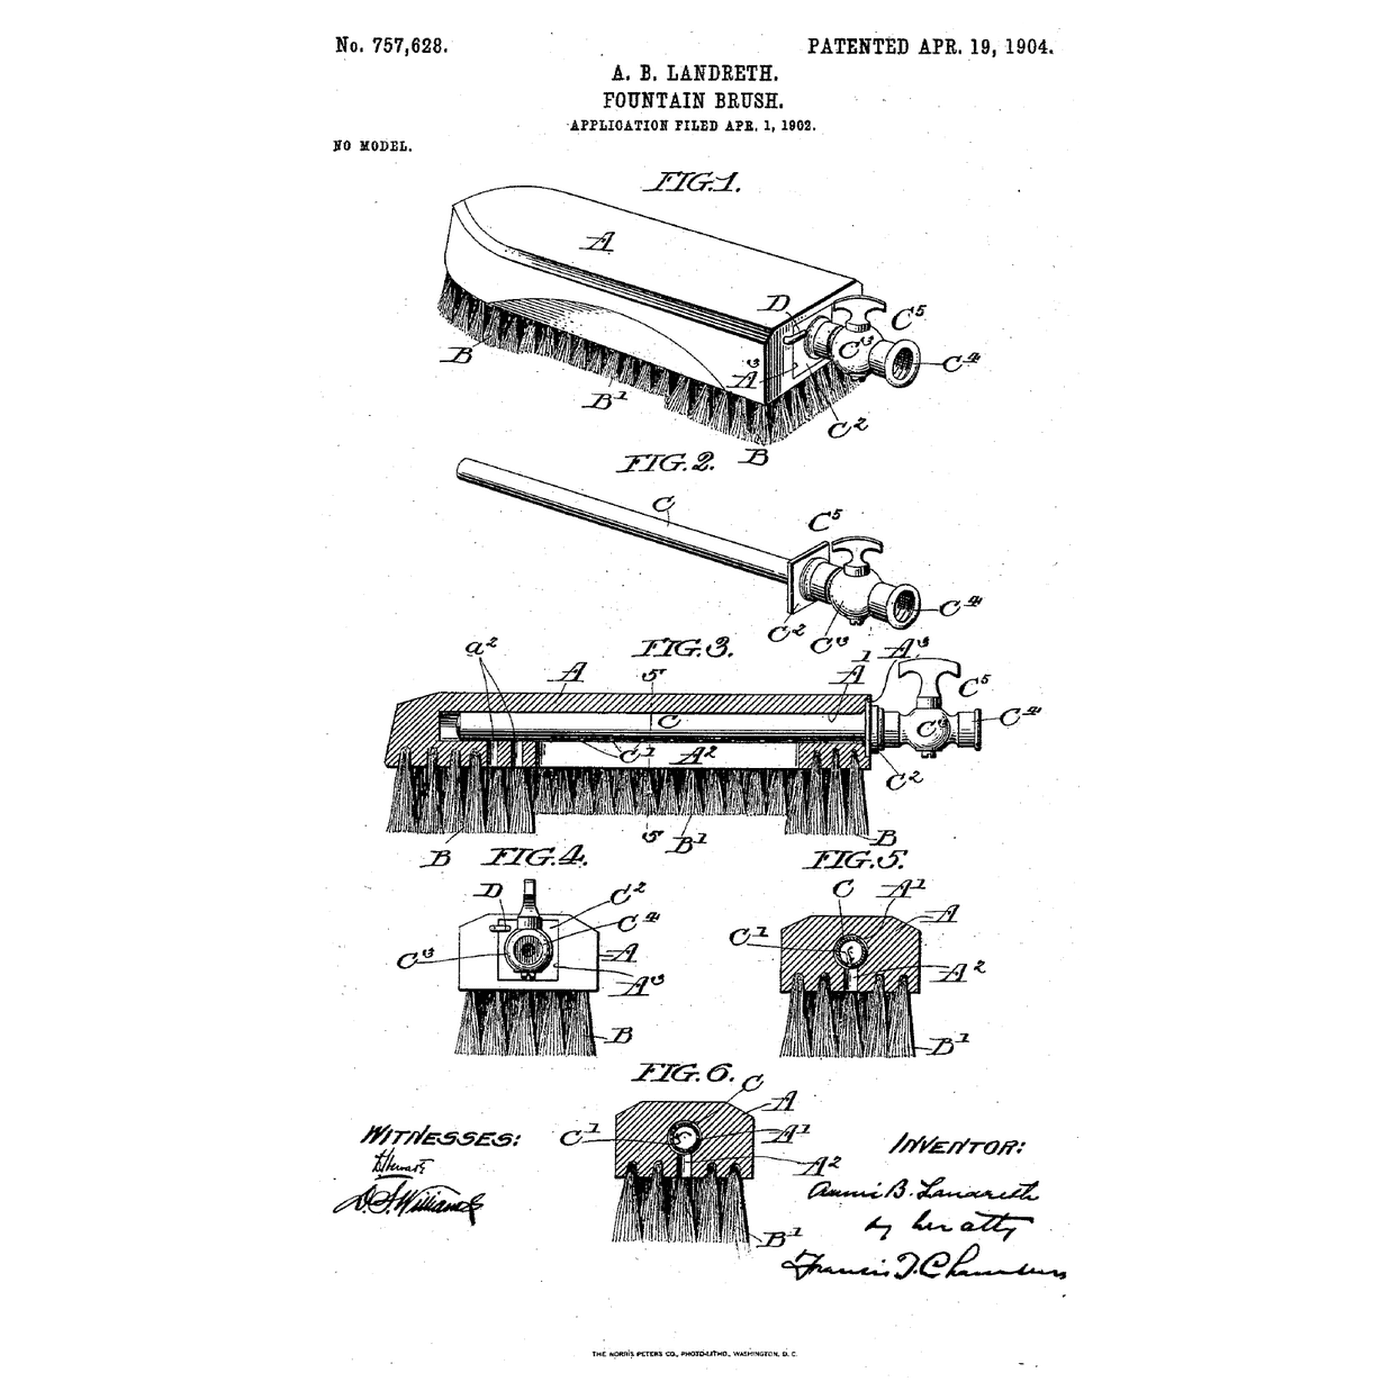
The embedded blueprint jets or soaks water through openings in a brush's back. Brinn shapes the openings into tapered slots so the water leaves as a sheet.
3
3
Read US 840,604
Read US 840,604
"By opening the valve at 3 to its full capacity a sheet of water will be discharged which will separate the bristles and effectively flush the surface to be washed, whether the bristles are in contact with such surface or not. By partially closing the valve at 3 the sheets of water escaping through the openings 18 are broken up by the bristles, and the water thus becomes distributed throughout the brush."
4
4
Cut the slots
Cut the slots
On the scrub brush's top mark two slots 60 × 8 mm, 90 mm apart on the centre line. Drill a row of holes in each and cut it through with the coping saw.
Materials for this step:
 Scrub Brush1 piece
Tools needed:
 Bench Vise
 Cordless Drill
 Drill Bit Set
 Coping Saw
 Permanent Marker
 Ruler
Ruler5
5
Taper the slots
Taper the slots
Pare each slot with chisels so its long sides close to about 1.5 mm at the bristle face and its ends open out to 70 mm. Trim the bristles along the slot line.
Tools needed:
 Chisel Set - Wood
 Hammer
 Digital Caliper 6-Inch
 Craft Knife
6
6
Make the manifold
Make the manifold
Cut 160 mm of 22 mm copper tube and cap both ends with fittings. File a 4 mm slot along its underside over both brush slots. Fit a tee in its middle for the handle.
Materials for this step:
 Copper Tube1 piece
 Brass Fittings1 piece
Tools needed:
 Tube Cutter
 Files (Hand File)
 Adjustable Spanner
7
7
Seat the manifold
Seat the manifold
Bed the manifold on the brush in silicone over a rubber gasket and strap it down with an aluminium strip and four wood screws.
Materials for this step:
 Silicone Sealant1 piece
 Rubber Sheet1 piece
 Aluminium Sheet1 piece
 #8 x 1" Wood Screw1 piece
Tools needed:
 Tin Snips
 Screwdriver SetCraft Knife
8
8
Handle, valve and drip cup
Handle, valve and drip cup
Fit 1.2 m of 15 mm copper tube to the tee, with a ball valve and hose connector at its top. Slide a small tin can, holed and sealed with silicone, onto the handle as a drip cup, and fit a short copper spout low on its side.
Materials for this step:
Copper Tube1 piece Ball Valve1 pieceBrass Fittings1 piece
 PTFE Thread Seal Tape1 piece
 Tin Can1 pieceSilicone Sealant1 piece
Tools needed:
Tube CutterAdjustable SpannerCordless DrillDrill Bit Set9
9
The patent drawing
The patent drawing
US 840,604 drawing sheet, public domain (expired patent).
10
10
Full flow against throttled
Full flow against throttled
Connect the garden hose. With the valve fully open, hold the brush 2 cm off a board and watch the sheet part the bristles; then close it half and watch the water spread through them. Time a litre into the jug each way.
Materials for this step:
 Garden Hose1 piece
 Water1 piece
Tools needed:
 Measuring Jug
 StopwatchRuler
11
11
A sheet that sprays, sputters or leaks
A sheet that sprays, sputters or leaks
Sheet-of-water fountain brush troubleshooting.
Flow
Loading...
12
12
History and honest limits
History and honest limits
**Frank L. Brinn**, a citizen of Canada residing in Milwaukee, filed US 840,604 on 20 February 1905; it was patented 8 January 1907. His cylinder is held to the block by a plate with packing and screws, its slots feeding the slot-apertures; the handle's end carries a rubber sheath and the valve; the cup, with its spout, collects the water instead of letting it run down the handle when the brush is raised.
**Honest limits.** A slotted copper tube stands in for his cylinder, and a tin can for his cup. The notebook treats the sheet as uniform. What you see on the board is the result.
Materials
12- 1 piecePlaceholder
- 1 piecePlaceholder
- 1 piecePlaceholder
- 2 piecesPlaceholder
- 1 piecePlaceholder
- 1 piecePlaceholder
- 1 piecePlaceholder
- 1 piecePlaceholder
- 1 piecePlaceholder
- 1 piecePlaceholder
- Garden Hose10% commission1 piecePlaceholder
- 1 piecePlaceholder
Tools Required
17- Placeholder
- 1 vendor sell this, none ship to you yetPlaceholder
- Placeholder
- Placeholder
- Placeholder
- Placeholder
- Placeholder
- Placeholder
- Placeholder
- Placeholder
- Placeholder
- Placeholder
- Placeholder
- Placeholder
- Placeholder
- Placeholder
- Placeholder
Related Blueprints
These blueprints share knowledge with this one — techniques, materials, or principles that connect them in the learning graph.

CC0 Public Domain
This blueprint is released under CC0. You are free to copy, modify, distribute, and use this work for any purpose, without asking permission.
Support the Maker by purchasing products through their Blueprint where they earn a Maker Commission set by Vendors, or create a new iteration of this Blueprint and include it as a connection in your own Blueprint to share revenue.