ART
BEAUTY & WELLNESS
CRAFT
CULTURE & HISTORY
ENTERTAINMENT
ENVIRONMENT
FOOD & DRINKS
REVERSE ENGINEERING
SCIENCES
SPORTS
TECHNOLOGY
WEARABLES


The Tube-in-the-Back Fountain Brush: Turn the Tube and the Jets Become a Soak
A scrubbing brush dipped in a bucket runs dry in seconds, and a hose beside it floods the floor.
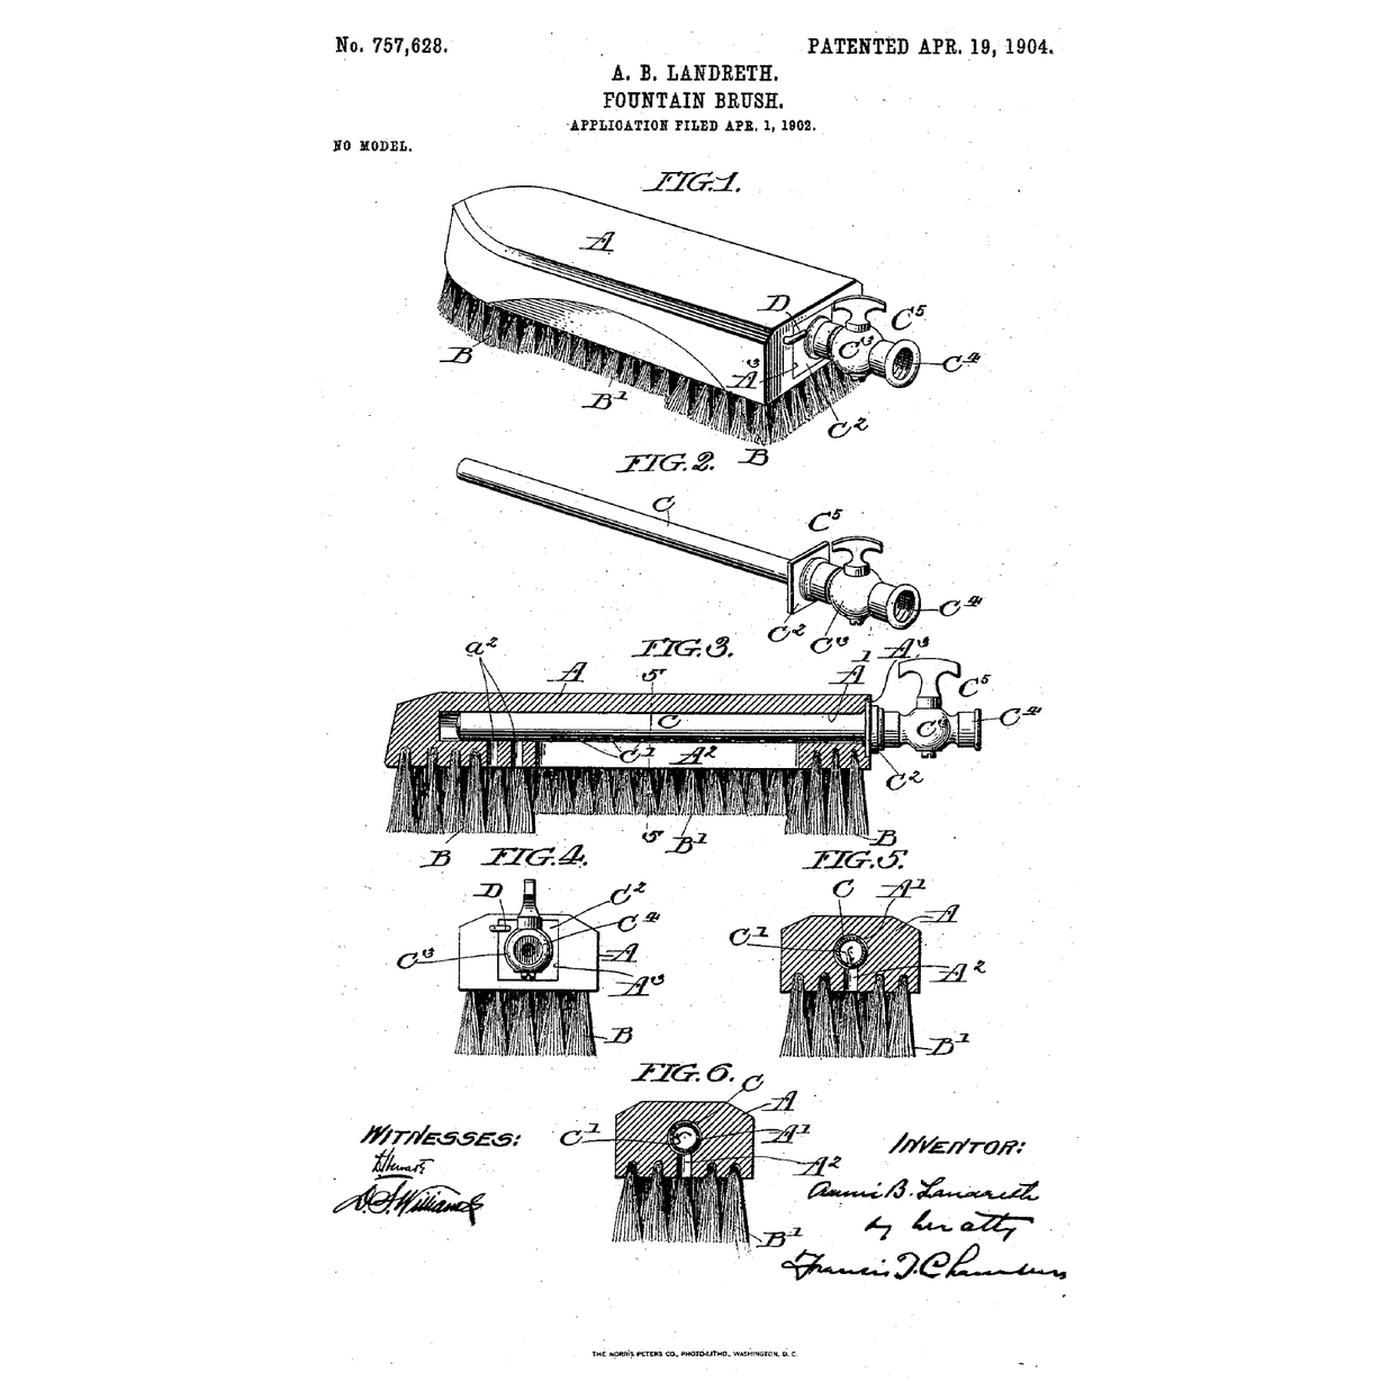
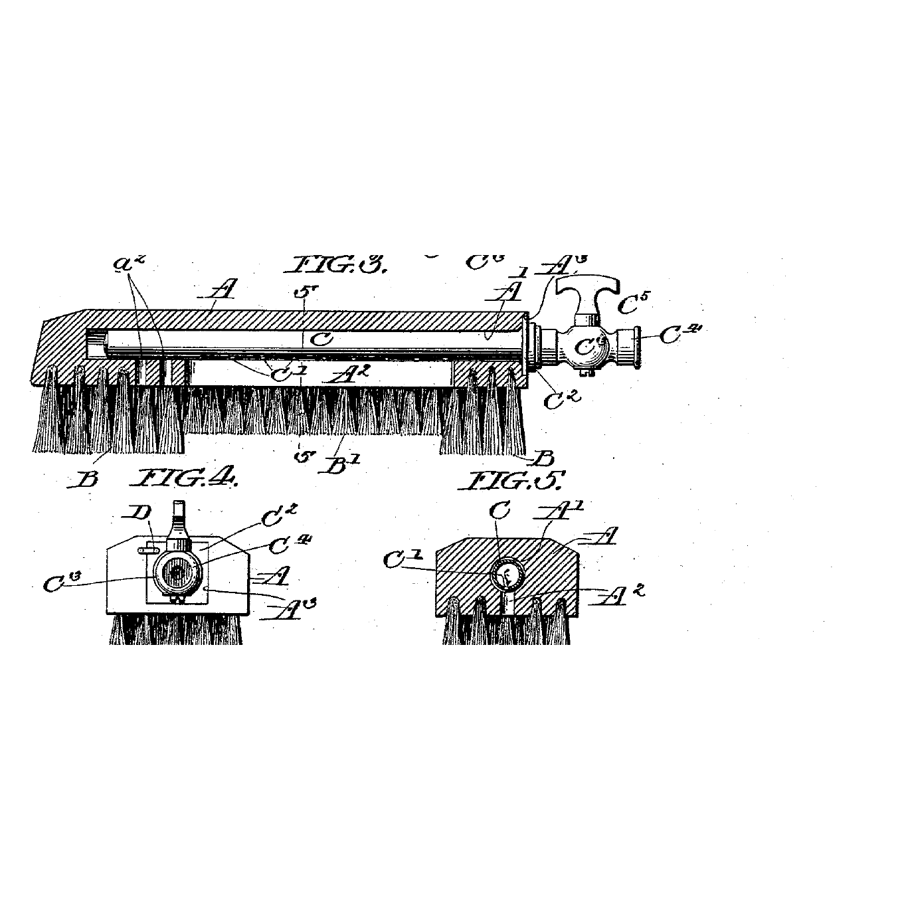
Annie B. Landreth of Bristol, Pennsylvania, received US 757,628, dated 19 April 1904, for a fountain brush "of great simplicity of construction": a recess bored lengthwise into an ordinary brush's back with openings to its face, and a perforated tube on a cock that slides in; a square plate on the tube sits in a square depression, so the holes can face the openings or be turned a quarter turn against the recess walls.
This rung compares the jet with the turned-away flow, then bores a scrub brush, fits a tube and tap, and measures both settings.
Intermediate
About 3 hours
Instructions
1
1
Jet against soak
Jet against soak
Loading Jupyter Notebook...
2
2
A scrubbing brush improved before it
A scrubbing brush improved before it
The embedded blueprint holds two brush heads on a sprung holder. Landreth leaves the brush ordinary and feeds water through a bore in its back.
3
3
Read US 757,628
Read US 757,628
"Thus the perforations may register with the openings a² a², as indicated in Fig. 5, or the fountain-tube may be turned to an angle of ninety degrees, so that the perforations C' face the lateral sides of the recess A', as indicated in Fig. 6, and in this way the force due to the pressure of the water-supply is broken and the water will pass out of the openings without force."
4
4
Bore the back
Bore the back
Clamp a scrub brush with a back at least 22 mm thick, bristles down. Drill a 12 mm hole 160 mm deep along the back's centre from one end, keeping the bit level.
Materials for this step:
 Scrub Brush1 piece
Tools needed:
 Bench Vise
 Cordless Drill
 Brad Point Drill Bit Set
 Ruler
Ruler Clear Safety Glasses
5
5
Drill the openings
Drill the openings
From the bristle face, between rows, drill seven 3 mm holes into the bore, 20 mm apart.
Tools needed:
Cordless Drill Drill Bit Set
 Permanent Marker
6
6
Cut the square depression
Cut the square depression
Round the bore's mouth, chisel a 30 mm square 2 mm deep.
Tools needed:
 Chisel Set - Wood
 HammerRuler
7
7
Make the tube
Make the tube
Cut 160 mm of 10 mm copper tube. Squeeze one end shut in the vice and solder it. Drill seven 1.8 mm holes in a line to match the openings.
Materials for this step:
 Copper Tube 10mm1 piece
 Lead-Free Plumbing Solder1 piece
 Plumbing Flux1 piece
Tools needed:
 Tube CutterBench Vise
 Propane TorchCordless DrillDrill Bit Set
 Heat-Resistant Gloves
8
8
Solder on the square plate
Solder on the square plate
Cut a 28 mm square of brass sheet, drill it 10 mm in the centre, slide it on 160 mm from the closed end with one edge square to the holes, and solder it.
Materials for this step:
 Brass Sheet1 pieceLead-Free Plumbing Solder1 piecePlumbing Flux1 piece
Tools needed:
 Tin SnipsCordless DrillDrill Bit SetPropane TorchHeat-Resistant Gloves
9
9
Fit the tap and button
Fit the tap and button
Fit the ball valve and a hose connector to the open end with brass fittings and PTFE tape. Screw a 10 × 40 mm brass strip beside the depression as a turn-button.
Materials for this step:
 Ball Valve1 piece
 Brass Fittings1 piece
 PTFE Thread Seal Tape1 pieceBrass Sheet1 piece
 #8 x 1" Wood Screw1 piece
Tools needed:
 Adjustable Spanner
 Screwdriver Set
10
10
The build in 3D
The build in 3D
FreeCAD model of this build, not of the patent: a 200 × 60 × 26 mm back with a 12 mm bore 160 mm deep, seven 3 mm openings, a 30 mm square depression, the perforated tube with its square plate, valve and turn-button.
11
11
Compare the two settings
Compare the two settings
Connect the garden hose. With the holes facing the openings, hold the brush face-up and measure how high the jets rise; time a litre into the jug. Turn the tube 90°, lock it, and repeat.
Materials for this step:
 Garden Hose1 piece
 Water1 piece
Tools needed:
Ruler Measuring Jug
 Stopwatch
12
12
A brush that sprays, leaks or will not lock
A brush that sprays, leaks or will not lock
Tube-in-the-back fountain brush troubleshooting.
Flow
Loading...
13
13
History and honest limits
History and honest limits
**Annie B. Landreth** of Bristol, Pennsylvania, filed US 757,628 on 1 April 1902; it is dated 19 April 1904. The nozzle carries a cock and the usual hose coupling; the square plate and depression may be any shape that holds the tube at the chosen angle, and a turn-button holds it in use. The attachment can be inserted and withdrawn instantly, leaving the sides and back free to hold the brush in the ordinary way.
**Honest limits.** She gives no sizes; ours are examples. The notebook ignores the loss in the bore. Your jet heights and times are the result.
Materials
11- 1 piecePlaceholder
- 1 piecePlaceholder
- 2 piecesPlaceholder
- 2 piecesPlaceholder
- 1 piecePlaceholder
- 1 piecePlaceholder
- 1 piecePlaceholder
- 1 piecePlaceholder
- 1 piecePlaceholder
- Garden Hose10% commission1 piecePlaceholder
- 1 piecePlaceholder
Tools Required
17- Placeholder
- 1 vendor sell this, none ship to you yetPlaceholder
- Placeholder
- Placeholder
- Placeholder
- Placeholder
- Placeholder
- Placeholder
- Placeholder
- Placeholder
- Placeholder
- Placeholder
- Placeholder
- Placeholder
- Placeholder
- Placeholder
- Placeholder
Design Files
1Related Blueprints
These blueprints share knowledge with this one — techniques, materials, or principles that connect them in the learning graph.


CC0 Public Domain
This blueprint is released under CC0. You are free to copy, modify, distribute, and use this work for any purpose, without asking permission.
Support the Maker by purchasing products through their Blueprint where they earn a Maker Commission set by Vendors, or create a new iteration of this Blueprint and include it as a connection in your own Blueprint to share revenue.