ART
BEAUTY & WELLNESS
CRAFT
CULTURE & HISTORY
ENTERTAINMENT
ENVIRONMENT
FOOD & DRINKS
REVERSE ENGINEERING
SCIENCES
SPORTS
TECHNOLOGY
WEARABLES
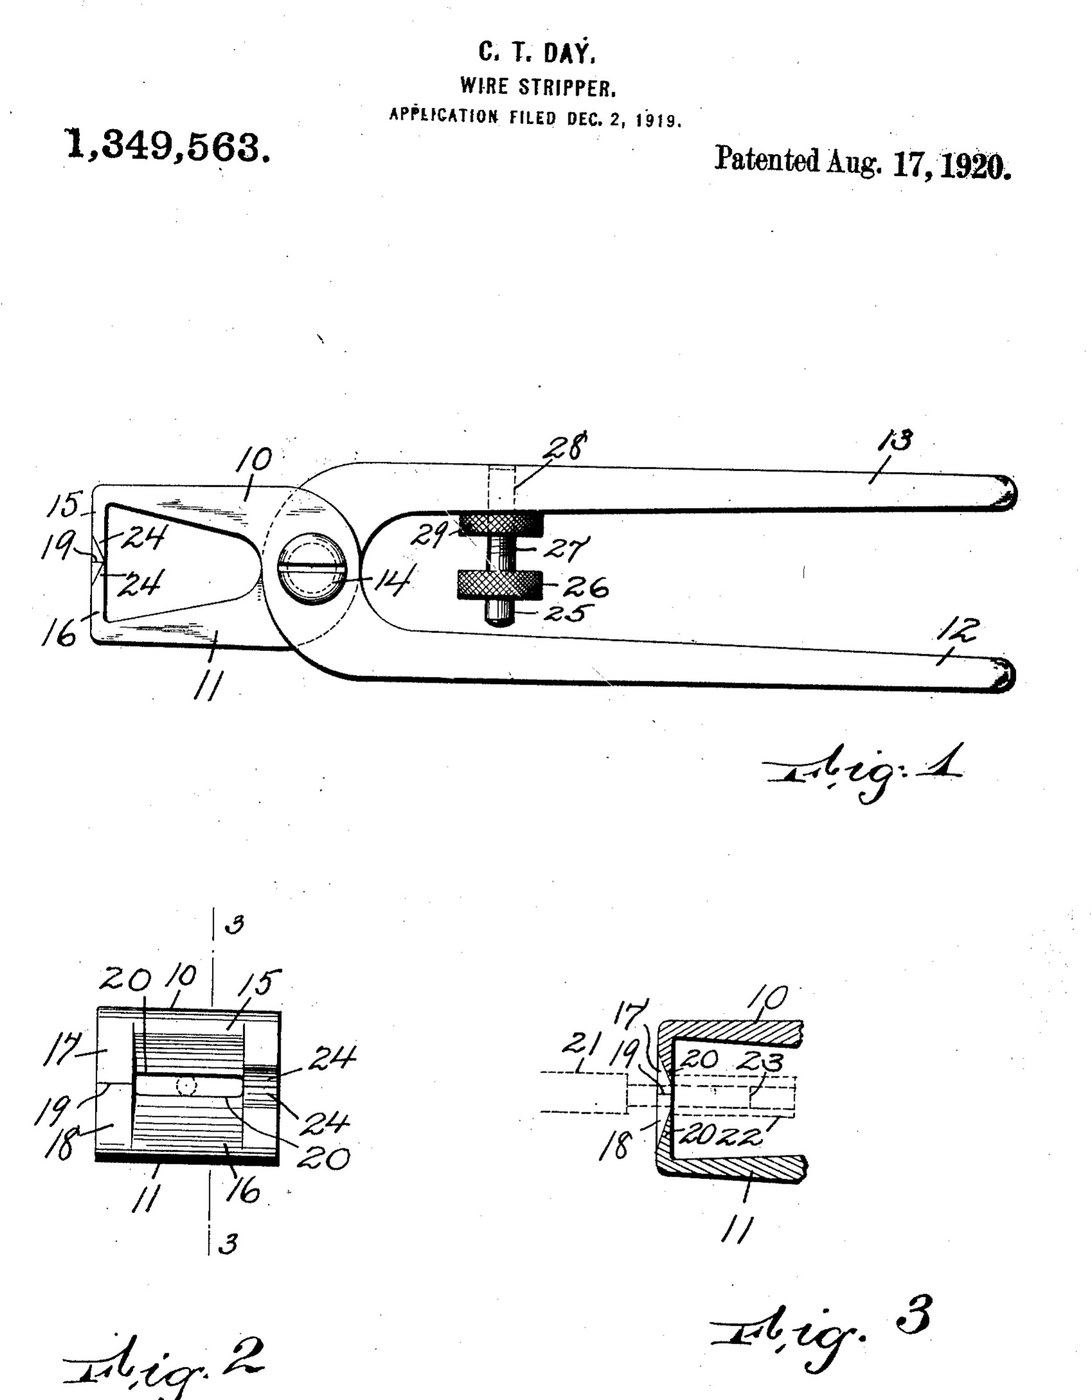


Wire Strippers: Pliers with Straight Parallel Stripping Edges (Day, US 1,349,563, 1920)
Pliers whose jaws stop with their two straight stripping edges exactly one wire-core apart. Grip the wire anywhere along the edges and twist: the insulation is cut through all round, but the copper is never nicked. A screw stop between the handles sets the gap for larger wire, and cutting edges beside the stripping edges cut the wire through.
Result: wire strippers that strip insulation without damaging the conductor.
Source: C. T. Day, US 1,349,563 (1920). Unknown: the metal, sizes and hardening. Picture: the patent drawing.
Intermediate
Unknown
Instructions
1
1
Forge the two jaw-handles
Forge the two jaw-handles
Make two pieces like a pair of pliers: each a jaw with a long handle, pivoted together by a bolt. Bend each jaw's end inward. Ours: tool steel forged and filed. Not given: the metal, sizes.
Materials for this step:
 Flat Tool Steel Bar1 jaws and handles
 Unknown Metal1 pivot bolt
Tools needed:
 Forge
 Anvil
 Hammer
 Drill Press
 Unknown Dimensions
2
2
Shape the cheek pieces and stripping edges
Shape the cheek pieces and stripping edges
Give each inward jaw end a cheek piece; the cheek faces meet when the jaws close and stop them closing further. Set back from those faces, file two straight, parallel stripping edges, much longer than the gap between them, so that with the jaws shut they stand apart by exactly the diameter of the wire's metal core. On the other side of the stripping edges, opposite the cheeks, file cutting edges that meet, for cutting the wire through.
Tools needed:
 Metal FileUnknown Dimensions
3
3
Add the stop, harden, and strip a wire
Add the stop, harden, and strip a wire
For use on a larger wire, drill and tap a hole in one handle and fit a stud with a hand piece and a threaded end. Screwed in, its free end meets the other handle and stops the jaws closing so far. A lock nut holds the setting. Harden the edges. To strip, lay the wire across the jaws anywhere along the stripping edges, close them and turn the pliers right and left with the wrist: the insulation is cut through all round, and a pull slides its end off the core. Not given: how they are hardened.
Materials for this step:
Unknown Metal1 stud and lock nutTools needed:
Drill Press Tap and Die Set
 Heat Treating Oven
 Quench Bucket
Materials
2- 1 jaws and handlesPlaceholder
- 1 stud and lock nutPlaceholder
Connected Blueprint Materials

This blueprint makes

CC0 Public Domain
This blueprint is released under CC0. You are free to copy, modify, distribute, and use this work for any purpose, without asking permission.
Support the Maker by purchasing products through their Blueprint where they earn a Maker Commission set by Vendors, or create a new iteration of this Blueprint and include it as a connection in your own Blueprint to share revenue.