NGHỆ THUẬT
LÀM ĐẸP VÀ SỨC KHỎE
THỦ CÔNG
VĂN HÓA VÀ LỊCH SỬ
GIẢI TRÍ
MÔI TRƯỜNG
THỰC PHẨM VÀ ĐỒ UỐNG
KỸ THUẬT NGƯỢC
KHOA HỌC
THỂ THAO
CÔNG NGHỆ
THIẾT BỊ ĐEO
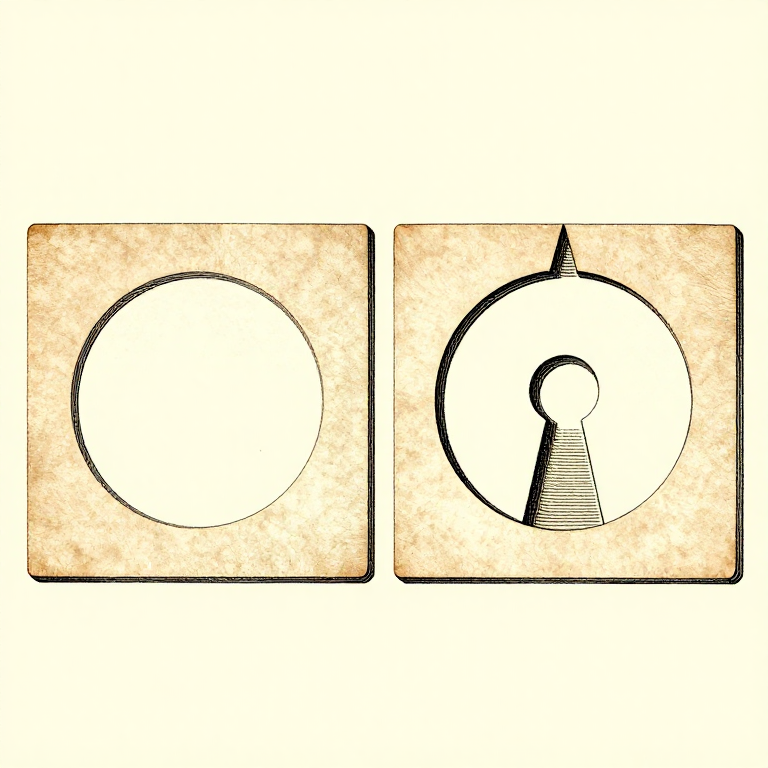


Designing For the Process: A Printable Part Is a Different Shape
A model drawn without thinking about printing can usually be printed. A model drawn WITH the process in mind prints faster, stronger, with no supports and a better surface — from the same amount of design effort.
Every rung before this one is a constraint: layers are weak in one direction, overhangs have a limit, holes come out small, corners warp, walls carry the load. Design is where those stop being problems to work around and become the rules the shape is drawn to.
That is the same move as designing a casting with draft angles, or a timber frame with wood movement allowed for. The process has a grain, and a good design runs with it.
Nâng cao
4 hours
Hướng dẫn
1
1
Chamfer the bottom, fillet the rest
Chamfer the bottom, fillet the rest
A 45-degree CHAMFER on the bottom edge of a part is self-supporting, removes the elephant-foot bulge, and makes the part easier to insert into anything. It is close to free and almost always an improvement.
Fillets elsewhere reduce stress concentration and warping, exactly as a radiused corner does on any other part. Internal corners especially: a sharp internal corner is where a printed part cracks.
But do NOT fillet the bottom edge — a bottom fillet is an overhang that starts at 90 degrees, which is the one angle nothing can print. Chamfer at the bottom, fillet above it, and that single rule removes a lot of support material.
Vật liệu cho bước này:
 Sợi in 3D (PLA)1 cái
Công cụ cần thiết:
 Máy tính để bàn
 Phần mềm cắt lớp tệp 3MF
 Dụng cụ gọt ba via
2
2
Turn overhangs into bridges and teardrops
Turn overhangs into bridges and teardrops
A horizontal hole printed round has an unsupported arch at the top that sags. Printed as a TEARDROP — a circle with a 45-degree point on top — it is entirely self-supporting and needs no support at all.
A hexagonal hole does the same job and takes a nut. So does simply making the top of the hole a flat bridge rather than a curve, which prints well for the reasons the overhang rung gives.
The general form: wherever the model has a surface between 45 and 90 degrees, ask whether it can become a chamfer, a bridge, or a shape with a point on top. Nearly always it can, and nearly always the result is better than supporting it.
Vật liệu cho bước này:
Sợi in 3D (PLA)1 cáiCông cụ cần thiết:
Máy tính để bànPhần mềm cắt lớp tệp 3MF Thước cặp điện tử 6 inch
3
3
Split the part where splitting helps
Split the part where splitting helps
A part that needs supports, or warps, or is too tall to be stable, can often be cut into two pieces that each print flat and are then glued or bolted.
Put the split where a joint is natural — at a change of section, behind a flange — and add a locating feature, a peg and socket or a dovetail, so the two halves cannot be assembled wrong. Design the clearance into one side only, as the tolerance rung sets out.
Splitting also lets each half be oriented for its own load path, which the orientation rung says is the highest-leverage decision available. A part split into two well-oriented halves can be stronger than the same part printed whole.
Vật liệu cho bước này:
Sợi in 3D (PLA)1 cáiCông cụ cần thiết:
Máy tính để bànPhần mềm cắt lớp tệp 3MFThước cặp điện tử 6 inchDụng cụ gọt ba via4
4
Use real hardware where it belongs
Use real hardware where it belongs
Printed threads are weak, printed bearings wear, and printed springs creep. Heat-set brass inserts, steel pins, real bearings and real fasteners cost very little and remove the weakest parts of a printed assembly.
Design the pocket for them from the start: a straight bore for an insert, a captive hex pocket for a nut, a shoulder for a bearing to seat against. A pocket designed in prints perfectly; one drilled afterwards splits the part along a layer.
Which is the whole argument of this batch. The printer is one process among several, it has specific strengths and specific limits, and the best results come from using it for what it is good at and something else for the rest.
Vật liệu cho bước này:
Sợi in 3D (PLA)1 cái Sợi in PETG pha carbon1 cái
Công cụ cần thiết:
Máy tính để bànThước cặp điện tử 6 inch Bộ dụng cụ cho máy in 3D
Blueprint liên quan
Các blueprint này chia sẻ kiến thức — kỹ thuật, vật liệu hoặc nguyên tắc
CC0 Phạm vi công cộng
Bản thiết kế này được phát hành theo CC0. Bạn tự do sao chép, sửa đổi, phân phối và sử dụng cho bất kỳ mục đích nào mà không cần xin phép.
Hỗ trợ nhà sáng tạo bằng cách mua sản phẩm qua bản thiết kế, nơi họ nhận Hoa hồng nhà sáng tạo do nhà bán hàng đặt, hoặc tạo phiên bản mới và kết nối trong bản thiết kế riêng để chia sẻ doanh thu.