NGHỆ THUẬT
LÀM ĐẸP VÀ SỨC KHỎE
THỦ CÔNG
VĂN HÓA VÀ LỊCH SỬ
GIẢI TRÍ
MÔI TRƯỜNG
THỰC PHẨM VÀ ĐỒ UỐNG
KỸ THUẬT NGƯỢC
KHOA HỌC
THỂ THAO
CÔNG NGHỆ
THIẾT BỊ ĐEO
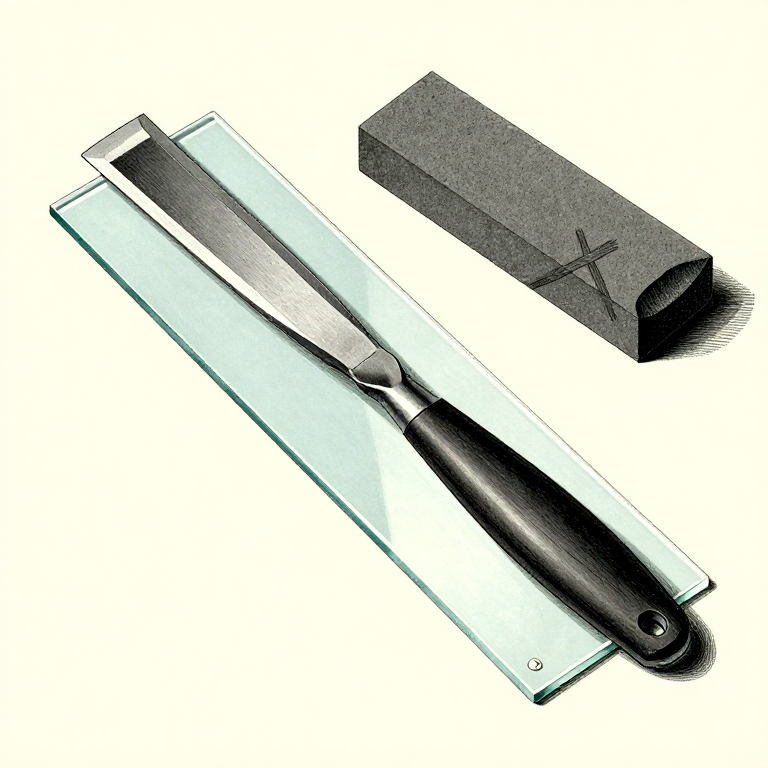


Flattening the Back: The Half of the Edge Everyone Forgets
An edge is two surfaces. Beginners polish one of them to a mirror, wonder why the tool still will not cut, and go back to the bevel — which is the half that was already finished.
The flat side matters just as much, and it is worse than that: if the back is hollow or rounded near the edge, no amount of work on the bevel will ever produce a sharp tool, because the two surfaces cannot meet at a line. They meet at a curve.
The good news is that this is a once-per-tool job. Flatten the back properly when the tool is new and you never do it again — every later sharpening touches only the bevel and a few strokes on the flat.
Cơ bản
3 hours
Hướng dẫn
1
1
Find out whether the back is flat at all
Find out whether the back is flat at all
Colour the back of the blade with marker for the first 30 mm behind the edge, lay it flat on a stone with light finger pressure directly over the edge, and take a few straight strokes. Then look.
Ink removed right at the edge and along both corners means the back is flat where it matters. Ink surviving in a band ALONG the edge means the back is hollow there — the stone is touching everywhere except the one place that counts. Ink surviving at one corner means it is twisted.
Most new tools, including expensive ones, need this. Some old ones have been rounded by decades of someone lifting the handle while honing, which is the same fault made by hand.
Công cụ cần thiết:
 Bộ đục - lưỡi vát cạnh
 Đá mài dao
 Bút dạ không xoá
 Kính lúp thợ kim hoàn
2
2
Flat means flat — use glass if the stone is not
Flat means flat — use glass if the stone is not
Stick abrasive paper to a sheet of float glass and work the back on that, starting coarse. A stone that has been used for bevels is dished in the middle, and a dished stone makes a rounded back.
Float glass is flat to a few micrometres over its area, costs little, and is the cheapest reference surface a workshop can own. The same trick flattens the stones themselves — coarse paper on glass, or one stone rubbed against another.
Keep the pressure directly over the edge and the blade flat on the surface. The commonest way to ruin a back is to press near the handle, which lifts the edge a fraction and rounds exactly the part you are trying to flatten.
Công cụ cần thiết:
 Tấm kính nổiBộ đục - lưỡi vát cạnh
 Vải cô tông
 Bộ giấy nhám nhiều loại
3
3
You only need the first centimetre
You only need the first centimetre
Flatten the back for 20 to 30 mm behind the edge and stop. The rest of the blade can stay as the factory left it.
Only the part that meets the bevel forms the cutting edge, and a chisel will never be ground back far enough to reach the untouched region. Trying to flatten a whole blade is hours of work for no benefit, and it is why people abandon the job half done and leave the tool worse than before.
For a plane iron the same applies. A narrow polished strip along the edge — the 'ruler trick' raises the blade a fraction on a thin steel rule to create a tiny back bevel — turns an hour into two minutes, and on a bevel-down plane it costs nothing.
Công cụ cần thiết:
 Bào tayTấm kính nổiBút dạ không xoáBộ giấy nhám nhiều loại
4
4
Work up through the grits, and stop when it is uniform
Work up through the grits, and stop when it is uniform
Once the coarse abrasive has the back flat, repeat at each finer grit until the strip behind the edge has an even, uniform surface with no coarse scratches crossing it.
It does not need to be a mirror. It needs to be FLAT and finished to the same grit you will finish the bevel at — because the edge can only be as fine as the coarser of its two surfaces. A mirror bevel meeting a 200-grit back gives a 200-grit edge.
That single fact explains most disappointing results, and it is why the progression rung treats both surfaces as one job rather than two.
Công cụ cần thiết:
Tấm kính nổiĐá mài daoKính lúp thợ kim hoànBộ giấy nhám nhiều loạiBlueprint liên quan
Các blueprint này chia sẻ kiến thức — kỹ thuật, vật liệu hoặc nguyên tắc
CC0 Phạm vi công cộng
Bản thiết kế này được phát hành theo CC0. Bạn tự do sao chép, sửa đổi, phân phối và sử dụng cho bất kỳ mục đích nào mà không cần xin phép.
Hỗ trợ nhà sáng tạo bằng cách mua sản phẩm qua bản thiết kế, nơi họ nhận Hoa hồng nhà sáng tạo do nhà bán hàng đặt, hoặc tạo phiên bản mới và kết nối trong bản thiết kế riêng để chia sẻ doanh thu.