NGHỆ THUẬT
LÀM ĐẸP VÀ SỨC KHỎE
THỦ CÔNG
VĂN HÓA VÀ LỊCH SỬ
GIẢI TRÍ
MÔI TRƯỜNG
THỰC PHẨM VÀ ĐỒ UỐNG
TƯƠNG LAI XANH
KỸ THUẬT NGƯỢC
KHOA HỌC
THỂ THAO
CÔNG NGHỆ
THIẾT BỊ ĐEO
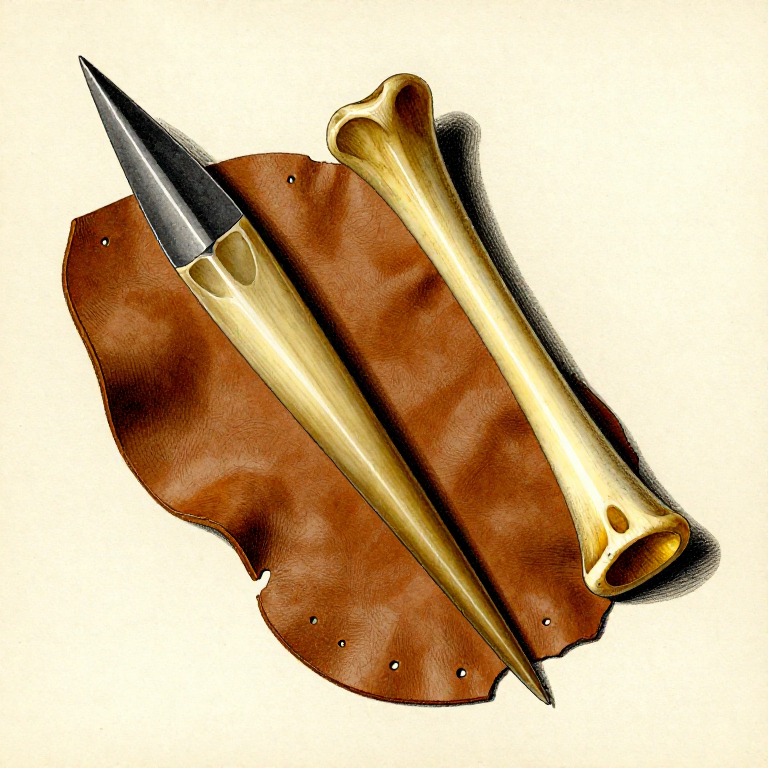
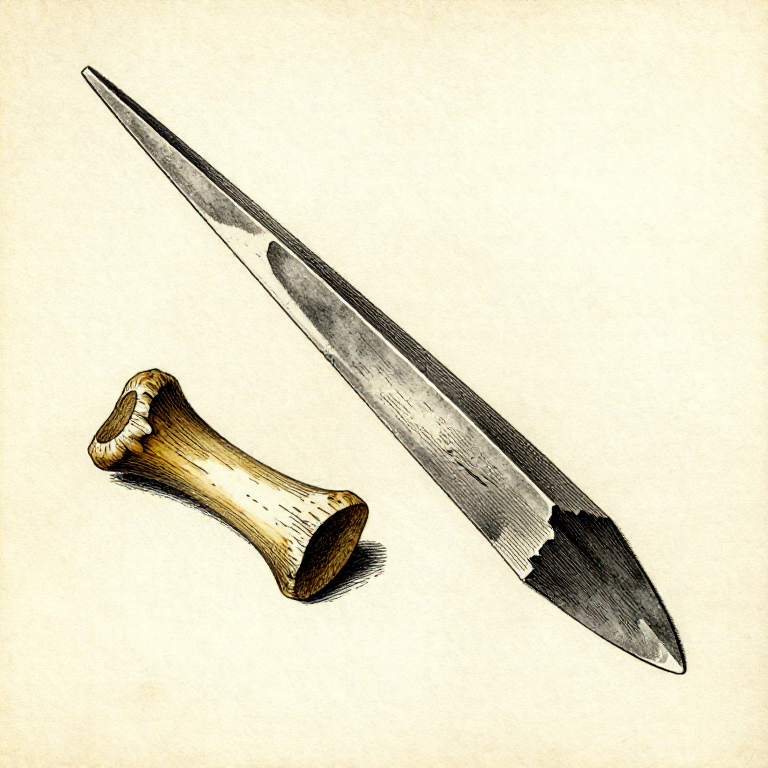
Making a Bone Awl — Piercing Tool for Sewing and Basketry
The bone awl is one of the oldest compound tools in the archaeological record, appearing alongside the earliest evidence of sewn clothing and woven containers roughly 60,000 years ago. An awl is a pointed tool used to pierce holes in leather, bark, plant fibers, and other materials before threading cordage or sinew through them. Bone is ideal for awls because it is hard enough to punch through tough materials, can be ground to a very fine point, is slightly flexible (preventing snap breakage under lateral stress), and is self-lubricating from the natural oils in its microstructure. This blueprint teaches how to select suitable bones, split them into blanks, grind the working point, and finish the handle — producing a tool that is essential for sewing hides into clothing, lacing snowshoes, stitching bark containers, and weaving baskets.
Cơ bản
45 minutes
Hướng dẫn
1
1
Select a Suitable Bone
Select a Suitable Bone
Choose a long bone from a medium to large mammal — deer metatarsals, elk cannon bones, or cattle shin bones are ideal. The bone must be fresh or recently cleaned (not weathered and brittle). Long bones have thick cortical walls and a natural hollow centre, making them easy to split into elongated blanks with strong cross-sections.
Vật liệu cho bước này:
 Animal Bones (cleaned, degreased)1 cái
2
2
Remove Remaining Tissue and Grease
Remove Remaining Tissue and Grease
Scrape off any remaining periosteum (the thin membrane covering the bone surface) using a stone scraper or the edge of a flint flake. If the bone still feels greasy, soak it in warm water for several hours to leach out fats. Degreased bone grinds more cleanly and accepts abrasion without clogging the grinding stone.
3
3
Score a Splitting Line Along the Bone
Score a Splitting Line Along the Bone
Using a sharp flint flake, score a deep groove along the length of the bone shaft where you want it to split. Apply firm, repeated strokes in the same channel until the groove cuts through at least half the cortical wall thickness. Score both sides of the bone along parallel lines to define the blank width — typically 8 to 12 mm wide.
Công cụ cần thiết:
 Flint Nodule
4
4
Split the Bone Along the Score Lines
Split the Bone Along the Score Lines
Place the scored bone on a flat stone anvil with the groove facing up. Position a pointed stone or antler wedge in the groove and strike it firmly with a hammerstone. The bone should split cleanly along the scored line. If it resists, deepen the score groove and try again. You need one splinter approximately 8 to 15 cm long and 8 to 12 mm wide.
Công cụ cần thiết:
 Hammerstone
 Flat Stone Slab
5
5
Rough-Shape the Blank
Rough-Shape the Blank
Examine the bone splinter and decide which end will become the point. Choose the end with the straightest grain and thickest cross-section. Using a flint flake, scrape away any jagged edges or protrusions along the sides of the blank. The blank should be roughly rectangular in cross-section at this stage, tapering slightly toward the point end.
6
6
Grind the Point on a Coarse Sandstone Slab
Grind the Point on a Coarse Sandstone Slab
Wet a flat sandstone slab with water to create an abrasive slurry. Hold the point end of the bone blank at a 15 to 20 degree angle against the stone and push forward with firm, even pressure. Rotate the blank slightly between strokes to grind all faces evenly, creating a symmetrical conical point. The coarse stone removes material quickly — switch to finer stone once the basic taper is established.
Công cụ cần thiết:
 Sandstone (Abrasive)
7
7
Refine the Point on a Fine-Grained Stone
Refine the Point on a Fine-Grained Stone
Switch to a finer abrasive stone (fine sandstone or a smooth river pebble) to polish the last 2 cm of the point. The tip should be needle-sharp — it must pierce leather without tearing. Rotate the awl continuously while grinding to maintain a perfectly symmetrical point. Test sharpness by pressing the tip lightly against your thumbnail — it should catch immediately without sliding.
Công cụ cần thiết:
 Sharpening Stone
8
8
Shape the Handle End for Grip
Shape the Handle End for Grip
The handle end (the blunt end opposite the point) should be wide enough to push against your palm without pain. Round off any sharp corners by light abrasion on the sandstone slab. Some prehistoric awls show deliberate widening of the handle end — you can leave the natural bone flare or epiphysis as a palm rest if your blank includes it.
9
9
Smooth the Entire Shaft
Smooth the Entire Shaft
Run the full length of the awl shaft over the fine abrasive stone, removing any remaining ridges, score marks, or rough patches from the splitting process. A smooth shaft slides through pierced holes without snagging the material. The bone surface should feel uniformly smooth to the touch, with no catches when you run a fingernail along it.
10
10
Polish with Animal Fat or Beeswax
Polish with Animal Fat or Beeswax
Rub a small amount of rendered animal fat or beeswax into the entire bone surface. This seals the porous bone structure, reduces friction when the awl passes through leather, and prevents the bone from drying out and becoming brittle over time. Buff with a scrap of soft leather until the surface develops a slight sheen.
11
11
Test the Awl on Scrap Leather
Test the Awl on Scrap Leather
Place a piece of scrap leather on a wooden surface. Push the awl point through the leather with steady pressure while twisting slightly. The point should pierce cleanly, creating a round hole without tearing the surrounding material. If the hole tears, the point is too blunt — return to the fine grinding stone. If the awl bends, the blank is too thin — start with a thicker bone.
12
12
Maintain the Point Between Uses
Maintain the Point Between Uses
After each use session, wipe the awl clean of debris and rub a thin film of fat over the point. Store the awl point-down in a sand-filled container or wrapped in soft leather to protect the tip. When the point dulls after extended use, resharpen it on a fine-grained stone — bone resharpens quickly. A well-maintained bone awl lasts for years of regular use.
Vật liệu
1- Tạm thời
Công cụ yêu cầu
5- Tạm thời
- Tạm thời
- Tạm thời
- Tạm thời
- Tạm thời
Vật liệu bản thiết kế liên kết
Blueprint liên quan
Các blueprint này chia sẻ kiến thức — kỹ thuật, vật liệu hoặc nguyên tắc
Related blueprints
Other builds that share materials, tools, or techniques with this one.
Making a Hammerstone — The First Tool in Human Historystoneworking
Making a Stone Scraper for Hide Working — Conchoidal Flake Toolstoneworking
Carving a Stone Bowl by Pecking and Grinding — Soapstone Vesselstoneworking
Making a Stone Burin — The Engraving Chisel That Enabled Bone and Antler Workstoneworking
Making a Stone Hoe — The First Agricultural Toolstoneworking

Making a Stone Chisel — Splitting and Grooving Toolstoneworking
CC0 Phạm vi công cộng
Bản thiết kế này được phát hành theo CC0. Bạn tự do sao chép, sửa đổi, phân phối và sử dụng cho bất kỳ mục đích nào mà không cần xin phép.
Hỗ trợ nhà sáng tạo bằng cách mua sản phẩm qua bản thiết kế, nơi họ nhận Hoa hồng nhà sáng tạo do nhà bán hàng đặt, hoặc tạo phiên bản mới và kết nối trong bản thiết kế riêng để chia sẻ doanh thu.