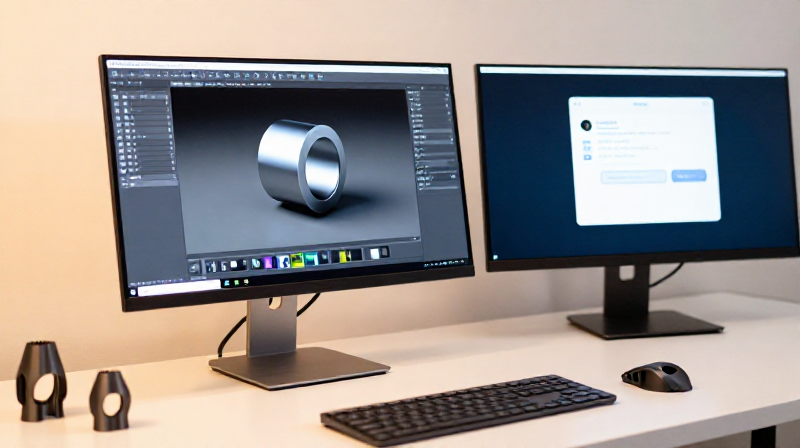
From Blender to G-code on Youblob — Upload .blend, Generate Print-Ready Instructions
Youblob lets you skip the traditional slicer workflow entirely. Instead of exporting STL files and manually configuring PrusaSlicer or Cura, you upload your .blend file directly when publishing a blueprint. Every viewer who opens your blueprint can then generate G-code matched to their own printer — all inside the browser, with zero software to install.
The pipeline works entirely client-side: Youblob parses the .blend file, extracts the 3D geometry, and slices it using the built-in Kiri:Moto engine. The viewer selects their printer (from their personal workshop, a makerspace they belong to, or the global printer catalog), configures supports and infill, and downloads print-ready G-code. Once generated, the G-code is cached — the next maker with the same printer gets it instantly.
Instruções
Open the .blend file in Blender
Open the .blend file in Blender
Open your .blend model file in Blender (File → Open, or double-click the file). Verify the model looks correct in the viewport — check dimensions by selecting the object and pressing N to open the sidebar, then looking at the Dimensions fields under the Item tab. For the hammer head example, the dimensions should read approximately 126 × 43 × 38 mm.
If the model uses modifiers that have not been applied (visible in the Properties panel → Modifier tab), apply them now: select the object, then for each modifier click the dropdown arrow → Apply. The STL export needs the final mesh geometry, not unapplied modifier stacks.

Materiais para este passo:
 Blender (Software)1 peça
Export as STL from Blender
Export as STL from Blender
Export the model: File → Export → STL (.stl). In the export dialog, check these settings:
• Selection Only: Enable this if your scene has cameras, lights, or other objects you do not want in the STL
• Scale: Leave at 1.0 (Blender's internal unit is meters; PrusaSlicer reads STL coordinates as millimeters, and the Blender exporter handles the conversion automatically)
• Apply Modifiers: Enable (exports the final mesh, not the base geometry)
Click Export STL. The resulting file contains only triangle mesh data — no colors, materials, or scene information. For the hammer head, the STL is approximately 1.2 MB (compared to 536 KB for the .blend source).
Install PrusaSlicer
Install PrusaSlicer
Download PrusaSlicer from github.com/prusa3d/PrusaSlicer (releases page). It is free, open-source (AGPL license), and runs on Windows, macOS, and Linux. Despite the Prusa name, it supports printers from every manufacturer — Bambu Lab, Creality, Voron, Elegoo, and generic profiles.
On first launch, the Configuration Wizard guides you through selecting your printer model. If your exact printer is not listed, choose a generic FDM profile and adjust the bed size and nozzle diameter manually. PrusaSlicer stores profiles in a local configuration directory — you can import, export, and share profiles as .ini files.
Materiais para este passo:
 PrusaSlicer (Software)1 peça
Import the STL into PrusaSlicer
Import the STL into PrusaSlicer
Open PrusaSlicer and drag the STL file onto the build plate, or use File → Import → Import STL. The model appears on the virtual build plate. PrusaSlicer auto-detects the dimensions and shows them in the right panel.
Check the orientation: the model should sit flat on the build plate with maximum contact area for stability. For the hammer head, lay it on one of the flat rune-engraved faces (the Y face) — this gives a large, stable base. If needed, right-click the model → Lay on Face and click the face you want as the bottom.
If the model needs to be scaled (for example, printing a pattern at 102% for sand casting shrinkage allowance), use the Scale tool (S key) and enter the percentage uniformly.
Select your printer profile and print settings
Select your printer profile and print settings
In PrusaSlicer, configure three dropdown menus in the right panel:
Printer: Select your specific printer model (e.g., Prusa MK4, Bambu Lab P1S, Creality Ender 3 V3). This sets the bed size, nozzle diameter, and firmware flavor.
Print Settings: Choose a quality preset — 0.20 mm layer height for normal quality (faster) or 0.10 mm for fine detail (slower, but captures the rune engravings more crisply). For functional parts like a casting pattern, 0.15 mm is a good balance.
Filament: Select your filament type (PLA, PETG, ABS) and brand if available. This sets the extrusion temperature, bed temperature, and cooling fan speed. For casting patterns, PLA is sufficient — the pattern will be used at room temperature.
Materiais para este passo:
 3D Printing Filament (PLA)0.1 kg
Ferramentas necessárias:
 FDM 3D Printer
Configure infill and supports
Configure infill and supports
Click 'Print Settings' in the top menu bar to access detailed settings:
Infill: For a casting pattern (not a structural part), 15-20% infill is sufficient — the pattern only needs to hold its shape during sand ramming. For structural prints, use 40-60%. Infill pattern: 'Gyroid' distributes strength evenly; 'Grid' is faster.
Supports: Check if the model has overhangs greater than 45°. The hammer head's eye hole is a through-hole and needs support material inside it. Enable 'Support on build plate only' if the only overhangs touch the base, or 'Everywhere' if there are mid-air overhangs. PrusaSlicer's auto-detection (Paint-on supports tool) handles complex geometries.
Brim: Enable a brim (3-5 mm) for better bed adhesion on the first layer, especially for long, narrow parts like the hammer head.
Slice the model and preview the G-code
Slice the model and preview the G-code
Click 'Slice Now' (bottom right). PrusaSlicer calculates every toolpath, layer by layer, and generates the G-code. This takes a few seconds for small models, up to a minute for complex ones. The status bar shows estimated print time and filament usage.
Switch to the 'Preview' tab to see a layer-by-layer visualization. Drag the layer slider on the right to scrub through each layer. Check for:
• Clean first layer with good coverage (no gaps)
• Support structures only where needed (not blocking the rune detail)
• Consistent infill pattern throughout
• Smooth outer perimeters (no blobs or gaps in the wall lines)
For the hammer head at 0.15 mm layer height with 20% infill: approximately 3 hours print time, 45 g of PLA filament.
Export the G-code file
Export the G-code file
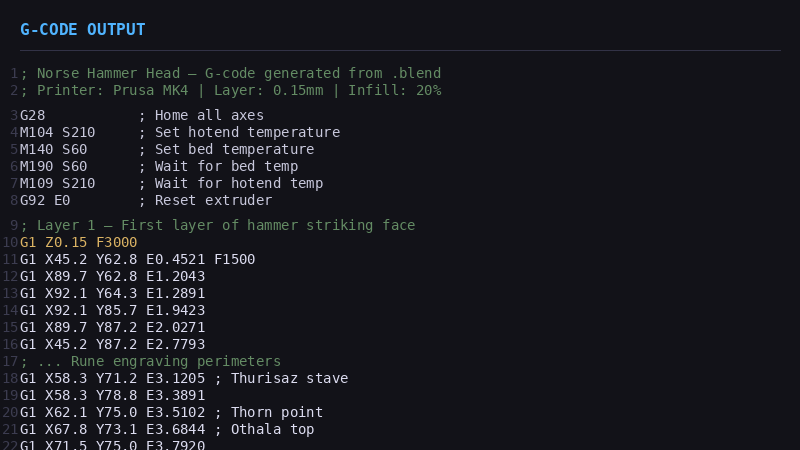
Click 'Export G-code' (bottom right after slicing). Save the .gcode file to your computer. The file contains every movement instruction for your printer: nozzle position (X, Y, Z), extrusion amount (E), travel speed (F), temperature commands (M104/M109 for hotend, M140/M190 for bed), and fan control (M106/M107).
The G-code file is specific to your printer and settings — it cannot be used on a different printer model without re-slicing. For the hammer head, the G-code file is typically 5-15 MB depending on layer height and complexity.
Transfer G-code to your printer and print
Transfer G-code to your printer and print
Transfer the .gcode file to your printer:
• SD card / USB drive: Copy the file to the card, insert into printer, select from the printer's menu
• USB cable: Use a print host (OctoPrint, Mainsail, Fluidd) to upload and start the print remotely
• WiFi / LAN: Many modern printers (Bambu Lab, Prusa with PrusaLink) accept direct uploads from the slicer — click 'Send to Printer' instead of 'Export G-code'
Before printing, ensure the bed is clean and level, the filament is loaded, and the nozzle is clear. Start the print and monitor the first few layers for adhesion. The printer follows the G-code instructions exactly — every movement was computed by the slicer from the 3D model you created with Claude and Blender.
Ferramentas necessárias:
FDM 3D Printer SD Card
Automate with PrusaSlicer CLI (advanced)
Automate with PrusaSlicer CLI (advanced)
PrusaSlicer includes a command-line interface for automated slicing — no GUI needed. This is how server-side pipelines (like Youblob's blueprint system) generate G-code on demand:
prusa-slicer --load printer-profile.ini --load print-settings.ini --load filament.ini --export-gcode model.stl
The CLI accepts the same profiles used in the GUI. You can chain this with Blender's headless export to create a fully automated pipeline:
1. Blender API receives the .blend file
2. Blender exports .stl to a temporary directory
3. PrusaSlicer CLI slices the .stl with the maker's printer profile
4. The server returns the .gcode file for download
The entire chain — from .blend source to print-ready G-code — runs server-side in seconds with no human interaction. This is the foundation of Youblob's 'Print This Blueprint' feature.
Materiais
3- 1 peçaReferência
- 1 peçaReferência
- Referência
Ferramentas necessárias
2- Referência
- Referência
Materiais de Blueprints conectados
Blueprints relacionados
Estes blueprints compartilham conhecimento — técnicas, materiais ou princípios
Related blueprints
Other builds that share materials, tools, or techniques with this one.


CC0 Domínio Público
Este blueprint é liberado sob CC0. Você é livre para copiar, modificar, distribuir e usar este trabalho para qualquer finalidade, sem pedir permissão.
Apoie o Maker comprando produtos através do Blueprint, onde ele ganha uma Comissão Maker definida pelos vendedores, ou crie uma nova versão deste Blueprint e inclua-o como conexão no seu próprio Blueprint para compartilhar receita.