Colaboração
ARTE
BELEZA E BEM-ESTAR
ARTESANATO
CULTURA E HISTÓRIA
ENTRETENIMENTO
MEIO AMBIENTE
COMIDA E BEBIDAS
ENGENHARIA REVERSA
CIÊNCIAS
ESPORTES
TECNOLOGIA
TECNOLOGIA VESTÍVEL
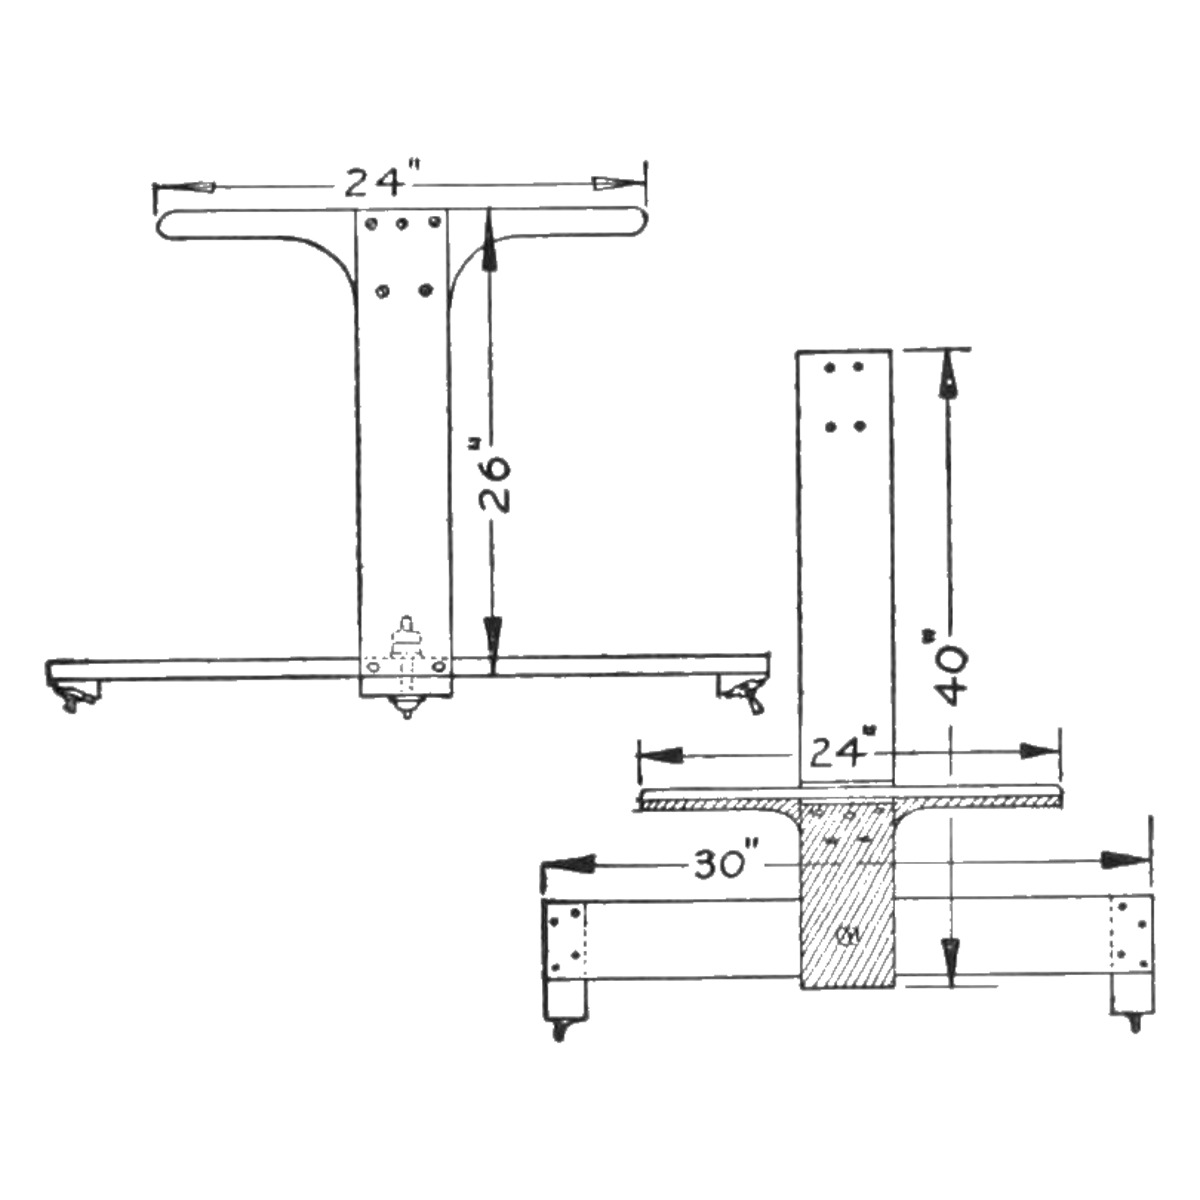


Ice Glider: Three-Skate Push Scooter With a Steering Crosspiece and Spiked Pusher (Boy Mechanic, 1915)
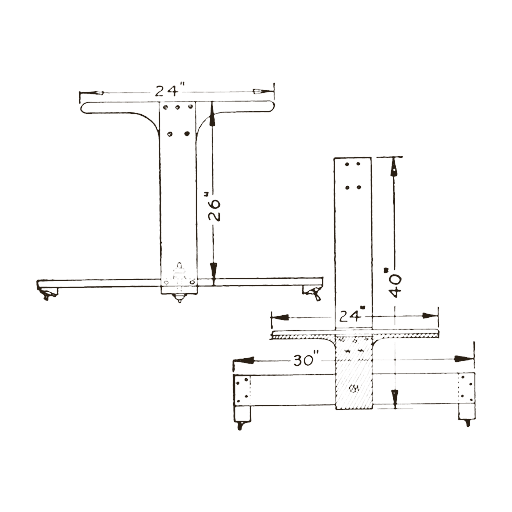
Mildred E. Thomas's ice glider from The Boy Mechanic, Book 2 (1915), "similar to an ice yacht, only a great deal smaller": a 40 in rear board on one skate, bolted to a 30 in front crosspiece on two skates tilted about 30 deg, with a 26 in upright and a handle to steer. It is pushed along with a spiked block strapped to one shoe.
Iniciante
About 1 day
Instruções
1
1
Her sizes, and the skate angle
Her sizes, and the skate angle
A carregar o notebook Jupyter…
2
2
Read The Boy Mechanic, Book 2
Read The Boy Mechanic, Book 2
"The enthusiastic pushmobilist need not put aside his hobby during the winter, as an amusement device for use on ice, which will surpass the very best pushmobile, can be easily made as shown in the illustration."
3
3
Make the front crosspiece
Make the front crosspiece
Cut the front crosspiece 30 in long and about 8 in wide, with its front and back edges cut on a slant. Fasten a tapering block to each end so that the skates on them stand at an angle of about 30 deg, edges outward, and fix a skate to each block with screws through holes drilled in the top plates (or with straps).
Materiais para este passo:
 Tábua de pinho1 peça
 Tábua de madeira de lei1 peça
 Patim de gelo2 peças
 Parafusos para madeira1 peça
Ferramentas necessárias:
 Serrote
 Plaina manual
 Transferidor
 Berbequim de mão
 Lápis
 Fita métrica
4
4
Build the upright and handle
Build the upright and handle
In the centre of the crosspiece build an upright 26 in high: nail a piece to its front and back edges so that, on the slanted edges, they stand sloping toward the rear. Fasten a handle 24 in long between the two uprights at the top.
Materiais para este passo:
Tábua de pinho1 peçaTábua de madeira de lei1 peça Pregos1 peçaParafusos para madeira1 peça
Ferramentas necessárias:
Serrote MarteloBerbequim de mão
5
5
Make the rear board and join it
Make the rear board and join it
Cut the rear board 8 in wide and 40 in long and fasten the third skate in a perfectly straight position on its rear end. Bore a hole in the front end of the board and bolt it to the centre of the front crosspiece, so the crosspiece turns to guide the glider.
Materiais para este passo:
Tábua de pinho1 peçaPatim de gelo1 peça Parafuso de carroçaria1 peça
 Anilha plana2 peçasParafusos para madeira1 peça
Ferramentas necessárias:
Serrote Arco de pua e brocaBerbequim de mão
6
6
Make the pusher
Make the pusher
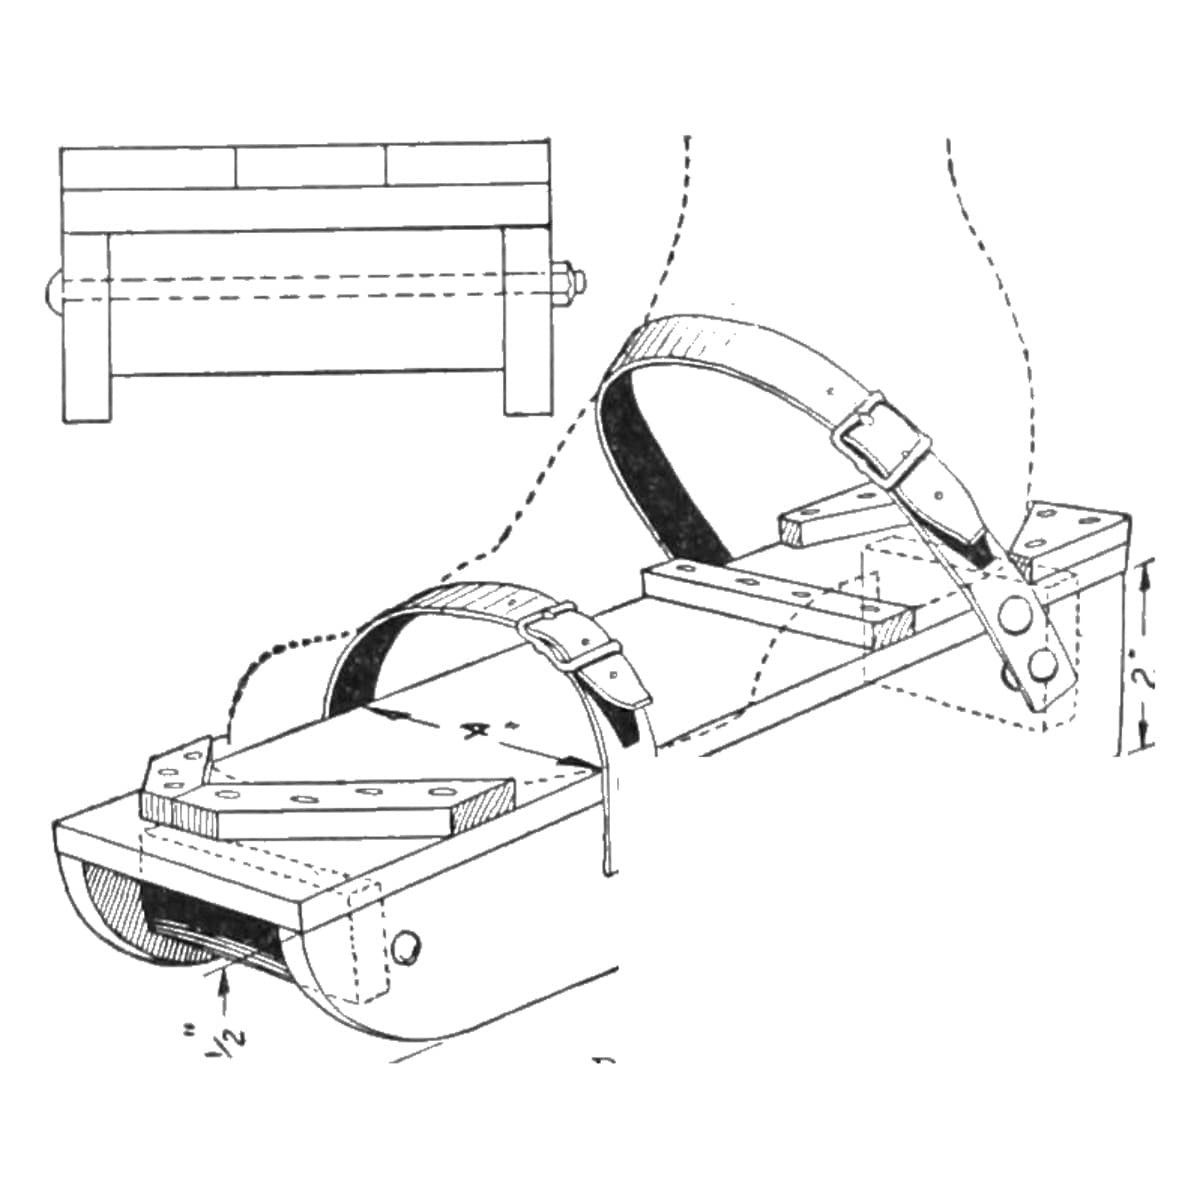
Drive nails through a block of wood so their points project on the underside, and strap the block to one shoe. Or use sole leather instead of the block, with small slots cut in the sides for the straps and nails driven through so the points project. Push the glider along like a pushmobile.
Materiais para este passo:
Tábua de madeira de lei1 peçaPregos1 peça Correia de couro1 peça
Ferramentas necessárias:
SerroteMartelo7
7
Troubleshooting
Troubleshooting
Ice glider troubleshooting.
Flow
Loading...
8
8
History and honest limits
History and honest limits
From "An Ice Glider" by Mildred E. Thomas, in **The Boy Mechanic, Book 2**, Popular Mechanics, 1915 (Project Gutenberg 44585; checked on the archive.org scan boymechanicbook200chic2, pp. 31-32). She gives no board thicknesses, bolt size or block taper, only the 30 deg skate angle. The tools and metric figures are ours.
Materiais
8- 1 peçaReferência
- 1 peçaReferência
- 2 peçasReferência
- 3 peçasReferência
- 2 peçasReferência
- 1 peçaReferência
- 2 peçasReferência
- 1 peçaReferência
Ferramentas necessárias
8- Referência
- Referência
- Referência
- Referência
- 1 vendor sell this, none ship to you yetReferência
- 1 vendor sell this, none ship to you yetReferência
- Referência
- Referência
Este projeto faz
Blueprints relacionados
Estes blueprints compartilham conhecimento — técnicas, materiais ou princípios
CC0 Domínio Público
Este blueprint é liberado sob CC0. Você é livre para copiar, modificar, distribuir e usar este trabalho para qualquer finalidade, sem pedir permissão.
Apoie o Maker comprando produtos através do Blueprint, onde ele ganha uma Comissão Maker definida pelos vendedores, ou crie uma nova versão deste Blueprint e inclua-o como conexão no seu próprio Blueprint para compartilhar receita.