Colaboração
ARTE
BELEZA E BEM-ESTAR
ARTESANATO
CULTURA E HISTÓRIA
ENTRETENIMENTO
MEIO AMBIENTE
COMIDA E BEBIDAS
ENGENHARIA REVERSA
CIÊNCIAS
ESPORTES
TECNOLOGIA
TECNOLOGIA VESTÍVEL
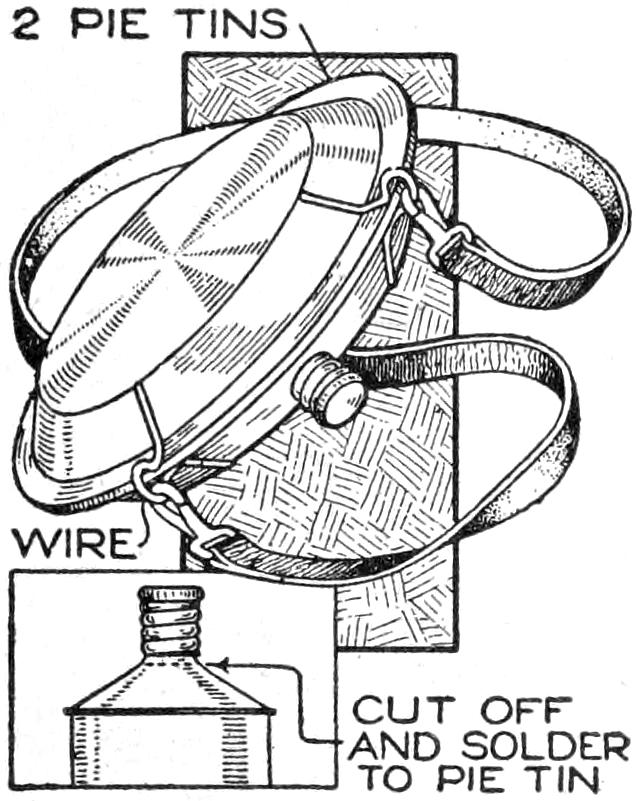


Canteen From Two Pie Plates: Rims Soldered Together, a Screw-Cap Neck in the Edge (Boy Mechanic, 1919)
A canteen "for the camper or hiker", sent to The Boy Mechanic (1919) by J. R. Townsend of Itasca, Texas: two nickel-plated pie plates soldered rim to rim, the screw-capped neck of a metal-polish can soldered over an opening in the edge, and two wire loops for the snap hooks of a shoulder strap.
The book gives no sizes: the plates set the size.
Iniciante
About 2 hours
Instruções
1
1
Read The Boy Mechanic
Read The Boy Mechanic
"Two good-quality pie plates were soldered at their edges to form a water-tight container." (J. R. Townsend, Itasca, Texas.)
2
2
Solder the plates together
Solder the plates together
Take two good-quality nickel-plated pie plates of the same size. Clean the rims, set them face to face, and solder them together all round the edge so the joint is water-tight. Use lead-free solder: this holds drinking water (our choice; the book only says solder).
Materiais para este passo:
 Tarteira2 peças
 Solda de canalização sem chumbo1 peça
 Fluxo1 peça
Ferramentas necessárias:
 Ferro de solda elétrico
 Lima para metal
3
3
Cut the neck off the can
Cut the neck off the can
Take a small metal-polish can with a screw cap. As the book's drawing shows, cut off its sloping top with the threaded neck, and trim the cut edge.
Materiais para este passo:
 Lata1 peça
Ferramentas necessárias:
 Tesoura de chapa reforçadaLima para metal
4
4
Cut the opening and fit the neck
Cut the opening and fit the neck
Cut an opening in the edge of the canteen to suit the neck. Fit the neck carefully over it and solder it all round.
Materiais para este passo:
Solda de canalização sem chumbo1 peçaFluxo1 peçaFerramentas necessárias:
 Berbequim de mãoLima para metalFerro de solda elétrico
5
5
Solder on the strap loops
Solder on the strap loops
Bend two short pieces of wire into loops and solder one at each side of the screw cap, as loops for the snap hooks of the shoulder strap.
Materiais para este passo:
 Arame de ferro1 peçaSolda de canalização sem chumbo1 peçaFluxo1 peça
Ferramentas necessárias:
 Alicate de bico chatoFerro de solda elétrico
6
6
Fit the strap and test
Fit the strap and test
Put a snap hook on each end of a shoulder strap and hook them into the loops. Fill the canteen with water, screw on the cap and check every joint for leaks (our test), then rinse it before use.
Materiais para este passo:
 Correia de couro1 peça
 Mosquetão2 peças
Ferramentas necessárias:
 Água doce
7
7
Troubleshooting
Troubleshooting
Canteen troubleshooting.
Flow
Loading...
8
8
History and honest limits
History and honest limits
From **The Boy Mechanic, Book 3**, edited by H. H. Windsor, Popular Mechanics, Chicago, 1919 (Project Gutenberg 71856), "How to Make a Canteen", sent in by J. R. Townsend of Itasca, Texas. The book gives no sizes and names no tools; the lead-free solder, the tools, the strap material and the leak test are ours.
Materiais
7- 2 peçasReferência
- Referência
- 3 peçasReferência
- 1 peçaReferência
- 1 peçaReferência
- 1 peçaReferência
- 2 peçasReferência
Este projeto faz

Blueprints relacionados
Estes blueprints compartilham conhecimento — técnicas, materiais ou princípios


CC0 Domínio Público
Este blueprint é liberado sob CC0. Você é livre para copiar, modificar, distribuir e usar este trabalho para qualquer finalidade, sem pedir permissão.
Apoie o Maker comprando produtos através do Blueprint, onde ele ganha uma Comissão Maker definida pelos vendedores, ou crie uma nova versão deste Blueprint e inclua-o como conexão no seu próprio Blueprint para compartilhar receita.