Colaboração
ARTE
BELEZA E BEM-ESTAR
ARTESANATO
CULTURA E HISTÓRIA
ENTRETENIMENTO
MEIO AMBIENTE
COMIDA E BEBIDAS
ENGENHARIA REVERSA
CIÊNCIAS
ESPORTES
TECNOLOGIA
TECNOLOGIA VESTÍVEL
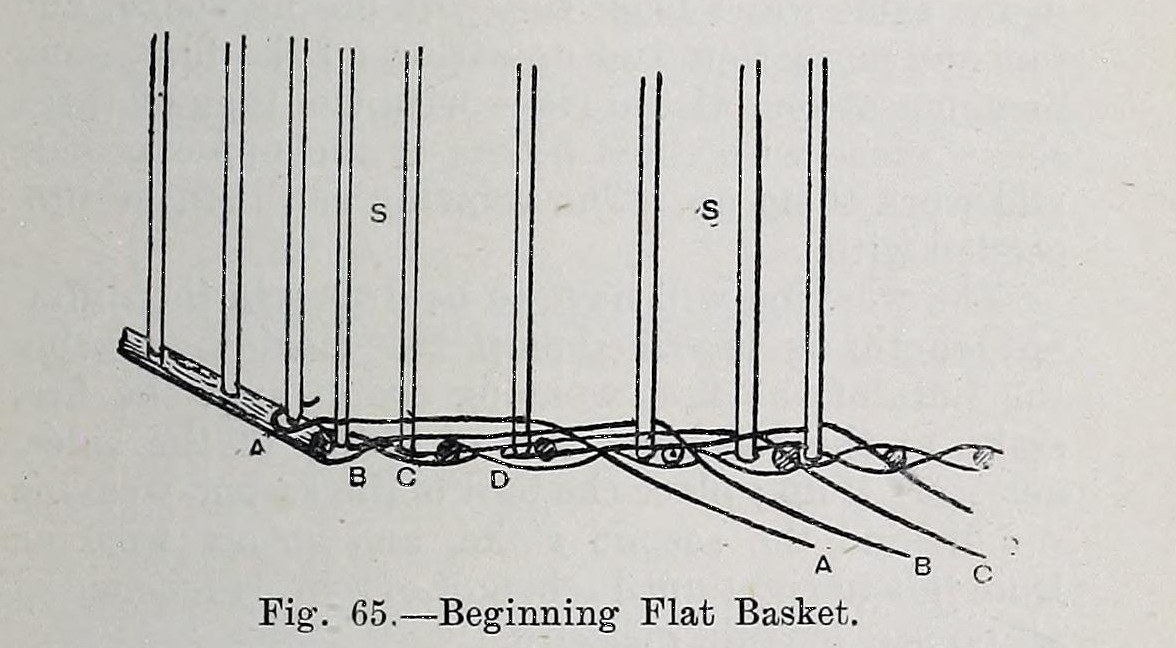


Flat Harvesting Basket: the Willow 3-Peck Fruit Flat (Hasluck, 1903)
The basket-maker's 'flat' for the fruit season: an oblong willow basket with a woven stick bottom about 19 1/2 in wide, straight sides 8 in high, a rope handle at each end and its own flat lid on a bent bow.
Rough brown osiers do for the bottom; eight white ones start the sides.
Source: Paul N. Hasluck, Basket Work of All Kinds (1903), pp. 64-69. Picture: Fig. 65 of the book.
Avançado
Unknown
Instruções
1
1
Soak the osiers and weave the bottom
Soak the osiers and weave the bottom
Soak the osiers until pliable. Cut eight sticks about 17 in long; set the two thickest in the screw-block 19 1/2 in apart outside, the rest between, and weave the bottom with the roughest osiers as for Hasluck's square basket. Take it out and trim it with the picking knife.
Materiais para este passo:
 Varas de vime mais grossas8 17 in
 Vime de salgueiro1 weavers
Ferramentas necessárias:
 Água
 Tesoura de podar de uma mão
 Tábua de madeira plana
2
2
Stake up
Stake up
Drive nine stakes into the weaving beside the sticks along each side, and seven through the sticks at each end after opening holes with the bodkin, the eight thickest at the corners. Prick them up and gather them in a hoop.
Materiais para este passo:
 Estacas de salgueiro32 9 per side, 7 per end
Ferramentas necessárias:
 Passador de fitasTesoura de podar de uma mão
3
3
Upset the sides
Upset the sides
Point eight white osiers. With no foot rim, start by driving four in beside the first stakes at the left of one 19 1/2 in side. Sitting high with the work between your knees, upset with four rods pulled tight into the bend of each stake, each in front of three stakes, behind the fourth and out (Fig. 65). Start the other four at the opposite corner, finish the tops round the corners, then add one more round with three rods.
Materiais para este passo:
Vime de salgueiro8 white, upsettingFerramentas necessárias:
Tesoura de podar de uma mãoPassador de fitas Martelo
4
4
Weave and add handles
Weave and add handles
Weave with rods in their lengths, each butt behind the next stake, left to right, until the sides are 8 in high all round outside. For each end handle push a stiff rod down beside the third stake, twist it rope-like, push its top through about 1 1/2 in below the top by the fifth stake, leave a bow, and twist it over the bow three times (Fig. 66).
Materiais para este passo:
Vime de salgueiro1 weavingVime de salgueiro2 handlesFerramentas necessárias:
MarteloPassador de fitas5
5
Pair off and border
Pair off and border
Pair off a round with two rods from the back. Make the border by laying down stakes and working them round the corners (Fig. 67), finish by cramming, and trim inside and out.
Materiais para este passo:
Vime de salgueiro2 pairingFerramentas necessárias:
 TesourãoTesoura de podar de uma mão
6
6
Make the lid
Make the lid
Notch a bow stick at the corners, bend it to the basket's shape and tie a strainer across to hold the width. Bind in two thick split sticks a little longer than the flat, flat side inward, on four scallom rods lapped round the bow (Figs. 68-69), and weave the lid between them.
Materiais para este passo:
Varas de vime mais grossas3 bow, two lid sticksVime de salgueiro1 scalloms, weaversFerramentas necessárias:
Tesoura de podar de uma mãoMarteloMateriais
3- 3 bow, two lid sticksReferência
- 1 scalloms, weaversReferência
- 32 9 per side, 7 per endReferência
Materiais de Blueprints conectados

Este projeto faz

CC0 Domínio Público
Este blueprint é liberado sob CC0. Você é livre para copiar, modificar, distribuir e usar este trabalho para qualquer finalidade, sem pedir permissão.
Apoie o Maker comprando produtos através do Blueprint, onde ele ganha uma Comissão Maker definida pelos vendedores, ou crie uma nova versão deste Blueprint e inclua-o como conexão no seu próprio Blueprint para compartilhar receita.