ARTE
BELEZA E BEM-ESTAR
ARTESANATO
CULTURA E HISTÓRIA
ENTRETENIMENTO
MEIO AMBIENTE
COMIDA E BEBIDAS
ENGENHARIA REVERSA
CIÊNCIAS
ESPORTES
TECNOLOGIA
TECNOLOGIA VESTÍVEL
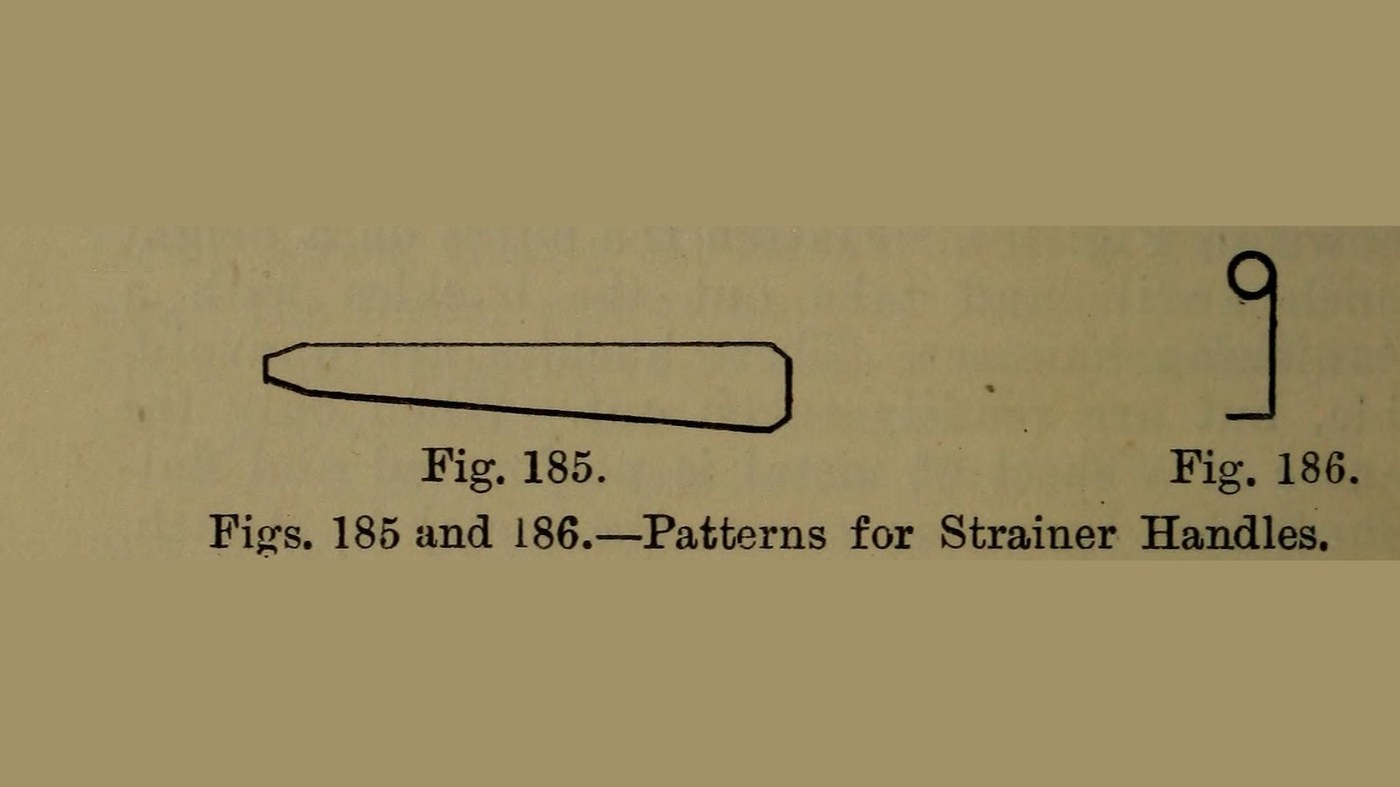


Handle: a Wired Tinplate Lifting Handle, Riveted and Soldered On (Hasluck, 1907)
A tinsmith's lifting handle is a strip of tinplate cut to a tapering pattern, stiffened with wire along its edges and bent so its narrow end curls into a ring, then riveted and soldered to the vessel.
Paul N. Hasluck's Tinplate Work (1907) gives it for the strainer of a fish kettle (Figs. 185-186). He gives no sizes for the pattern or the wire; those are unknown here.
Source: P. N. Hasluck, Tinplate Work (1907), pp. 89-90. Picture: his Figs. 185 and 186.
Iniciante
An hour for a pair
Instruções
1
1
Read Hasluck
Read Hasluck
"Having cut two to this pattern, wire the edges, and bend to the shape of Fig. 186, letting the narrow part of the pattern form the ring; then rivet and solder them to the strainer."
2
2
Cut to the pattern
Cut to the pattern
Mark out the handle on tinplate to the pattern of Fig. 185, a long strip tapering to a narrow end, and cut it out with snips; cut two for a pair. Hasluck gives no sizes (unknown).
Materiais para este passo:
 Chapa de folha de flandres1 two strips
Ferramentas necessárias:
 Ponta de traçar
 Tesoura de chapa
 Dimensões desconhecidas
3
3
Wire the edges
Wire the edges
Wire the edges of each strip: The gauge for the handles is not given; the strainer they are made for is wired with No. 10 B.W.G. tinned wire.
Materiais para este passo:
 Arame de ferro1 edges
Ferramentas necessárias:
 Maço de madeira
 Estaca
4
4
Bend the ring
Bend the ring
Bend the strip to the shape of Fig. 186, curling the narrow end of the pattern round into the ring you lift by.
Ferramentas necessárias:
Maço de madeiraEstaca5
5
Rivet and solder on
Rivet and solder on
Punch the rivet holes, rivet the flat end of the handle to the vessel, and solder it.
Materiais para este passo:
 Rebites de ferro1 per handle
 Solda de estanho-chumbo1 small amount
Ferramentas necessárias:
 Puncionador de furos para chapa
 Martelo de rebitar
 Ferro de solda elétrico
 Fluxo
6
6
History and honest limits
History and honest limits
In Hasluck this handle lifts the perforated strainer out of a fish kettle; his colander has a pair of bow handles riveted on opposite each other.
He gives the pattern by figure only, with no sizes, and does not say which wire goes in the handle edges; the tools are ours.
Materiais
4- 1 two stripsReferência
- 1 edgesReferência
- 1 per handleReferência
- 1 small amountReferência
Ferramentas necessárias
9- Referência
- Referência
- Referência
- Referência
- Referência
- Referência
- Referência
- Referência
- Referência
Este projeto faz

Blueprints relacionados
Estes blueprints compartilham conhecimento — técnicas, materiais ou princípios

CC0 Domínio Público
Este blueprint é liberado sob CC0. Você é livre para copiar, modificar, distribuir e usar este trabalho para qualquer finalidade, sem pedir permissão.
Apoie o Maker comprando produtos através do Blueprint, onde ele ganha uma Comissão Maker definida pelos vendedores, ou crie uma nova versão deste Blueprint e inclua-o como conexão no seu próprio Blueprint para compartilhar receita.