Colaboração
ARTE
BELEZA E BEM-ESTAR
ARTESANATO
CULTURA E HISTÓRIA
ENTRETENIMENTO
MEIO AMBIENTE
COMIDA E BEBIDAS
ENGENHARIA REVERSA
CIÊNCIAS
ESPORTES
TECNOLOGIA
TECNOLOGIA VESTÍVEL
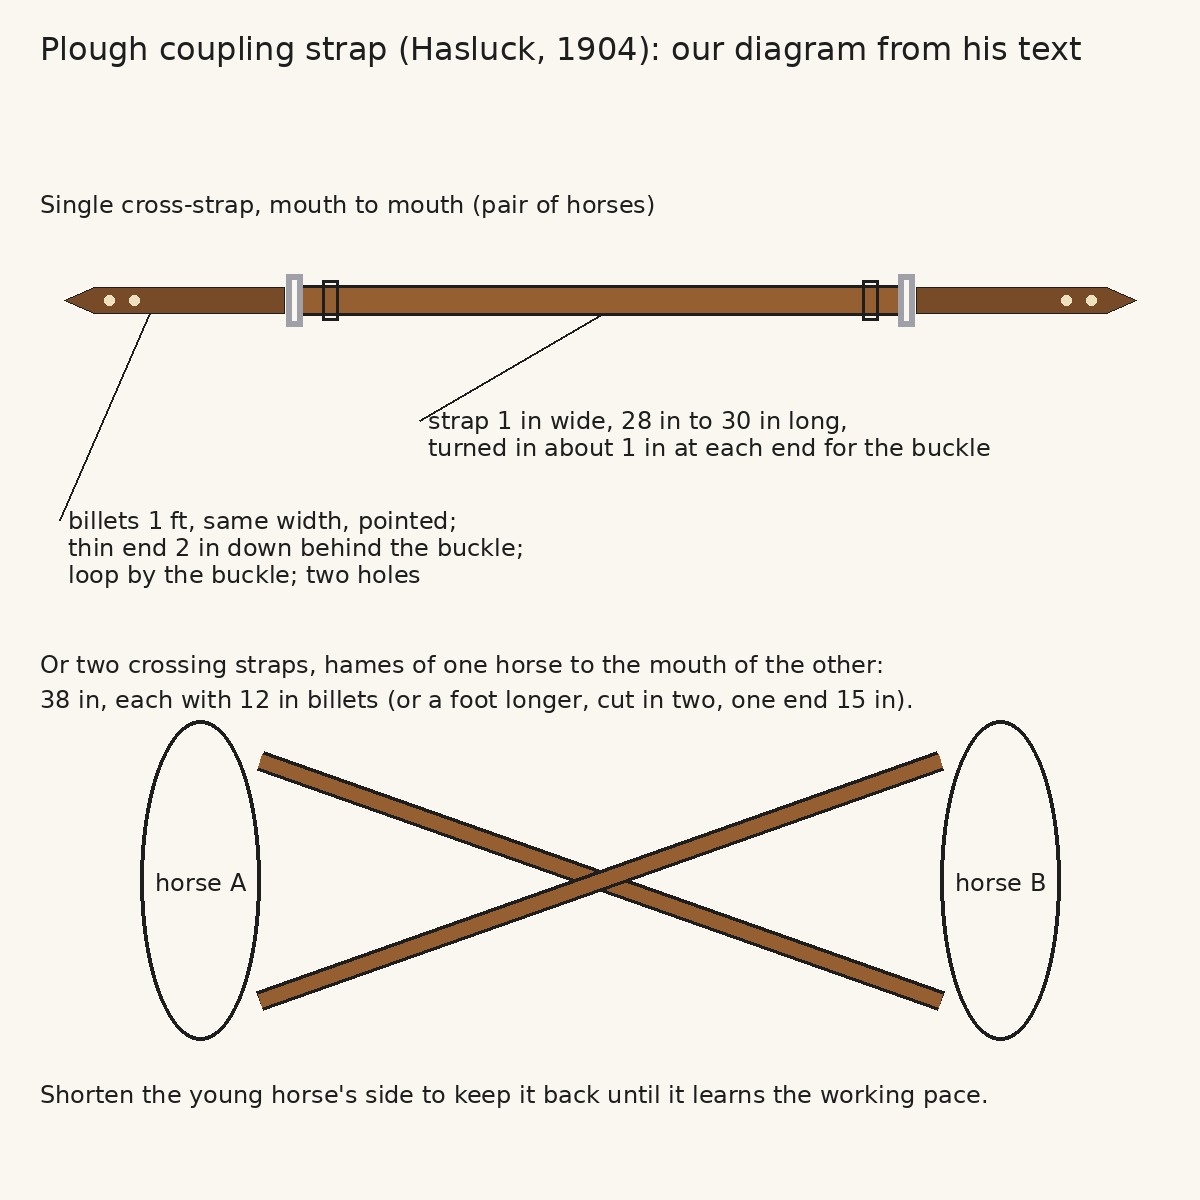


Plough Coupling Strap: Cross-Strap With Buckled Billets for a Pair of Horses (Hasluck, Harness Making, 1904)
When two horses plough side by side, a coupling strap ties them together so they keep level. This is the coupling from Paul N. Hasluck's Harness Making (1904): a 1 in strap 28 in to 30 in long with a buckled billet at each end, buckled from the mouth of one horse to the other. Every size is his; the picture is our diagram.
Iniciante
About 2 hours
Instruções
1
1
His sizes in centimetres
His sizes in centimetres
A carregar o notebook Jupyter…
2
2
Read Harness Making, ch. IX
Read Harness Making, ch. IX
"Couplings are also a necessary part of plough gear. In some localities only cross-straps are employed from mouth to mouth when ploughing in pairs."
3
3
Cut the strap
Cut the strap
Cut the strap 1 in wide and 28 in to 30 in long. Turn it in about 1 in at each end, make a hole for the buckle, and shave the points.
Materiais para este passo:
 Couro para arreios1 peça
Ferramentas necessárias:
 Faca para couro
 Vazador para couro
 Fita métrica
4
4
Make the billets
Make the billets
Cut two billets the same width, 1 ft long; trim them to a point at one end and shave the other. Edge them and crease them (the book prints "edge back, and crease them", probably for "edge, black").
Materiais para este passo:
Couro para arreios1 peça Tinta para couro1 peça
Ferramentas necessárias:
Faca para couro Biselador de bordos
 Dobradeira
 Maçarico a propano
5
5
Put it together
Put it together
Put the buckle in, then the thin end of the billet 2 in down at the back of the buckle. Put a loop between the chape by the buckle, and stitch one billet and buckle at each end. Punch two holes in each billet.
Materiais para este passo:
 Fivela de ferro com fuzilhão2 peçasCouro para arreios1 peça
 Fio de couro1 peça
 Cera de abelha1 peça
Ferramentas necessárias:
 Forma de passadores
 Sovela
 Duas agulhas de correeiro
 Torno de seleiroVazador para couro
6
6
Crossing couplings for a pair
Crossing couplings for a pair
Sometimes two coupling straps are used for a pair, crossing each other from the hames of each horse to the mouth of the other. Make them the same way but longer: 38 in, each with 12 in billets. Some are made a foot longer and cut in two, one end 15 in long with a buckle and loop and the other made to buckle on, with many holes. Then the coupling can be shortened on a young horse's side, to keep it back until it has learned the ordinary working pace.
Materiais para este passo:
Couro para arreios1 peçaFivela de ferro com fuzilhão4 peçasFio de couro1 peçaCera de abelha1 peçaFerramentas necessárias:
Faca para couroForma de passadoresSovelaDuas agulhas de correeiroVazador para couroFita métrica7
7
Troubleshooting
Troubleshooting
Coupling strap troubleshooting.
Flow
Loading...
8
8
History and honest limits
History and honest limits
From **Harness Making**, edited by Paul N. Hasluck, Cassell, 1904 (Project Gutenberg 70169), chapter IX, "Plough Harness", couplings, pp. 110-111; every figure was checked on the archive.org scan (harnessmaking00hasl). He gives no buckle size; a 1 in buckle suits the 1 in strap. The picture is our diagram from his text. The tools and metric figures are ours.
Materiais
5- 4 peçasReferência
- 1 peçaReferência
- 4 peçasReferência
- 2 peçasReferência
- 2 peçasReferência
Ferramentas necessárias
10- Referência
- Referência
- 1 vendor sell this, none ship to you yetReferência
- Referência
- Referência
- Referência
- Referência
- Referência
- Referência
- Referência
Este projeto faz
Blueprints relacionados
Estes blueprints compartilham conhecimento — técnicas, materiais ou princípios
CC0 Domínio Público
Este blueprint é liberado sob CC0. Você é livre para copiar, modificar, distribuir e usar este trabalho para qualquer finalidade, sem pedir permissão.
Apoie o Maker comprando produtos através do Blueprint, onde ele ganha uma Comissão Maker definida pelos vendedores, ou crie uma nova versão deste Blueprint e inclua-o como conexão no seu próprio Blueprint para compartilhar receita.