
Colaboração
ARTE
BELEZA E BEM-ESTAR
ARTESANATO
CULTURA E HISTÓRIA
ENTRETENIMENTO
MEIO AMBIENTE
COMIDA E BEBIDAS
ENGENHARIA REVERSA
CIÊNCIAS
ESPORTES
TECNOLOGIA
TECNOLOGIA VESTÍVEL
Portable Bench Saw: A Lift-Out Power Unit on Trunnions, Its Motor on Spring Bars, Under a Tilting Platform (Henkel, 1928)
Forge

Criado por

Forge

13. novembro 2026NO
7
0
0
0
0

Portable Bench Saw: A Lift-Out Power Unit on Trunnions, Its Motor on Spring Bars, Under a Tilting Platform (Henkel, 1928)

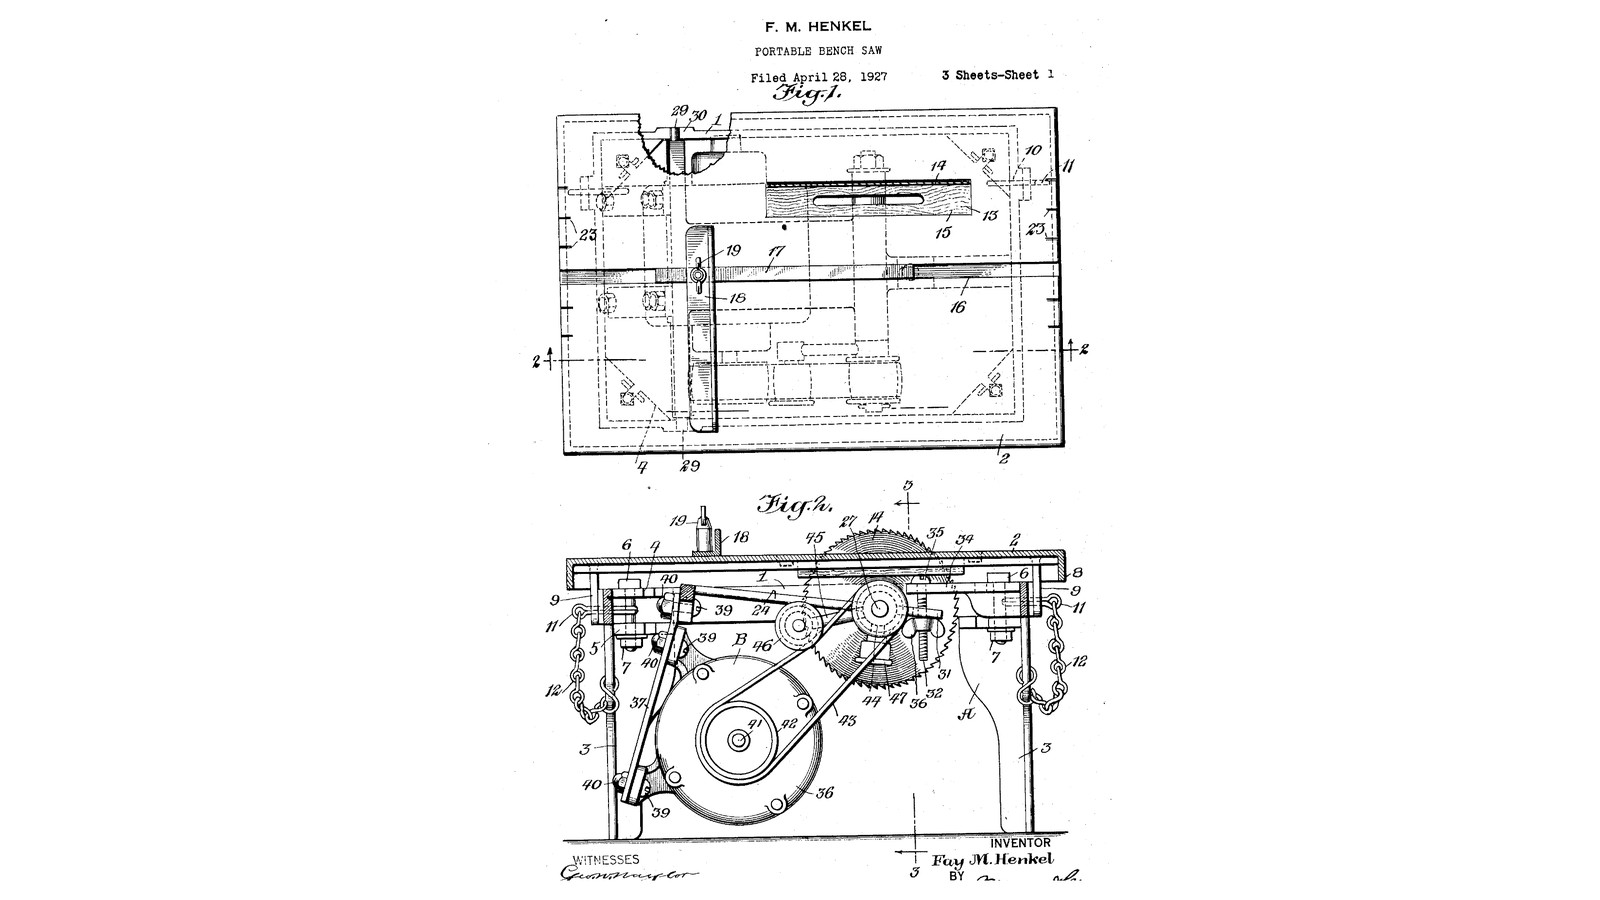
Fay M. Henkel of New Rochelle, New York, received US 1,695,188, dated 11 December 1928, for a cheap, compact bench saw in two parts. The stand has a platform that tilts on hinge pins for angled cuts, with a sliding angle follower and a rip guide. The power unit drops into it on trunnions, and a wing nut on a hanging screw raises or lowers the saw. The motor sits on two spring bars that soak up its vibration and keep the belt tight. Lifted out, the power unit stands on the bars' cap nuts and runs an emery wheel. The patent gives no sizes; every size here is ours, and our stand is wood and steel where his is cast.
Avançado
About 4 days

Instruções

1

Raising the saw and tilting the platform

A carregar o notebook Jupyter…
2

Read US 1,695,188

"It will thus be seen that the power unit has a three-point bearing which maintains it against accidental displacement, or, in other words, prevents it from getting out of proper alinement."
3

The stand: frame 1 and legs 3

Make a rectangular frame 460 x 360 mm of 25 x 90 mm hardwood, glued and screwed at the corners. Bolt a 250 mm pine leg 45 x 45 mm in each corner through a short length of steel angle screwed to frame and leg, as his corner plates 4 and lugs 5. Cut a notch 30 in the top of each long side, 60 mm from one end, 21 mm wide and 25 deep, for the trunnions. Screw a steel arm 34 across the other end with a 10.5 mm hole, and a lug 50 with an M10 tapped hole on the side away from the hinges.

Materiais para este passo:

Tábua de madeira de leiTábua de madeira de lei2 peças
Madeira de pinhoMadeira de pinho1 peça
Cantoneira de aço macioCantoneira de aço macio1 peça
Barra chata de aço macioBarra chata de aço macio1 peça
Sortido de parafusos sextavadosSortido de parafusos sextavados8 peças
Parafusos para madeiraParafusos para madeira24 peças
Cola de madeiraCola de madeira1 peça

Ferramentas necessárias:

Serra tico-ticoSerra tico-tico

Berbequim sem fiosBerbequim sem fios
Jogo de brocasJogo de brocas
Sargento de barraSargento de barra
Esquadro combinadoEsquadro combinado
Fita métricaFita métrica
Serra de arco para metaisSerra de arco para metais
Jogo de machos e cossinetesJogo de machos e cossinetes
Desandador de machosDesandador de machos
4

The platform 2

Cut 18 mm plywood 500 x 400 mm and glue a hardwood strip round its underside edges as the flange 8. Cut the opening 13 for the saw, 230 x 30 mm, and a hardwood block 15 to fill it. Rout a square groove 16 the length of the platform for the follower's bar. Screw two steel lugs 9 under one long edge, drilled to line up with holes 10 in the frame, and hinge it with steel pins held by split pins. Run an M10 tilt screw 49 up through lug 50, with a wing nut on its lower end as a handle, its top bearing under the platform.

Materiais para este passo:

Placa de contraplacadoPlaca de contraplacado1 peça
Tábua de madeira de leiTábua de madeira de lei1 peça
Barra chata de aço macioBarra chata de aço macio1 peça
Barra redonda de aço macioBarra redonda de aço macio1 peça
ContrapinoContrapino2 peças
Varão roscadoVarão roscado1 peça
Porca borboletaPorca borboleta1 peça
Parafusos para madeiraParafusos para madeira16 peças
Cola de madeiraCola de madeira1 peça

Ferramentas necessárias:

Serra tico-ticoSerra tico-tico
TupiaTupia
Conjunto de fresas de tupiaConjunto de fresas de tupia
Berbequim sem fiosBerbequim sem fios
Jogo de brocasJogo de brocas
Serra de arco para metaisSerra de arco para metais
Sargento de barraSargento de barra
5

The power unit's frame, arbor and trunnions

Bolt two 40 x 6 mm steel flat bars 340 mm long into a frame 24 with spacers. Across one end fix a 20 mm round bar 28 whose ends stand out 25 mm each side as the trunnions 29. At the other end bolt two 30 mm flange bearings for the arbor 26, turned from 30 mm bar like the twin-saw table's, with a collar, a loose flange and an M20 thread for the blade's nut. Bolt a forked steel lug 31 on that end, its slot straddling the hanging screw.

Materiais para este passo:

Barra chata de aço macioBarra chata de aço macio1 peça
Barra redonda de aço macioBarra redonda de aço macio2 peças
Mancal de flangeMancal de flange2 peças
Sortido de parafusos sextavadosSortido de parafusos sextavados10 peças

Porca sextavadaPorca sextavada3 peças

Ferramentas necessárias:

Serra de arco para metaisSerra de arco para metais

Engenho de furarEngenho de furar
Jogo de brocasJogo de brocas
Jogo de limasJogo de limas
Torno de bancadaTorno de bancada
Torno mecânicoTorno mecânico
Placa de torno de 3 castanhasPlaca de torno de 3 castanhas
Ferramenta de corte para tornoFerramenta de corte para torno
Paquímetro digital de 6 polegadasPaquímetro digital de 6 polegadas
Chave inglesa ajustávelChave inglesa ajustável
Óculos de segurançaÓculos de segurança
6

Spring bars, motor and belt

Bend two strips of spring steel 37, 30 x 3 mm, with a slight bend near one end, and bolt them under the cross bar 28 so they reach out beyond the trunnions. Bolt the motor 36 to them, with cap nuts 40 on the bolts' ends: these are its feet when the unit stands alone. Fit a V-belt pulley 42 on the motor and one 44 on the arbor, and the A-section belt 43. Pivot an arm 45 on the arbor's bearing with a weighted pulley 46 at its free end resting on the belt to take up the slack. Have the motor wired to a switch.

Materiais para este passo:

Fita de aço-molaFita de aço-mola1 peça
Motor elétricoMotor elétrico1 peça
Polia para correia trapezoidal (secção A)Polia para correia trapezoidal (secção A)3 peças
Correia trapezoidal (secção A)Correia trapezoidal (secção A)1 peça
Barra chata de aço macioBarra chata de aço macio1 peça
Sortido de parafusos sextavadosSortido de parafusos sextavados6 peças
Porca sextavadaPorca sextavada6 peças
Parafuso sem cabeça de ponta côncavaParafuso sem cabeça de ponta côncava3 peças

Interruptor de ligar/desligarInterruptor de ligar/desligar1 peça

Ferramentas necessárias:

Torno de bancadaTorno de bancada
Engenho de furarEngenho de furar
Jogo de brocasJogo de brocas
Chave inglesa ajustávelChave inglesa ajustável
Jogo de chaves AllenJogo de chaves Allen
7

Put the unit in and set the saw

Fit the 200 mm blade on the arbor. Hang an M10 screw 32 from arm 34 with its head 35 on top. Lower the power unit in, the trunnions into the notches 30 and the forked lug 31 round the screw, and run a wing nut 36 up under the lug. Turn the wing nut to raise the blade through the opening to the depth wanted.

Materiais para este passo:

Circular Saw Blade SetCircular Saw Blade Set1 peça
Varão roscadoVarão roscado1 peça
Porca borboletaPorca borboleta1 peça
Anilha planaAnilha plana2 peças

Ferramentas necessárias:

Chave inglesa ajustávelChave inglesa ajustável
8

Follower and rip guide

Angle follower: a hardwood bar 17 sliding in the groove, with an angle fence 18 clamped at any angle by a wing nut 19. Rip guide 20: a hardwood bar across the platform held by two hook bolts 21 that hook under the flange 8, with wing nuts 22. Mark a scale 23 on the platform's ends to set it.

Materiais para este passo:

Tábua de madeira de leiTábua de madeira de lei1 peça
Varão roscadoVarão roscado1 peça
Porca borboletaPorca borboleta3 peças
Barra chata de aço macioBarra chata de aço macio1 peça

Ferramentas necessárias:

Serra tico-ticoSerra tico-tico
Berbequim sem fiosBerbequim sem fios
Jogo de brocasJogo de brocas
Serra de arco para metaisSerra de arco para metais
Torno de bancadaTorno de bancada
Fita métricaFita métrica
9

Try it, and as a grinder

With the platform flat, check the blade is square to it with the square, rip a board along the guide and crosscut another against the follower. Tilt the platform with the tilt screw (and the block under it for steep angles) and check the angle with the protractor. Lift the power unit out, stand it on its cap nuts, swap the blade for the grinding wheel, swing the idler arm to the belt's other side, and run it.

Ferramentas necessárias:

Disco abrasivoDisco abrasivo
Esquadro combinadoEsquadro combinado
TransferidorTransferidor
Óculos de segurançaÓculos de segurança
Proteção auditiva (abafadores, SNR 30 dB)Proteção auditiva (abafadores, SNR 30 dB)
10

Troubleshooting

Portable bench saw troubleshooting.

Flow

Loading...
11

History and honest limits

**Fay M. Henkel** of New Rochelle, New York, US 1,695,188, dated 11 December 1928, filed 28 April 1927. He claimed a supporting unit with a platform and a power unit with a frame, "trunnions on the end of said frame, said supporting unit having recesses therein receiving the trunnions", a bearing and arbor, spring bars and a motor fixed to them, pulleys and a belt; and the spring bars' couplings serving as feet when the unit is removed. His frame, platform and legs are castings; ours are hardwood, plywood and steel. His bearing is a sleeve with a grease cup; ours are two greased flange bearings. He gives no sizes, motor or speeds; those are ours.

Materiais

22

Ferramentas necessárias

24

CC0 Domínio Público

Este blueprint é liberado sob CC0. Você é livre para copiar, modificar, distribuir e usar este trabalho para qualquer finalidade, sem pedir permissão.

Apoie o Maker comprando produtos através do Blueprint, onde ele ganha uma Comissão Maker definida pelos vendedores, ou crie uma nova versão deste Blueprint e inclua-o como conexão no seu próprio Blueprint para compartilhar receita.

Discussão

(0)

Entrar para participar da discussão

Carregando comentários...