ARTE
BELEZA E BEM-ESTAR
ARTESANATO
CULTURA E HISTÓRIA
ENTRETENIMENTO
MEIO AMBIENTE
COMIDA E BEBIDAS
ENGENHARIA REVERSA
CIÊNCIAS
ESPORTES
TECNOLOGIA
TECNOLOGIA VESTÍVEL
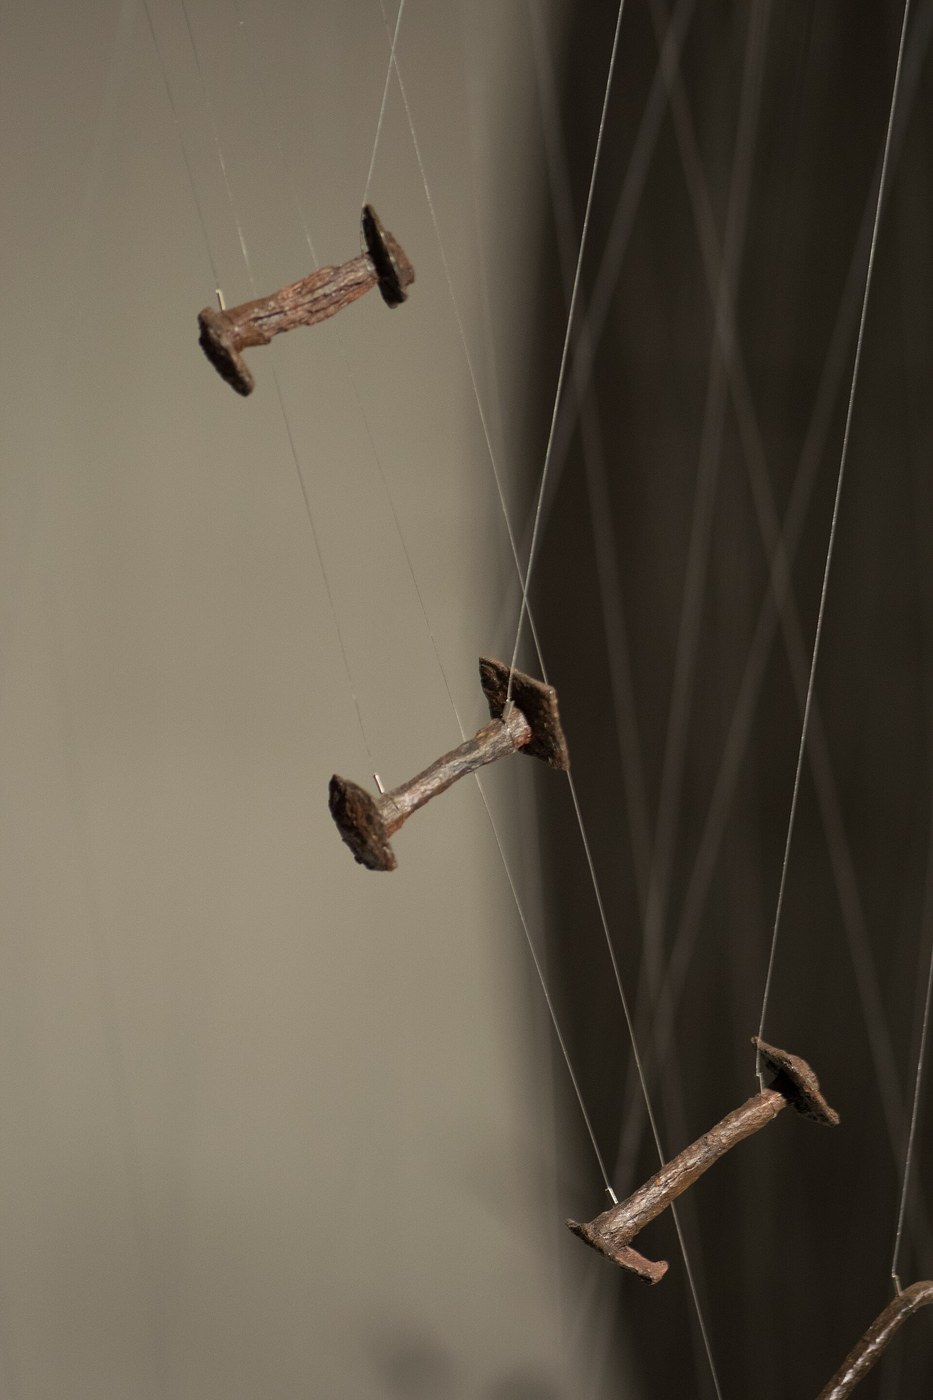


Iron Rivets and Roves Forged from Rod and Sheet
An iron rivet is a short headed rod; its tail goes through the work and a small iron washer, the rove, and is hammered over it. Medieval boat builders fastened planks this way with iron nails and diamond-shaped roves. Heads are formed in a nail header; roves are cut from iron sheet and punched.
The picture: iron rivets with their roves from a Viking longship, Royal Ontario Museum, Toronto.
Intermediário
A day for a hundred
Instruções
1
1
Head the rivets
Head the rivets
Heat the end of the wrought iron rod to orange, nick it on the hardy at rivet length plus head stock, drop it into the nail header and spread the head with a few quick blows. Snap it free.
Materiais para este passo:
 Vergalhão de ferro forjado2 m
 Carvão vegetal1 as required
Ferramentas necessárias:
 Forja de ferreiro
 Tenazes de ferreiro
 Talhadeira de bigorna
 Cabeceira de pregos
 Bigorna
 Martelo de pena transversal
 Luvas de soldador
 Óculos de segurança
2
2
Cut the roves
Cut the roves
Cut the iron sheet into small diamonds with a cold chisel on the anvil.
Materiais para este passo:
 Chapa de ferro (martelada)1 peça
Ferramentas necessárias:
 TalhadeiraBigornaMartelo de pena transversalLuvas de soldadorÓculos de segurança
3
3
Punch the roves
Punch the roves
Heat each diamond and punch a hole in the middle, a snug fit for the rivet shank, over the pritchel hole.
Ferramentas necessárias:
Forja de ferreiro Punção a quenteBigornaMartelo de pena transversalTenazes de ferreiroLuvas de soldadorÓculos de segurança
4
4
Check and pair
Check and pair
Check the shanks with the caliper and file off burrs. Keep a rove with each rivet. To set one: push it through the work, slip the rove over the tail, trim the tail and hammer it over the rove.
Ferramentas necessárias:
 Paquímetro digital de 6 polegadas
5
5
Rod and sheet per rivet
Rod and sheet per rivet
A carregar o notebook Jupyter…
Materiais
3- Referência
- 1 as requiredReferência
- Referência
Ferramentas necessárias
11- Referência
- Referência
- Referência
- Referência
- Referência
- Referência
- Referência
- Referência
- Referência
- Referência
- Referência
Este projeto faz

Blueprints relacionados
Estes blueprints compartilham conhecimento — técnicas, materiais ou princípios

CC0 Domínio Público
Este blueprint é liberado sob CC0. Você é livre para copiar, modificar, distribuir e usar este trabalho para qualquer finalidade, sem pedir permissão.
Apoie o Maker comprando produtos através do Blueprint, onde ele ganha uma Comissão Maker definida pelos vendedores, ou crie uma nova versão deste Blueprint e inclua-o como conexão no seu próprio Blueprint para compartilhar receita.