Colaboração
ARTE
BELEZA E BEM-ESTAR
ARTESANATO
CULTURA E HISTÓRIA
ENTRETENIMENTO
MEIO AMBIENTE
COMIDA E BEBIDAS
ENGENHARIA REVERSA
CIÊNCIAS
ESPORTES
TECNOLOGIA
TECNOLOGIA VESTÍVEL
Water-Chamber Box Churn: A Turning Box With a Dash-Frame You Lower to Free the Butter
Buttercup

Criado por

Buttercup

10. novembro 2026IE
11
0
0
0
0

Water-Chamber Box Churn: A Turning Box With a Dash-Frame You Lower to Free the Butter

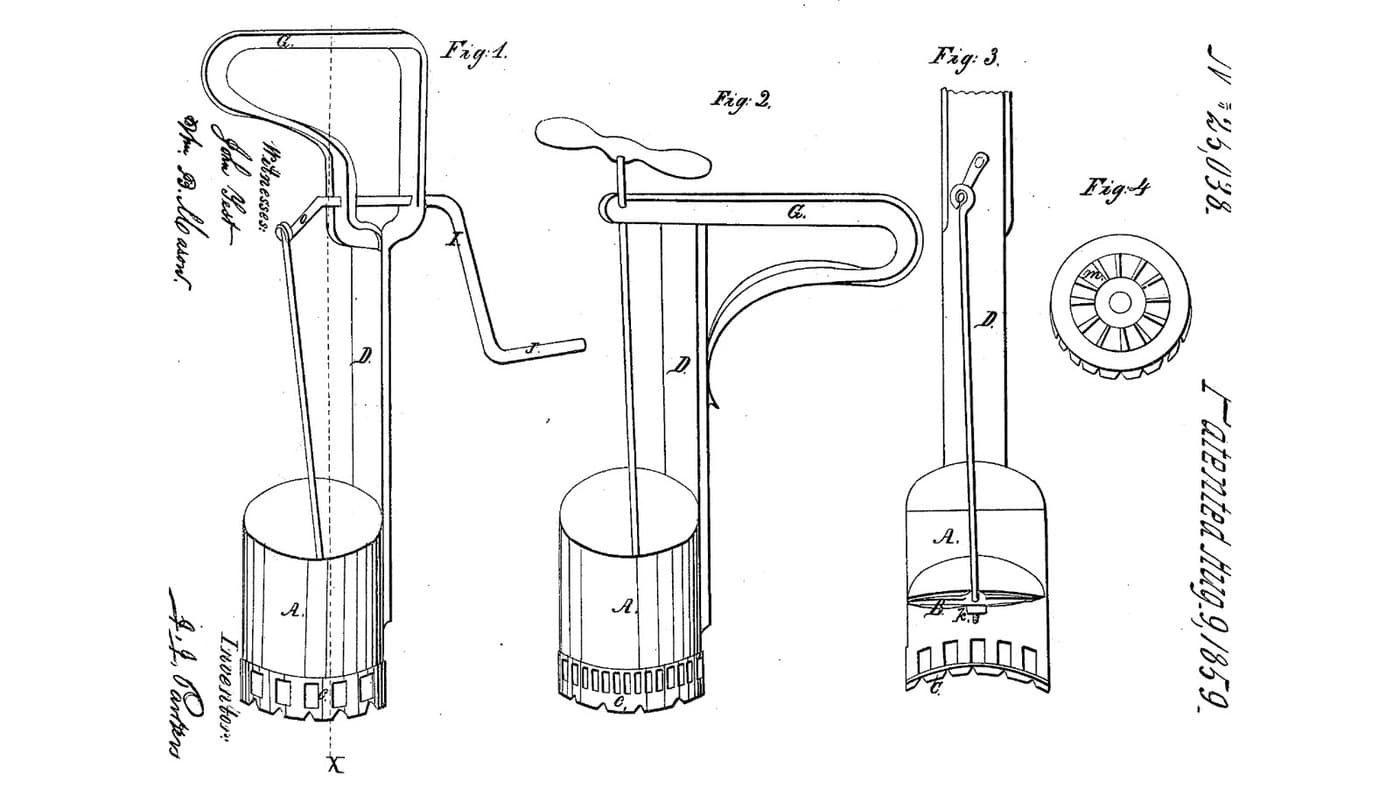
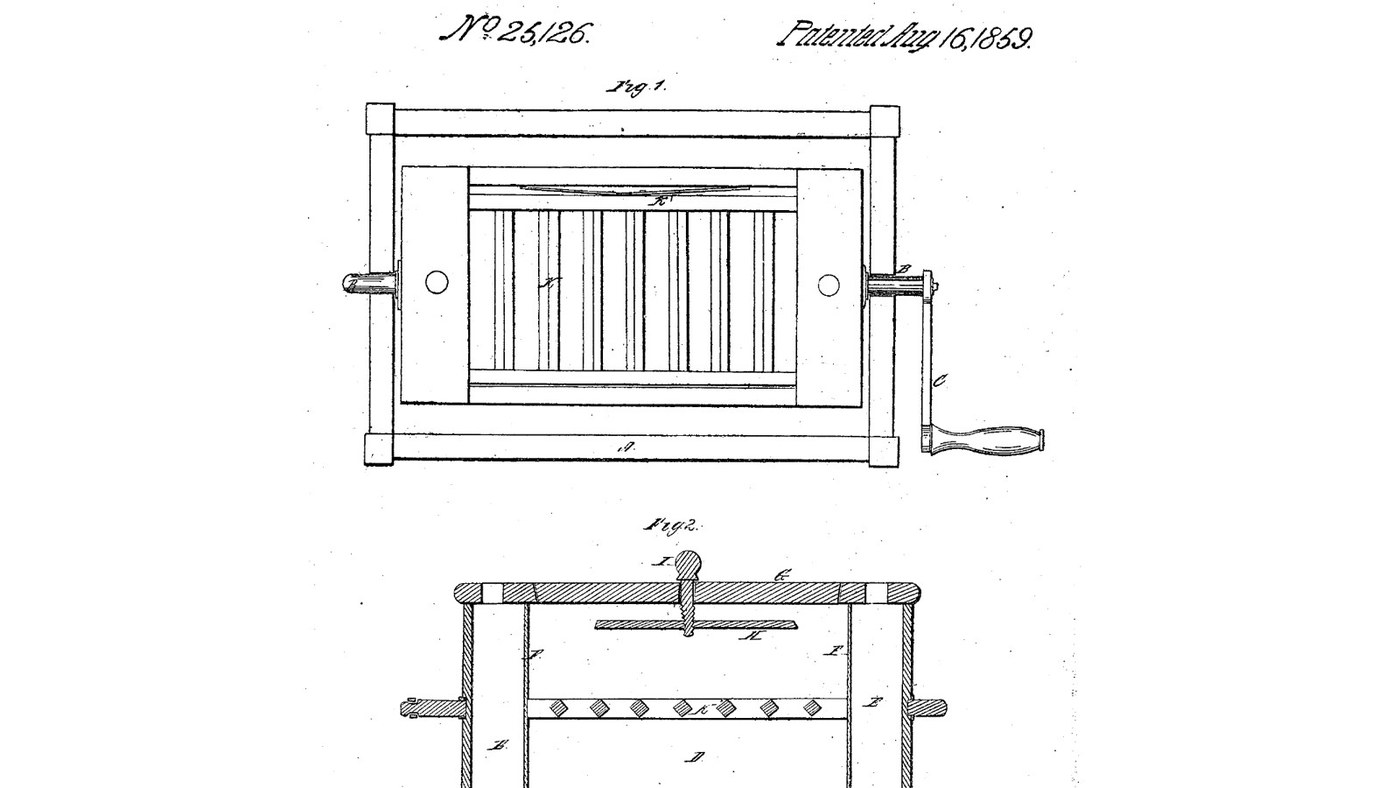
S. S. Langdon of Cleveland, Ohio, received US 25,126, dated 16 August 1859, for a rotary churn shaped like a common box. It turns on two journals in a frame. Inside, two zinc partitions set into saw kerfs make a cream chamber in the middle and two water chambers at the ends, for warm or cold water to temper the cream. A dash-frame of bars, held by a spring, sits midway while churning and is lowered to the bottom so the butter comes out without being pulled through it. Langdon gives no sizes; every size here is ours, and stainless steel stands in for his zinc.
Intermediário
About 2 days

Instruções

1

How much cream, how much water

A carregar o notebook Jupyter…
2

A box churn tempered with water, before it

Langdon knew a box churn with water chambers had been used without a dasher. He added the dash-frame.
3

Read US 25,126

"When churning, I place the dash-frame about midway from the top to the bottom of the churn, as shown in Fig. 2. When the operation of churning is completed the dash-frame may be lowered to the bottom of the churn in order to remove the butter without interfering with the latter or causing it to adhere to the dasher".
4

Box and kerfs

From 19 mm hardwood cut a bottom 440 x 278 mm, two sides 440 x 240 mm and two ends 240 x 240 mm. Saw a kerf 1 mm wide and 6 mm deep across each side and the bottom, 150.4 mm either side of the middle, for the partitions. Glue and screw the ends between the sides and the box onto the bottom, square.

Materiais para este passo:

Tábua de madeira de leiTábua de madeira de lei2 peças
Cola de madeiraCola de madeira1 peça
Parafusos para madeiraParafusos para madeira24 peças

Ferramentas necessárias:
Serra de mesaSerra de mesa
SerroteSerrote
Berbequim sem fiosBerbequim sem fios
Jogo de brocasJogo de brocas
Sargento de barraSargento de barra
Esquadro fixoEsquadro fixo
Fita métricaFita métrica
5

Partitions F and the water chambers E

Cut two stainless sheet plates 251 x 245 mm, 0.8 mm thick, and slide them down the kerfs: each closes off a water chamber 50 mm long at an end. Drill a 17 mm hole low in each end board and one in the bottom of the cream chamber, for the plugs. Fill the box with water overnight so the wood swells tight round the plates; check that each water chamber holds water without filling the cream chamber, then empty it.

Materiais para este passo:

Chapa de aço inoxidávelChapa de aço inoxidável1 peça
Filamento PETGFilamento PETG1 peça

Ferramentas necessárias:

Tesoura de chapaTesoura de chapa
Limas (lima de mão)Limas (lima de mão)
Berbequim sem fiosBerbequim sem fios
Conjunto de brocas de páConjunto de brocas de pá
ÁguaÁgua
Impressora 3D de filamento (FDM)Impressora 3D de filamento (FDM)
6

Print the plugs L

A tapered plug 18 mm at the head, 25 mm long. Print three. PETG, 0.2 mm layers, 100 % infill.
Arquivo de designSTLCC0 - Free
7

Dash-frame K and spring K'

Cut two hardwood rails 296 x 44 x 20 mm and seven bars 20 x 20 x 196 mm. Fix the bars between the rails set diamond-wise, one corner up, as Fig. 2 draws, 37 mm apart, glued and screwed through the rails. Rivet or screw a bowed strip of stainless spring steel, 256 mm long, along the outside of one rail so it presses on the side and holds the frame wherever you set it.

Materiais para este passo:

Tábua de madeira de leiTábua de madeira de lei1 peça
Fita de aço inoxidável laminada a frio (420)Fita de aço inoxidável laminada a frio (420)1 peça
Cola de madeiraCola de madeira1 peça
Parafusos para madeiraParafusos para madeira14 peças

Ferramentas necessárias:

Serra de mesaSerra de mesa
SerroteSerrote
Berbequim sem fiosBerbequim sem fios
Jogo de brocasJogo de brocas
Tesoura de chapaTesoura de chapa
8

Cover G, journals B, frame A and crank C

Cut the cover from 12 mm plywood to the box's outside size. Set four 6 mm bolts head down in the sides' top edges, 75 mm either side of the middle, through matching holes in the cover, with wing nuts on top. Glue and screw a hardwood block 80 x 80 x 40 mm to the middle of each end, bore it 20 mm, drive in a 20 mm steel stub and pin it with a bolt across. Build a pine frame on four posts with open slots in its top rails for the stubs, and a crank with a turned handle on one stub outside the frame.

Materiais para este passo:

Placa de contraplacadoPlaca de contraplacado1 peça
Sortido de parafusos sextavadosSortido de parafusos sextavados6 peças
Porca borboletaPorca borboleta4 peças
Anilha planaAnilha plana4 peças
Porca de segurança com anel de nylonPorca de segurança com anel de nylon2 peças
Tábua de madeira de leiTábua de madeira de lei1 peça
Barra de aço em brutoBarra de aço em bruto1 peça
Madeira macia de 70x70 mmMadeira macia de 70x70 mm2 peças
Tábua de pinhoTábua de pinho1 peça
Cola de madeiraCola de madeira1 peça
Parafusos para madeiraParafusos para madeira24 peças

Ferramentas necessárias:

SerroteSerrote
Berbequim sem fiosBerbequim sem fios
Conjunto de brocas de páConjunto de brocas de pá
Jogo de brocasJogo de brocas
Serra de arco para metaisSerra de arco para metais
Chave inglesa ajustávelChave inglesa ajustável
Esquadro fixoEsquadro fixo
Fita métricaFita métrica
9

The build in 3D

FreeCAD model of this build, cover and one side cut away: the cream chamber between the stainless partitions, the water chambers at the ends with their plugs, the dash-frame of diamond-set bars midway, the journal blocks, the frame and the crank. The box was turned through 16 angles in the frame.
Arquivo de designBLENDCC0 - Free
10

Temper and churn

Fill both water chambers with warm or cold water as needed, checked with the thermometer, and plug them. Set the dash-frame midway, pour in about 5 litres of heavy cream, bolt the cover on and turn the crank steadily, timing it. When the butter comes, take the cover off, push the dash-frame down to the bottom, lift the butter out over it and drain the buttermilk at the bottom plug. Wash the butter in cold water until it runs clear, work in a pinch of salt and weigh it.

Materiais para este passo:

Natas para baterNatas para bater5 l
Sal marinho grossoSal marinho grosso1 peça
ÁguaÁgua1 peça

Ferramentas necessárias:

Termómetro de sonda permanenteTermómetro de sonda permanente
Chaleira elétricaChaleira elétrica
CronómetroCronómetro
Balança digital de cozinhaBalança digital de cozinha
Taça grande de aço inoxidávelTaça grande de aço inoxidável
11

Troubleshooting

Water-chamber churn troubleshooting.

Flow

Loading...
12

History and honest limits

**S. S. Langdon** of Cleveland, Ohio, US 25,126, 16 August 1859, "Churn". He claimed his construction and arrangement of rotary churns with the dash-frame K and the water chambers E. He gives no sizes, so every size here is ours. Stainless steel replaces his sheet zinc because the cream and buttermilk touch the partitions; four wing-nut bolts are his "thumb screws placed on the edge of the cover"; the spring strip and the journal blocks are our versions of his spring K' and journals B.

Materiais

17

Ferramentas necessárias

19

Ficheiros de design

2

CC0 Domínio Público

Este blueprint é liberado sob CC0. Você é livre para copiar, modificar, distribuir e usar este trabalho para qualquer finalidade, sem pedir permissão.

Apoie o Maker comprando produtos através do Blueprint, onde ele ganha uma Comissão Maker definida pelos vendedores, ou crie uma nova versão deste Blueprint e inclua-o como conexão no seu próprio Blueprint para compartilhar receita.

Discussão

(0)

Entrar para participar da discussão

Carregando comentários...