ARTE
BELEZA E BEM-ESTAR
ARTESANATO
CULTURA E HISTÓRIA
ENTRETENIMENTO
MEIO AMBIENTE
COMIDA E BEBIDAS
ENGENHARIA REVERSA
CIÊNCIAS
ESPORTES
TECNOLOGIA
TECNOLOGIA VESTÍVEL
Making Bolas — Weighted Throwing Weapon for Hunting
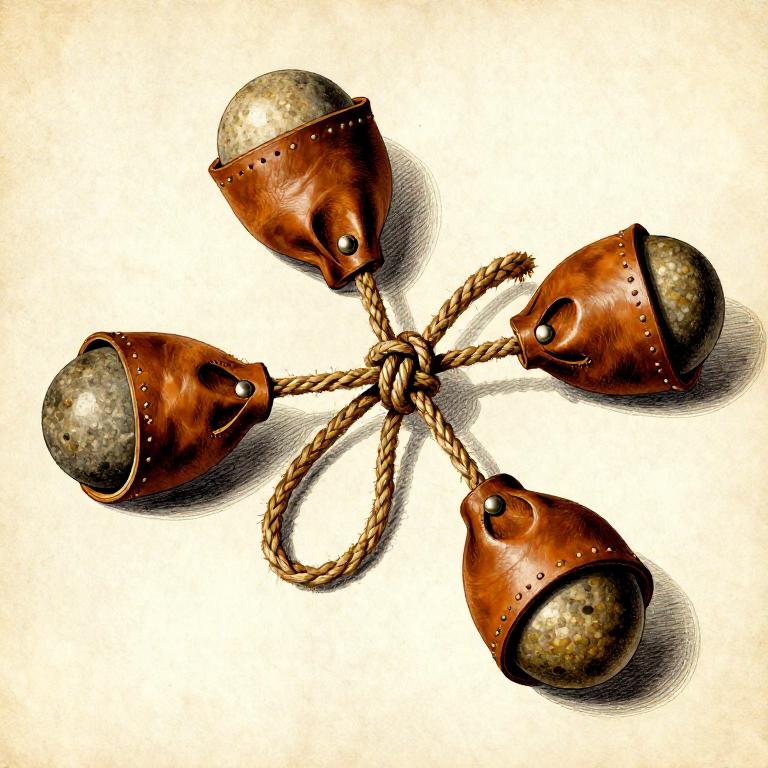
Bolas (from the Spanish for "balls") are a throwing weapon consisting of two or three weights connected by cords that, when thrown, wrap around an animal's legs to bring it down. The weapon was independently invented in South America (where Patagonian peoples used them for thousands of years to hunt rhea and guanaco), in the Arctic (Inuit bird bolas), and possibly in prehistoric Africa and Europe — stone spheres found at Olduvai Gorge dating to 1.8 million years ago may represent early bola weights, though this is debated. The physics are elegant: the weights spread apart in flight due to centrifugal force, creating a wide capture area, then wrap inward around the target on contact. A three-weight bola (tres boleadoras) is the most common hunting variant.
Iniciante
1-2 hours
Instruções
1
1
Select Three Dense, Round Stones
Select Three Dense, Round Stones
Select 3 round, dense stones roughly egg-sized, each weighing 150 to 250 grams. Smooth river cobbles work best — they are naturally rounded, dense, and uniformly shaped. All three stones should be as close in weight as possible. Unequal weights cause the bolas to fly erratically and miss the target.
2
2
Wrap Each Stone in Leather
Wrap Each Stone in Leather
Cut three squares of brain-tanned hide or rawhide, each large enough to fully enclose one stone with excess material gathered above. Place a stone in the centre of each square, pull the leather up around it, and gather the excess above the stone like a pouch. Tie tightly just above the stone with a short length of cordage, enclosing the stone securely.
Materiais para este passo:
 Brain-Tanned Hide1 peça
3
3
Cut Three Equal Lengths of Cordage
Cut Three Equal Lengths of Cordage
Cut three lengths of strong cordage — braided rawhide or twisted plant fibre rope — each 60 to 80 cm long. The cord must be strong enough to withstand the centrifugal force of spinning without snapping. Braided rawhide of 4 to 5 mm diameter is ideal. All three cords must be exactly the same length.
Materiais para este passo:
 Cordage3 peças
4
4
Tie One Cord to Each Wrapped Stone
Tie One Cord to Each Wrapped Stone
Tie one cord securely to each leather-wrapped stone. The best attachment point is the gathered leather neck above the stone — tie the cord around this neck with a clove hitch or two half hitches, then wrap and tie again for security. The connection must not slip under load. Tug hard on each cord to test before proceeding.
5
5
Join the Three Cords at a Central Knot
Join the Three Cords at a Central Knot
Gather the three free cord ends together and tie them in a single overhand knot — this is the handle knot. The knot should be tight and compact, forming the hub from which all three weighted cords radiate. Some makers add a small ring of rawhide or bone at the junction to prevent the knot from shifting.
6
6
Adjust Cord Lengths for Equal Balance
Adjust Cord Lengths for Equal Balance
Hang the bolas from the central knot and check that all three weighted cords are exactly the same length. Uneven cords cause erratic flight — the shorter cord swings faster than the longer ones, pulling the bolas off course. Adjust by retying the attachment to the stone pouches until all three weights hang at the same level.
7
7
Test the Balance by Swinging
Test the Balance by Swinging
Hold the handle knot and swing the bolas gently in a slow circle. The three weights should spread evenly into a triangular pattern as centrifugal force pulls them outward. If one weight lags behind or leads the others, it is heavier or lighter — replace it with a better-matched stone.
8
8
Learn the Throwing Technique
Learn the Throwing Technique
To throw, hold the handle knot in your dominant hand. Swing the bolas overhead in a horizontal circle 2 to 3 times to build speed and centrifugal force. The weights should be fully extended and spinning evenly before release. Keep the plane of rotation level — tilting causes the bolas to dive or climb unpredictably.
9
9
Release at the Target
Release at the Target
Release the handle knot when the bolas are aimed at the target's legs. Open your fingers smoothly — do not flick or jerk, which alters the trajectory. The bolas will fly horizontally with the weights spread wide, then wrap around whatever they contact. Aim low — the goal is to entangle legs, not to strike the body.
10
10
Practice on a Fixed Target
Practice on a Fixed Target
Practice on a fence post or sapling from 10 to 15 metres until you can consistently wrap the bolas around the target. Start at closer range and increase distance as accuracy improves. A skilled thrower can reliably entangle a target at 15 to 20 metres. Retrieve the bolas after each throw and check the knots and cord attachments for signs of loosening.
Materiais de Blueprints conectados

Blueprints relacionados
Estes blueprints compartilham conhecimento — técnicas, materiais ou princípios


CC0 Domínio Público
Este blueprint é liberado sob CC0. Você é livre para copiar, modificar, distribuir e usar este trabalho para qualquer finalidade, sem pedir permissão.
Apoie o Maker comprando produtos através do Blueprint, onde ele ganha uma Comissão Maker definida pelos vendedores, ou crie uma nova versão deste Blueprint e inclua-o como conexão no seu próprio Blueprint para compartilhar receita.