
ARTE
BELEZA E BEM-ESTAR
ARTESANATO
CULTURA E HISTÓRIA
ENTRETENIMENTO
MEIO AMBIENTE
COMIDA E BEBIDAS
ENGENHARIA REVERSA
CIÊNCIAS
ESPORTES
TECNOLOGIA
TECNOLOGIA VESTÍVEL
Push Button: Normally Open Momentary Switch with a Cushioned Contact (De Reamer, GE 1939)
Ed

Criado por

Ed

28. outubro 2026FI
0
0
0
0
0

Push Button: Normally Open Momentary Switch with a Cushioned Contact (De Reamer, GE 1939)

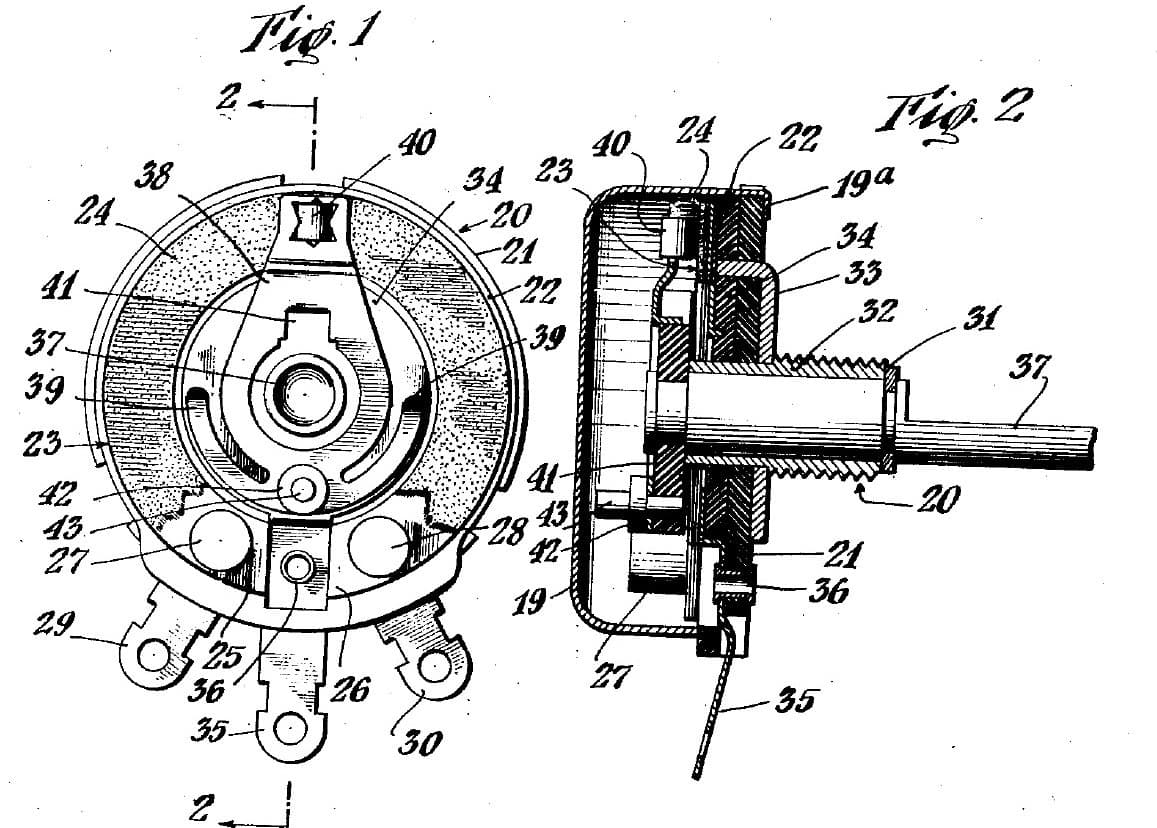
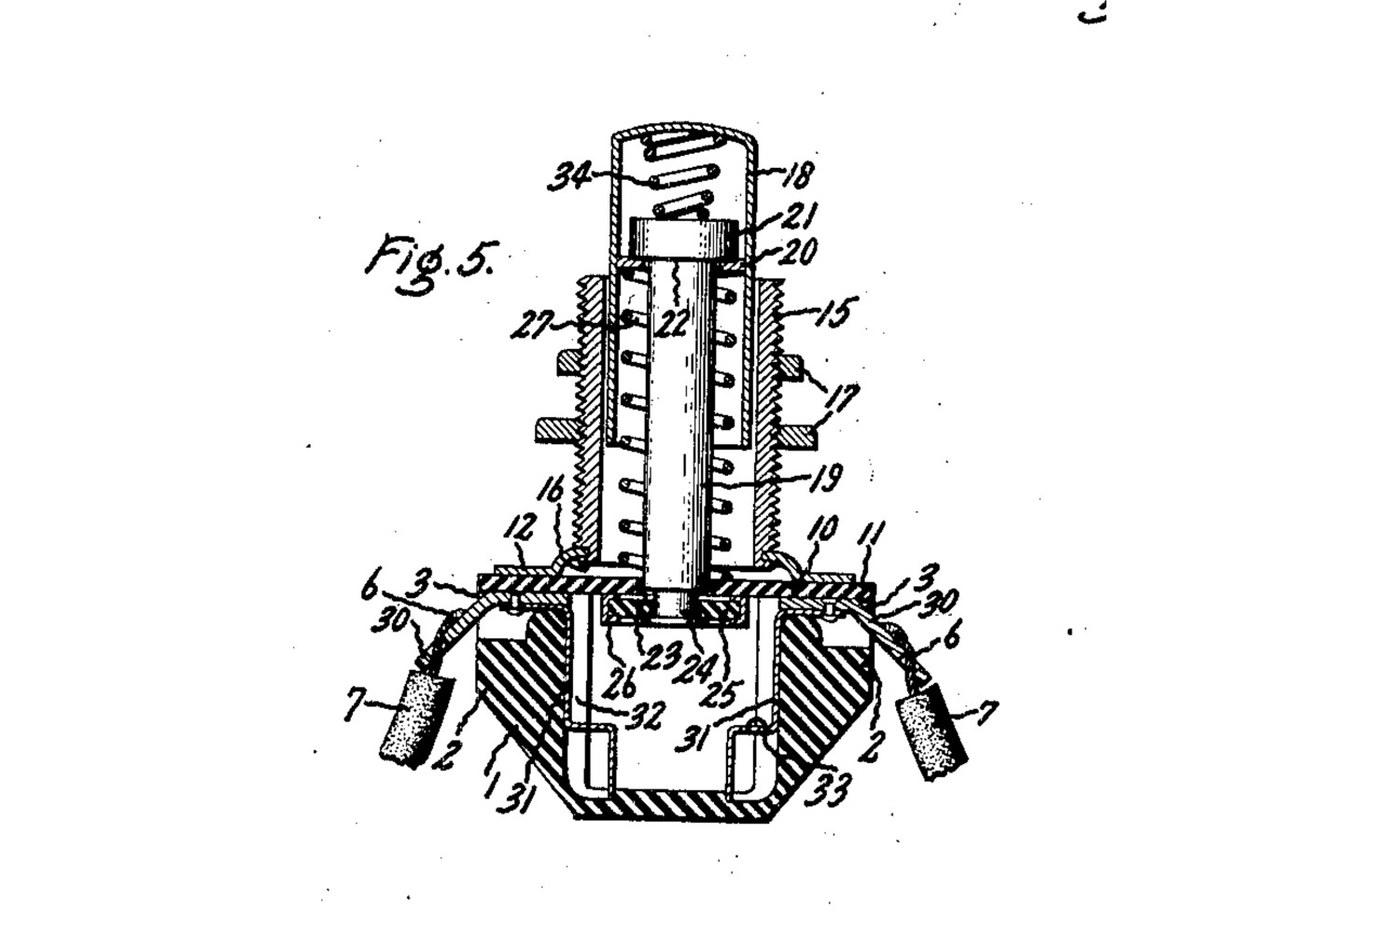
A panel push button that closes a circuit only while you press it. A spring holds the button out, and a metal rim on the end of its rod sits clear of two contacts. Press it and the rim bridges both contacts. A second spring inside the button lets the rod give, so the contacts never take more than that spring's force. Source: Frank C. De Reamer, US 2,166,803 (General Electric, 1939), Fig. 5. Unknown: the insulating material, the metals and every size. De Reamer gives none of them, so they are linked to unknown heads. The tools are ours. Picture: the patent's Fig. 5.
Avançado
2 days

Instruções

1

Mould the housing

Mould a cup-shaped housing of insulating material, with a boss on each of two opposite sides, a recess in the top of each boss, a groove inside below each boss, and a bead round the top. Unknown: the material, the sizes and the moulding.

Materiais para este passo:

Material isolante desconhecidoMaterial isolante desconhecido1 as required

Ferramentas necessárias:
Molde de compressãoMolde de compressão
Dimensões desconhecidasDimensões desconhecidas
2

Make the terminals and contacts

Bend two angled metal strips. The upper end of each sits in a boss recess, and the lower end is a solder lug. Fix each upper end to a contact that fits the groove inside the housing, stepped at its bottom end. Unknown: the metal.

Materiais para este passo:

Metal desconhecidoMetal desconhecido1 as required

Ferramentas necessárias:

Tesoura de chapaTesoura de chapa
Alicate de bico chatoAlicate de bico chato
Dimensões desconhecidasDimensões desconhecidas
3

Make the sleeve, plate and cover

Turn a threaded sleeve and cut its thread. Spin its lower end over onto a metal plate with tangs. Cut a cover of insulating sheet with ears that reach over the bosses and a hole in the middle to guide the rod.

Materiais para este passo:

Metal desconhecidoMetal desconhecido1 as required
Material isolante desconhecidoMaterial isolante desconhecido1 as required

Ferramentas necessárias:

Torno mecânicoTorno mecânico
Conjunto de ferramentas de torno (HSS)Conjunto de ferramentas de torno (HSS)
Porta-cossinetePorta-cossinete
Tesoura de chapaTesoura de chapa
PaquímetroPaquímetro
Dimensões desconhecidasDimensões desconhecidas
4

Make the push button

Make a drawn metal tube closed at the top, and a rod with a head. Put a small coil spring in the top of the tube, then the rod's head. Wedge a washer into the tube under the head. Leave clearance so the rod can swivel a little. Turn the rod's lower end down to a smaller diameter. Unknown: the metal.

Materiais para este passo:

Metal desconhecidoMetal desconhecido1 as required
Conjunto de molas de compressãoConjunto de molas de compressão1 spring

Ferramentas necessárias:

Torno mecânicoTorno mecânico
Conjunto de ferramentas de torno (HSS)Conjunto de ferramentas de torno (HSS)
PaquímetroPaquímetro
Dimensões desconhecidasDimensões desconhecidas
5

Assemble

Set the terminals in their recesses and the contacts in their grooves. Slide the button into the sleeve, with a coil spring round the rod between the cover and the wedged washer. Pass the rod's end through the cover's hole. Put on it a loose insulating washer with a metal rim round its edge. Hammer the rod's end over into a flange. Lay the cover on the housing, so its ears clamp the terminals, and bend the plate's tangs over the bead.

Materiais para este passo:

Material isolante desconhecidoMaterial isolante desconhecido1 as required
Metal desconhecidoMetal desconhecido1 as required
Conjunto de molas de compressãoConjunto de molas de compressão1 spring

Ferramentas necessárias:

Torno de bancadaTorno de bancada
Martelo de bolaMartelo de bola
Alicate de bico chatoAlicate de bico chato
Óculos de segurançaÓculos de segurança
6

Mount and wire it

Put the sleeve through a hole in the panel and clamp the panel between two nuts on the thread. Solder the bared wire ends to the two lugs.

Materiais para este passo:

Porca sextavadaPorca sextavada2 pcs
Fio de soldaFio de solda1 as required

Ferramentas necessárias:

Ferro de soldarFerro de soldar
Alicate de bico chatoAlicate de bico chato
7

Check it

At rest, the rim sits against the underside of the cover and the circuit is open. Pressed, the rim meets the stepped ends of both contacts and closes it. The checking is ours: the meter reads open, then closed while pressed.

Ferramentas necessárias:

MultímetroMultímetro

Materiais

5

Ferramentas necessárias

13

CC0 Domínio Público

Este blueprint é liberado sob CC0. Você é livre para copiar, modificar, distribuir e usar este trabalho para qualquer finalidade, sem pedir permissão.

Apoie o Maker comprando produtos através do Blueprint, onde ele ganha uma Comissão Maker definida pelos vendedores, ou crie uma nova versão deste Blueprint e inclua-o como conexão no seu próprio Blueprint para compartilhar receita.

Discussão

(0)

Entrar para participar da discussão

Carregando comentários...