
Colaboração
ARTE
BELEZA E BEM-ESTAR
ARTESANATO
CULTURA E HISTÓRIA
ENTRETENIMENTO
MEIO AMBIENTE
COMIDA E BEBIDAS
ENGENHARIA REVERSA
CIÊNCIAS
ESPORTES
TECNOLOGIA
TECNOLOGIA VESTÍVEL
Small Series-Wound Electric Motor with Laminated Field and 12-Slot Ring Armature (Robertson, Boy Mechanic 1913)
Volt

Criado por

Volt

14. novembro 2026SE
7
0
0
0
0

Small Series-Wound Electric Motor with Laminated Field and 12-Slot Ring Armature (Robertson, Boy Mechanic 1913)

A real workshop-built DC motor: a field of riveted sheet-iron plates bored to 2-3/4 in, a 12-slot laminated ring armature on a brass spider, a 12-segment brass commutator insulated with mica, gauze brushes, and series windings of cotton-covered magnet wire.
Avançado
Several weekends

Instruções

1

Read the Boy Mechanic

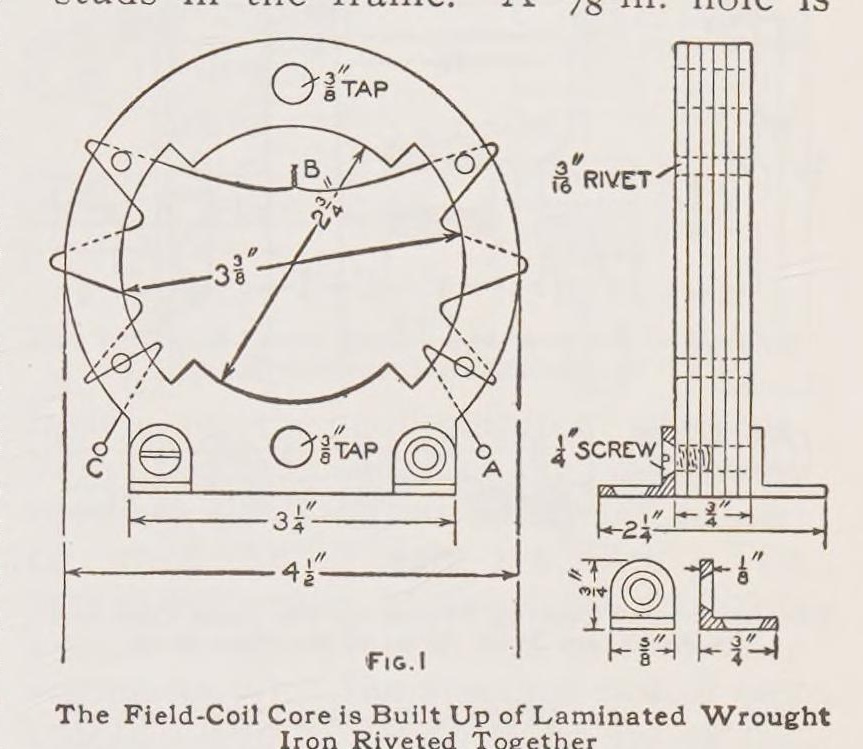
"The field frame of the motor, Fig. 1, is composed of wrought sheet iron."
2

Field frame

Mark a template 1/16 in larger than Fig. 1, cut enough sheet-iron plates to make 3/4 in, drill four rivet holes and rivet them. Mark the bore with dividers set at 1/8 in, drill 1/4 in holes round it and file to shape. Bore to 2-3/4 in on a lathe; mark the field core at 3-3/8 in and the outside at 4-1/2 in and finish to the marks.

Materiais para este passo:

Chapa de aço macioChapa de aço macio1 peça
Rebites de açoRebites de aço1 peça

Ferramentas necessárias:

Ponta de traçarPonta de traçar
Compasso de pontasCompasso de pontas
Berbequim de mãoBerbequim de mão
Limas (lima de mão)Limas (lima de mão)
Torno mecânicoTorno mecânico
MarteloMartelo
3

Studs, lugs and bearings

Drill and tap two 3/8 in holes 3-5/8 in apart for the bearing studs (Fig. 2) and 1/4 in holes for feet bent from 1/8 in brass or iron. Make the bearing supports from 1/8 in brass with a 5/8 in hole and a 5/8 in brass rod soldered in and drilled for the shaft. Fit them after the armature is made: wrap paper round the armature, set it in the field, slip the bearings on and solder them, then check it turns freely.

Materiais para este passo:

Chapa de latãoChapa de latão1 peça
Varão de latãoVarão de latão1 peça
Barra redonda de aço macioBarra redonda de aço macio1 peça
Solda de estanho-chumboSolda de estanho-chumbo1 peça

Ferramentas necessárias:

Jogo de machos e cossinetesJogo de machos e cossinetes
Torno mecânicoTorno mecânico
Ferro de soldarFerro de soldar
Berbequim de mãoBerbequim de mão
4

Armature core

Cut two 1/8 in wrought-iron outer plates and enough No. 24 sheet iron to make over 3/4 in (Fig. 5), drill six 1/8 in holes and rivet. Anneal at cherry red and cool in ashes. Bore to 1-11/16 in, fit a brass spider turned from 3/4 in brass on the machine-steel shaft with a setscrew, solder, turn the outside and face it to 3/4 in. File 12 slots 1/4 in deep and 7/16 in wide.

Materiais para este passo:

Chapa de aço macioChapa de aço macio1 peça
Rebites de açoRebites de aço1 peça
Varão de latãoVarão de latão1 peça
Barra redonda de aço macioBarra redonda de aço macio1 peça

Ferramentas necessárias:

Forja de ferreiroForja de ferreiro
Torno mecânicoTorno mecânico
Limas (lima de mão)Limas (lima de mão)
Berbequim de mãoBerbequim de mão
5

Commutator

Turn a piece of 3/4 in i.d. brass pipe to 3/4 in long, chamfer both ends at 60 deg, divide into 12, drill and tap a 1/8 in hole in each segment for a brass pin, turn the pins to 1-1/4 in outside and slit them for the wires. Saw it into 12 bars, fit them on turned fibre ends with 12 mica strips between, clamp with the nut and true up.

Materiais para este passo:

Tubo de latãoTubo de latão1 peça
Varão de latãoVarão de latão1 peça
Placa de fibra vulcanizadaPlaca de fibra vulcanizada1 peça
Folha de micaFolha de mica1 peça

Ferramentas necessárias:

Torno mecânicoTorno mecânico
Jogo de machos e cossinetesJogo de machos e cossinetes
Serra de arco para metaisSerra de arco para metais
6

Brushes

Make the brush holder of fibre (Fig. 8) and studs of 5/16 in brass rod (Fig. 9). Roll brass or copper wire gauze and flatten it to 1/8 x 1/4 in, solder one end, and fit the holder on the bearing with a setscrew.

Materiais para este passo:

Placa de fibra vulcanizadaPlaca de fibra vulcanizada1 peça
Varão de latãoVarão de latão1 peça
Rede metálicaRede metálica1 peça
Solda de estanho-chumboSolda de estanho-chumbo1 peça

Ferramentas necessárias:

Ferro de soldarFerro de soldar
Limas (lima de mão)Limas (lima de mão)
7

Wind the field

Insulate the field cores with 1/64 in fibre and end washers 1-1/8 x 1-1/2 in (softened in warm water, then glued). Wind each side with four layers (about 50 ft) of No. 18 double-cotton-covered wire, A to B and C to B, and join the ends at B.

Materiais para este passo:

Placa de fibra vulcanizadaPlaca de fibra vulcanizada1 peça
Fio de cobre esmaltadoFio de cobre esmaltado1 peça
Cola de madeiraCola de madeira1 peça
8

Wind the armature

Line the ring and spider with 1/16 in fibre and the slots with 1/64 in fibre channels. Wind each slot with about 12 ft of No. 21 wire, 40 turns in four layers of 10, shellacking each layer, leaving 2 in ends. Join each coil's start to the next coil's finish and solder the joints to the commutator pins.

Materiais para este passo:

Placa de fibra vulcanizadaPlaca de fibra vulcanizada1 peça
Fio de cobre esmaltadoFio de cobre esmaltado1 peça
Verniz de goma-lacaVerniz de goma-laca1 peça
Solda de estanho-chumboSolda de estanho-chumbo1 peça

Ferramentas necessárias:

Ferro de soldarFerro de soldar
9

Mount and wire

Screw the motor to a wood base 8 x 6 x 1 in with two terminals and a switch. Wire it in series: field end A to a terminal, field end C to one brush stud, the other brush through the switch to the other terminal.

Materiais para este passo:

Tábua de madeira de leiTábua de madeira de lei1 peça
Borne de painelBorne de painel1 peça
Interruptor de alavancaInterruptor de alavanca1 peça
Parafusos para madeiraParafusos para madeira1 peça

Ferramentas necessárias:

Arco de pua e brocaArco de pua e broca
10

Troubleshooting

Motor troubleshooting.

Flow

Loading...
11

History and honest limits

From W. A. Robertson in **The Boy Mechanic, Book 1** (Popular Mechanics, 1913), pp. 345-347 (checked on the archive.org scan boymechanic0000unse_n5a8). Sizes not in the text are in his Figs. 1-9; enamelled wire for cotton-covered and the low-voltage advice are ours.

Materiais

17

Ferramentas necessárias

11

Blueprints relacionados

Estes blueprints compartilham conhecimento — técnicas, materiais ou princípios
CC0 Domínio Público

Este blueprint é liberado sob CC0. Você é livre para copiar, modificar, distribuir e usar este trabalho para qualquer finalidade, sem pedir permissão.

Apoie o Maker comprando produtos através do Blueprint, onde ele ganha uma Comissão Maker definida pelos vendedores, ou crie uma nova versão deste Blueprint e inclua-o como conexão no seu próprio Blueprint para compartilhar receita.

Discussão

(0)

Entrar para participar da discussão

Carregando comentários...