ARTE
BELEZA E BEM-ESTAR
ARTESANATO
CULTURA E HISTÓRIA
ENTRETENIMENTO
MEIO AMBIENTE
COMIDA E BEBIDAS
ENGENHARIA REVERSA
CIÊNCIAS
ESPORTES
TECNOLOGIA
TECNOLOGIA VESTÍVEL
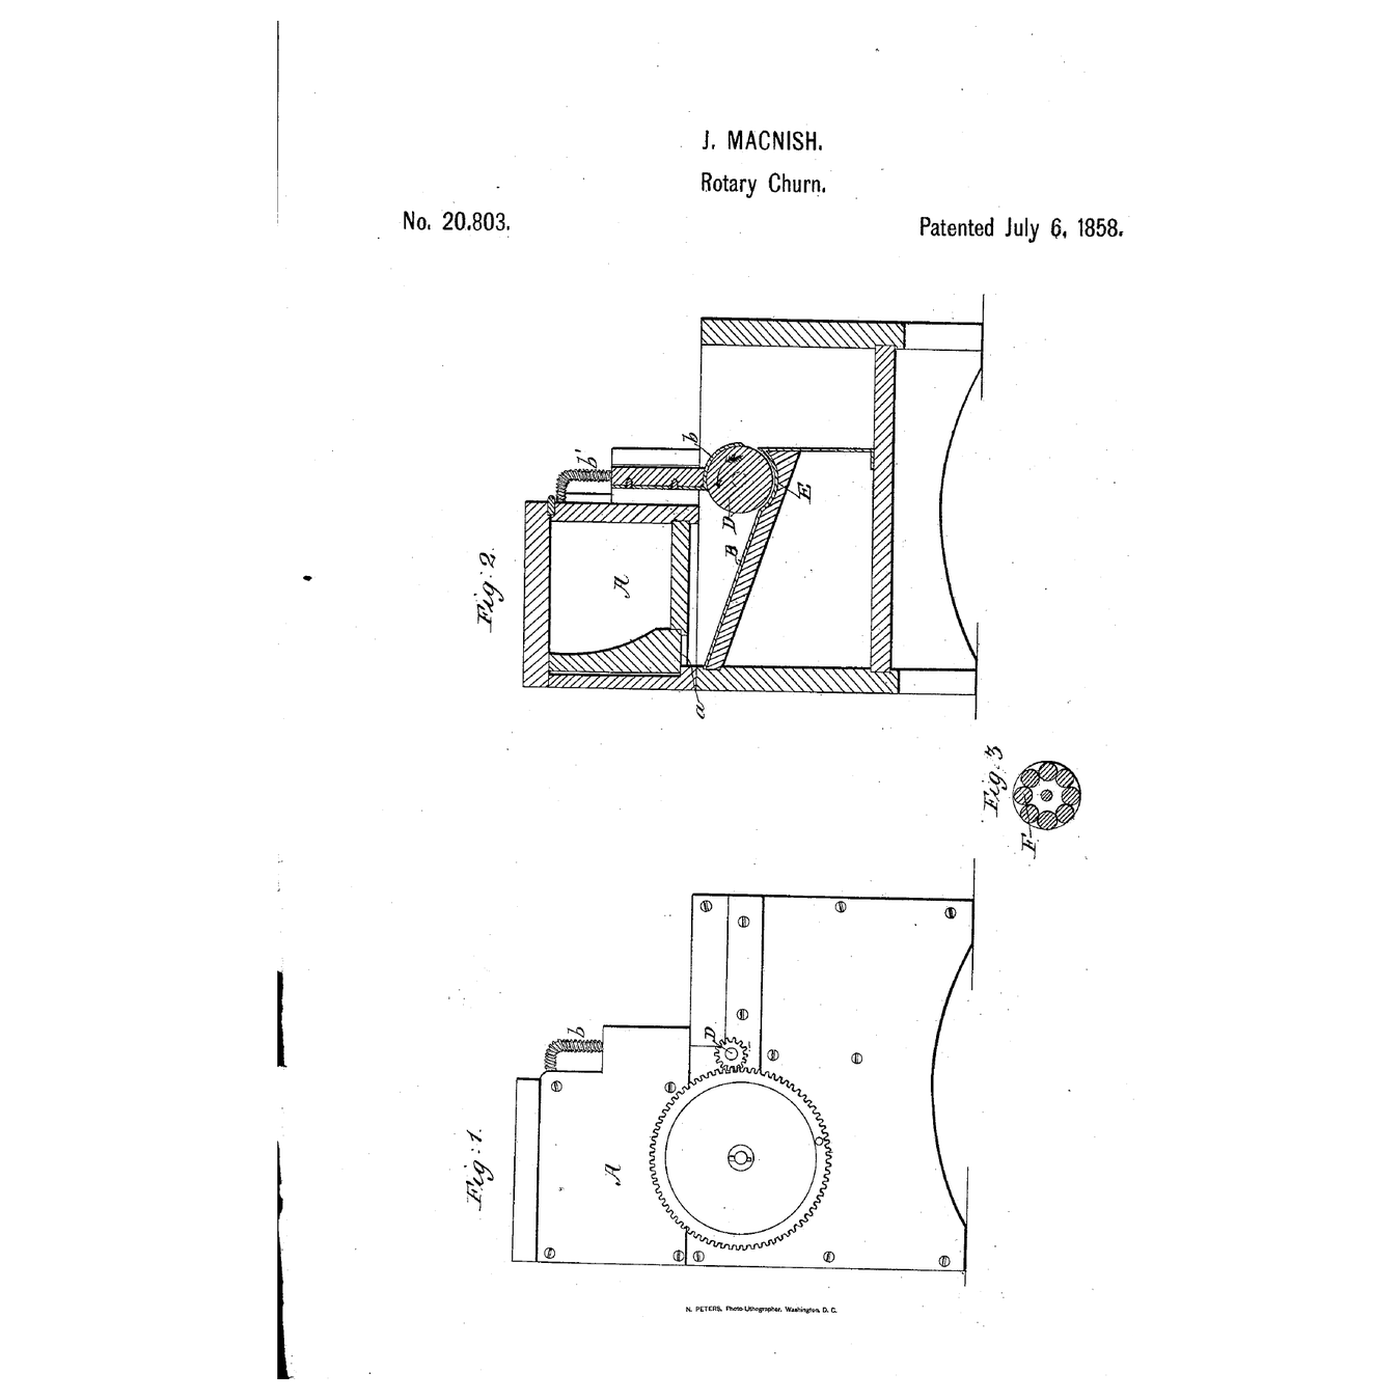


Roller-and-Concave Friction Churn: Cream Runs Once Between a Sprung Roller and a Fixed Concave
James MacNish of Berlin, Wisconsin, received US 20,803, dated 6 July 1858, for a churn that breaks the cream's fat globules by compression and friction: the cream runs down an apron into a fixed concave, where a roller held down by a sprung plate presses it through, and the plate scrapes the butter off the roller.
This rung prints the hopper, apron, concave, roller and gearing at tabletop scale, over a storage container.
Avançado
About 5 hours, plus printing
Instruções
1
1
Gearing and the roller's surface
Gearing and the roller's surface
A carregar o notebook Jupyter…
2
2
Churns with turning rollers, before it
Churns with turning rollers, before it
Those rollers worked inside a churn of cream; MacNish passes the cream once between a roller and a fixed concave.
3
3
Read US 20,803
Read US 20,803
"The cream only requires to pass between the roller and the concave once in order to produce butter."
4
4
Print the parts
Print the parts
Print the frame (/uploads/blueprints/roller-and-concave-friction-churn-frame.stl) lying on its cheek, the front cheek (/uploads/blueprints/roller-and-concave-friction-churn-cheek.stl), the roller (/uploads/blueprints/roller-and-concave-friction-churn-roller.stl), the shoe (/uploads/blueprints/roller-and-concave-friction-churn-shoe.stl), the pinion (/uploads/blueprints/roller-and-concave-friction-churn-pinion.stl), the wheel with its crank (/uploads/blueprints/roller-and-concave-friction-churn-wheel.stl) and the base (/uploads/blueprints/roller-and-concave-friction-churn-base.stl). The frame, cheek and base need a 240 mm print bed. Print in PETG at 0.2 mm layers, 30 % infill, 4 walls; wash before first use.
Materiais para este passo:
 Filamento PETG1 peça
Ferramentas necessárias:
 Impressora 3D de filamento (FDM)
5
5
Roller, shoe and cheek
Roller, shoe and cheek
Cut a 10 mm dowel 148 mm long as the axle and push it through the roller. Lay the roller in the concave with the axle in the back cheek's slot, and screw the front cheek on with five M4 screws. Lay the shoe over the roller, put a spring on each of two M4 screws, and screw them down through the bridge into the shoe until the springs press the roller into the concave.
Materiais para este passo:
 Cavilhas de madeira dura1 peça
 Parafusos de máquina1 peça
 Conjunto de molas de compressão1 peça
Ferramentas necessárias:
 Serrote
 Lixa
Lixa Conjunto de chaves de fendas
6
6
Gears and base
Gears and base
Fix the pinion on the axle behind the back cheek with an M3 screw drilled through the dowel. Glue a 10 mm dowel 19 mm long into the back cheek's stud hole, put the wheel on it meshing the pinion, and hold it with an M3 screw and washer through its crank arm into the stud's end. Screw the frame onto the base with four M4 screws and set the base on the container, its opening over the container.
Materiais para este passo:
Cavilhas de madeira dura1 peça Cola de madeira1 peçaParafusos de máquina1 peça
 Anilha plana1 peça
 Recipiente de armazenamento de grau alimentar1 peça
Ferramentas necessárias:
Serrote Berbequim de mãoConjunto de chaves de fendas
7
7
The build in 3D
The build in 3D
FreeCAD model of this build: the base on the container, the frame with hopper A, the gap a, apron B and concave E, the roller with the sprung shoe over it, the bridge, and the wheel and pinion behind the back cheek. The front cheek is left off to show the inside.
8
8
Churn
Churn
Pour 0.5 litre of heavy cream at about 15 °C, checked with the thermometer, into the hopper and turn the crank steadily, timing it with the stopwatch. The cream runs out under the hopper's front wall, down the apron and between the roller and the concave, and falls with the scraped butter into the container. Gather the butter into a lump with the spatula, pour off the buttermilk, wash the butter in cold water until it runs clear, work in a pinch of salt and weigh it.
Materiais para este passo:
 Natas para bater0.5 l
 Sal marinho grosso1 peça
 Água1 peça
Ferramentas necessárias:
 Termómetro de sonda permanente
 Cronómetro
 Espátula
 Balança digital de cozinha
 Taça grande de aço inoxidável
9
9
Troubleshooting
Troubleshooting
Roller-and-concave churn troubleshooting.
Flow
Loading...
10
10
History and honest limits
History and honest limits
**James MacNish** of Berlin, Marquette County, Wisconsin, US 20,803, 6 July 1858. His spring plate ran from end to end of the roller, partly encircling it, made yielding by spiral springs, and also scraped the butter off it. He showed a second roller (Fig. 3) and suggested placing it in an ordinary churn box with a concave bottom. His receptacle C had a faucet to let off the buttermilk. He claimed breaking the globules by compression and friction with a roller revolving in, and touching, a stationary concave. Our printed shoe, sizes, gearing and container are ours. FDM prints hold food in their layer lines, so wash well and replace when worn.
Materiais
10- 1 peçaReferência
- 1 peçaReferência
- 2 peçasReferência
- Referência
- 1 peçaReferência
- 1 peçaReferência
- Referência
- 0.5 lReferência
- 1 peçaReferência
- 1 peçaReferência
Ferramentas necessárias
10- Referência
- Referência
- Referência
- Referência
- Referência
- Referência
- Referência
- Referência
- Referência
- Referência
Ficheiros de design
1Blueprints relacionados
Estes blueprints compartilham conhecimento — técnicas, materiais ou princípios



CC0 Domínio Público
Este blueprint é liberado sob CC0. Você é livre para copiar, modificar, distribuir e usar este trabalho para qualquer finalidade, sem pedir permissão.
Apoie o Maker comprando produtos através do Blueprint, onde ele ganha uma Comissão Maker definida pelos vendedores, ou crie uma nova versão deste Blueprint e inclua-o como conexão no seu próprio Blueprint para compartilhar receita.