Colaboração
ARTE
BELEZA E BEM-ESTAR
ARTESANATO
CULTURA E HISTÓRIA
ENTRETENIMENTO
MEIO AMBIENTE
COMIDA E BEBIDAS
ENGENHARIA REVERSA
CIÊNCIAS
ESPORTES
TECNOLOGIA
TECNOLOGIA VESTÍVEL
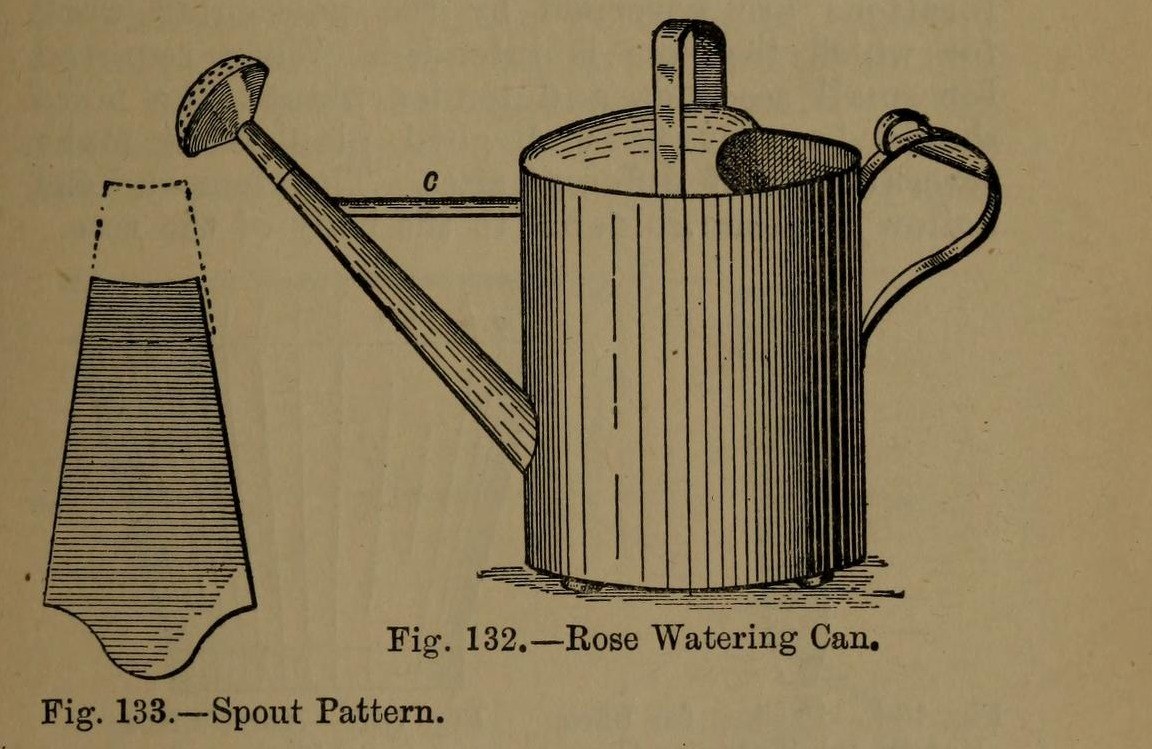


Watering Can: the Tinplate Rose Watering-Can (Hasluck, 1907)
A tinsmith's garden watering can: a round body from one sheet 2 ft 1 in x 8 1/2 in, a two-piece spout with a perforated rose, a hollowed top with a cross handle, and a back handle with a thumb ring. Tinplate or galvanised iron.
Variable: the rose. Its pattern diameter is the rose diameter x 4 / 3; finer holes for seedlings.
Source: Paul N. Hasluck, Tinplate Work (1907), pp. 54-57. Unknown: solder. Picture: Figs. 132-135 of the book.
Intermediário
Unknown
Instruções
1
1
Make the body and bottom
Make the body and bottom
Cut a sheet 2 ft 1 in by 8 1/2 in. Wire one edge, sink it in the crease iron, round it and groove the seam; solder the seam inside. Cut the spout hole opposite the seam, 2 1/2 in from the bottom. Edge the bottom to fit, beat it up and solder it from inside.
Materiais para este passo:
 Chapa de folha de flandres1 body, bottom
 Arame de ferro1 edge
 Solda de estanho-chumbo1 peça
Ferramentas necessárias:
 Tesoura de chapa
 Estaca
 Maço de madeira
 Ferro de solda elétrico
 Fluxo
2
2
Make and fit the spout
Make and fit the spout
Cut the spout in two pieces (Fig. 133), bend them to shape and solder the seams. Solder the larger piece into the body. Make it longer for plants out of reach, with an elbow for plants up high. Make the stay: a taper strip as long as the gap between can and spout, bent to a half-round section and soldered in.
Materiais para este passo:
Chapa de folha de flandres1 spout, staySolda de estanho-chumbo1 peçaFerramentas necessárias:
Tesoura de chapaEstacaFerro de solda elétricoFluxo3
3
Make the rose
Make the rose
Set out the rose body (Fig. 135): its diameter is the rose diameter x 4 / 3, so a 3 in rose needs a 4 in pattern, with lines a b at right angles. Bend it over a funnel stake and solder the seam. Hollow a disc for the front, with edges for capping on. Inside the hollow, mark circles and pierce them at intervals with a bradawl over a hard wood block; very fine for seedlings. Solder front and stem to the rose body. Several roses of different sizes are useful.
Materiais para este passo:
Chapa de folha de flandres1 roseSolda de estanho-chumbo1 peçaFerramentas necessárias:
 Compasso de pontasTesoura de chapaEstaca
 Martelo de aplanar
 Sovela
 Bloco de madeira duraFerro de solda elétricoFluxo
4
4
Fit the top and handles
Fit the top and handles
Hollow the top (Fig. 134), fit it to the body, wire its inner arc and solder it on. Cross handle: a strip about 1 3/4 in wide, wired with No. 12 B.W.G., bent to shape; cut two holes in the top with a small sharp chisel and solder the ends inside and on top. Back handle (Fig. 136): wire and bend it, solder a small boss under its upper part, and solder it opposite the spout with a thumb ring at the top. Solder three small hollowed studs under the bottom.
Materiais para este passo:
Chapa de folha de flandres1 top, handles, studsArame de ferro1 No. 12 B.W.G.Solda de estanho-chumbo1 peçaFerramentas necessárias:
Tesoura de chapaMartelo de aplanar Cinzel de açoFerro de solda elétricoFluxo
5
5
Clean and paint
Clean and paint
Clean with turpentine and whiting. Give two good coats of paint: red inside and green outside suit it.
Materiais para este passo:
 Tinta de óleo2 coats
Ferramentas necessárias:
 Terebintina
 Carbonato de cálcio (branco de espanha)
Materiais
4- 1 top, handles, studsReferência
- 1 No. 12 B.W.G.Referência
- 4 peçasReferência
- 2 coatsReferência
Ferramentas necessárias
12- Referência
- Referência
- Referência
- Referência
- Referência
- Referência
- Referência
- Referência
- Referência
- Referência
- Referência
- Referência
Materiais de Blueprints conectados



Este projeto faz

CC0 Domínio Público
Este blueprint é liberado sob CC0. Você é livre para copiar, modificar, distribuir e usar este trabalho para qualquer finalidade, sem pedir permissão.
Apoie o Maker comprando produtos através do Blueprint, onde ele ganha uma Comissão Maker definida pelos vendedores, ou crie uma nova versão deste Blueprint e inclua-o como conexão no seu próprio Blueprint para compartilhar receita.