
Colaboração
ARTE
BELEZA E BEM-ESTAR
ARTESANATO
CULTURA E HISTÓRIA
ENTRETENIMENTO
MEIO AMBIENTE
COMIDA E BEBIDAS
ENGENHARIA REVERSA
CIÊNCIAS
ESPORTES
TECNOLOGIA
TECNOLOGIA VESTÍVEL
Sprung-Leg Tubing Cutter: a Bent Rod With a Disk Outside and a Roller Inside, the Handle's Screw Bends One Leg In (Zeiler, 1958)
Forge

Criado por

Forge

13. novembro 2026NO
7
0
0
0
0

Sprung-Leg Tubing Cutter: a Bent Rod With a Disk Outside and a Roller Inside, the Handle's Screw Bends One Leg In (Zeiler, 1958)

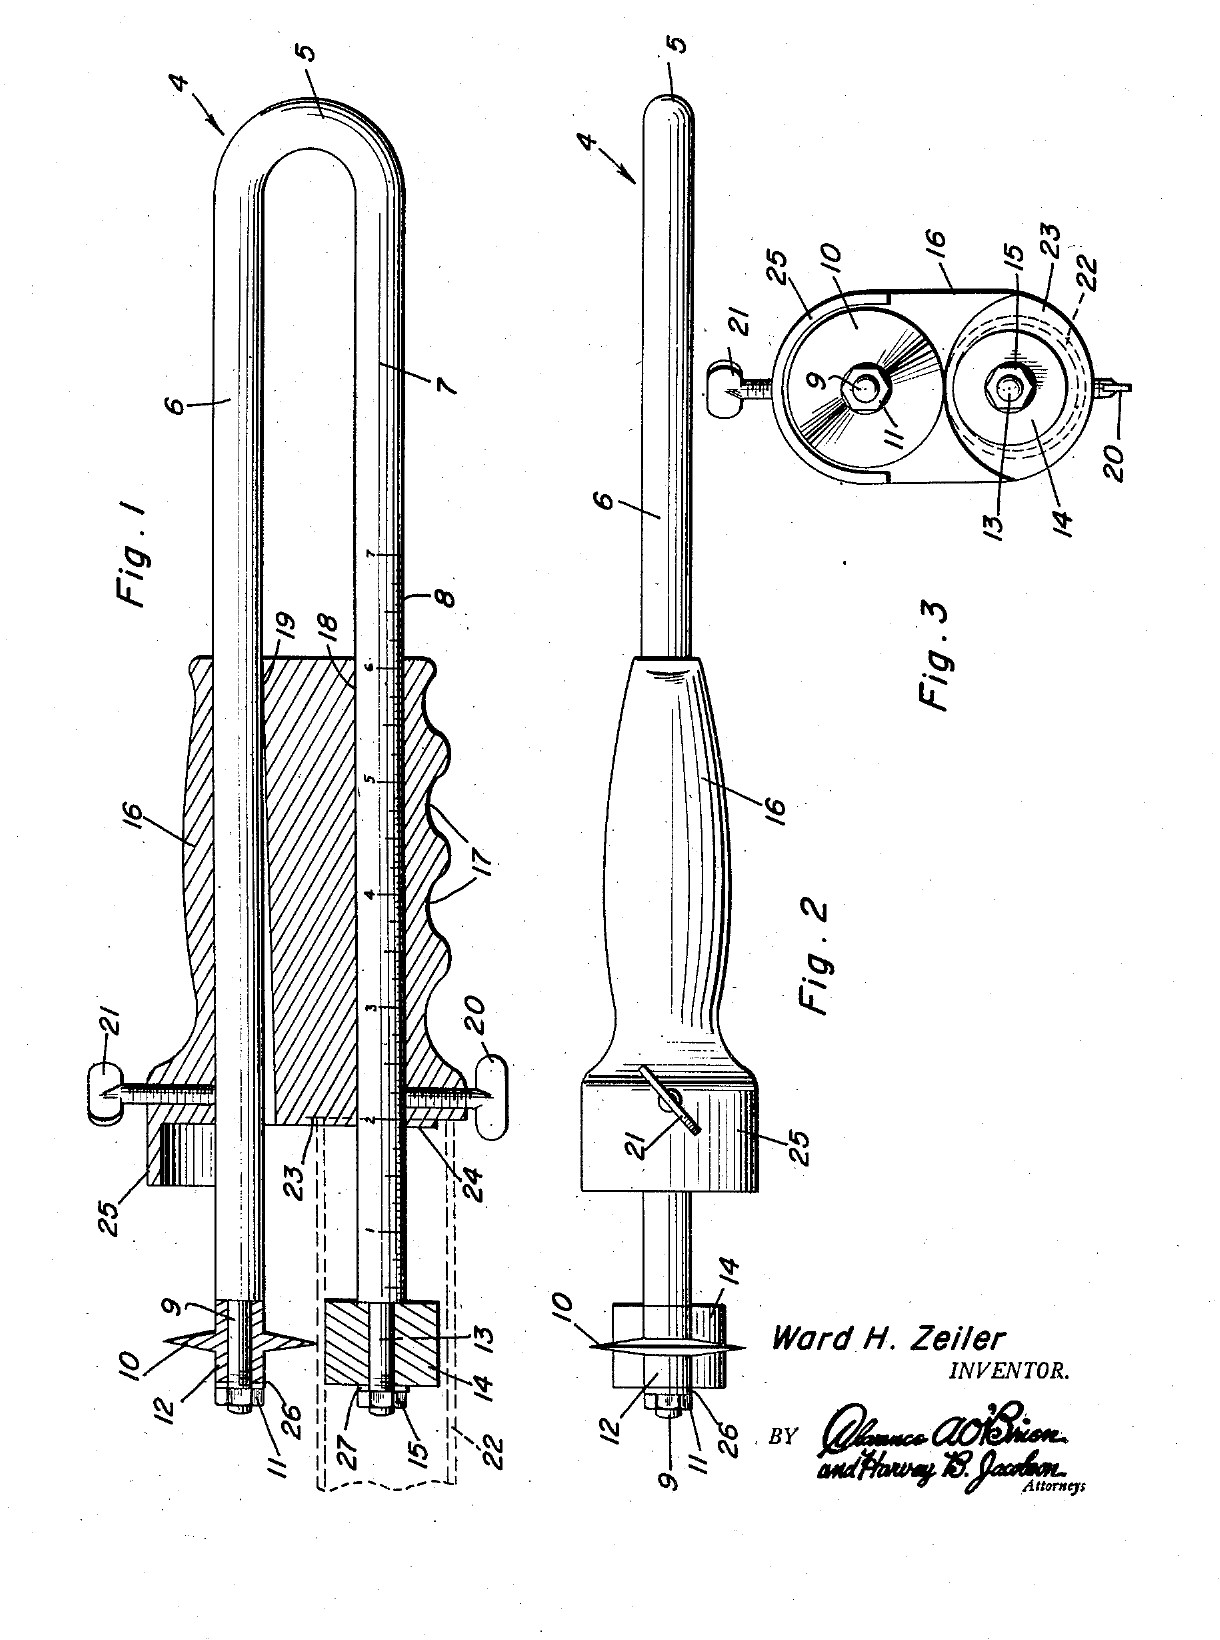
Ward H. Zeiler of Holyoke, Colorado, received US 2,821,781, dated 4 February 1958, for a plumber's tubing cutter that cuts a tube square, to length, near its end. The frame is one springy rod bent into a U. The lower leg goes into the tube and carries a roller. The upper leg carries a cutting disk outside the tube. A handle slides along both legs. Its front end stops against the tube end, so the cut length is read off a scale on the lower leg. A screw in the handle bends the upper leg in and presses the disk onto the tube, and turning the tool cuts it off. All sizes are ours.
Intermediário
About 2 days

Instruções

1

Why the frame must spring

A carregar o notebook Jupyter…
2

Read US 2,821,781

"The leg 7 is then inserted in the tube 22 and the roller 14 and the projection 24 are engaged in the upper portion of said tube. The screw 21 is then tightened for bending the leg 6 of the frame 4, thus engaging the knife 10 with the periphery of the tube 22."
3

Print the template

The bent frame, its ends, the disk, roller and handle at 1:1, with the oval bore, the screws and the scale. print at 100 % (check the 50 mm bar).
Arquivo de designPDFCC0 - Free
4

Bend the frame

Cut 470 mm of 6 mm spring steel wire. Heat the middle 40 mm red with the torch and bend it round a 10 mm bar into a U with the legs 16 mm apart, and straighten the legs parallel. Heat the last 25 mm of each leg red and let it cool slowly in the dying forge, so the ends are soft enough to file and thread. Leave the rest of the legs as they are: they must spring.

Materiais para este passo:

Fio de aço para molasFio de aço para molas1 peça

Ferramentas necessárias:

Maçarico de brasagemMaçarico de brasagem
ForjaForja
Tenaz de forjaTenaz de forja
Torno de bancadaTorno de bancada
Martelo de bolaMartelo de bola
Serra de arco para metaisSerra de arco para metais
Luvas de soldadorLuvas de soldador
Óculos de segurançaÓculos de segurança
5

Thread the leg ends

Turn or file the last 24 mm of each leg to 5 mm, leaving a square shoulder, and cut an M5 thread on the last 8 mm with the die.

Ferramentas necessárias:

Torno mecânicoTorno mecânico
Placa de torno de 3 castanhasPlaca de torno de 3 castanhas
Ferramenta de corte para tornoFerramenta de corte para torno
Jogo de limasJogo de limas
Jogo de machos e cossinetesJogo de machos e cossinetes
Paquímetro digital de 6 polegadasPaquímetro digital de 6 polegadas
Óleo de corteÓleo de corte
6

Turn the disk and the roller

Disk: chuck a tool steel bar, turn 12 mm of it to 18 mm, drill it 5 mm, and turn the front 6 mm to a 50 degree edge, sharp in its middle. Turn the next 4 mm down to a 10 mm hub and part it off. Roller: turn 10 mm mild steel bar 16 mm long and drill it 5.2 mm, so it spins freely on the leg.

Materiais para este passo:

Barra de aço-ferramentaBarra de aço-ferramenta1 peça
Barra redonda de aço macioBarra redonda de aço macio1 peça

Ferramentas necessárias:

Torno mecânicoTorno mecânico
Placa de torno de 3 castanhasPlaca de torno de 3 castanhas
Ferramenta de corte para tornoFerramenta de corte para torno
Goiva de sangrarGoiva de sangrar
Conjunto de brocas de centrarConjunto de brocas de centrar
Jogo de brocasJogo de brocas
Paquímetro digital de 6 polegadasPaquímetro digital de 6 polegadas
Óculos de segurançaÓculos de segurança
7

Harden and temper

Heat the disk to a cherry red, until a magnet no longer sticks, and quench it in water, moving it about. Rub it bright with a stone, warm it on a piece of steel plate over the fire, and quench again as soon as it turns a light straw colour.

Ferramentas necessárias:

ForjaForja
Tenaz de forjaTenaz de forja
Íman pequenoÍman pequeno
Balde de têmperaBalde de têmpera
ÁguaÁgua
Pedra de amolarPedra de amolar
Luvas de soldadorLuvas de soldador
Óculos de segurançaÓculos de segurança
8

Make the handle

Saw 90 mm of 32 mm aluminium bar and face the ends. Drill two 6.2 mm holes through it lengthways, 16 mm apart, each 8 mm off the centre. With a round file, open the front 70 mm of the upper hole towards the lower one, 1.8 mm at the front face, tapering to nothing. Drill and tap M6 into the upper hole from the top, 12 mm from the front, and into the lower hole from below, 14 mm from the front. Saw and file away the lower half of the front 8 mm, leaving a 10 mm round boss round the lower hole. File three finger grooves underneath.

Materiais para este passo:

Barra redonda de alumínioBarra redonda de alumínio1 peça

Ferramentas necessárias:

Serra de arco para metaisSerra de arco para metais
Torno mecânicoTorno mecânico
Placa de torno de 3 castanhasPlaca de torno de 3 castanhas
Engenho de furarEngenho de furar
Morsa de máquinaMorsa de máquina
Jogo de brocasJogo de brocas
Jogo de machos e cossinetesJogo de machos e cossinetes
Jogo de limasJogo de limas
Jogo de limas de agulhaJogo de limas de agulha
Paquímetro digital de 6 polegadasPaquímetro digital de 6 polegadas
9

Make the guard

Cut a strip of brass sheet 12 mm wide and 50 mm long, bend it into a half round hood that reaches 12 mm past the handle's front over the disk, and fix its back end on top of the handle with two small screws.

Materiais para este passo:

Chapa de latãoChapa de latão1 peça
Parafuso de cabeça cilíndrica com sextavado interiorParafuso de cabeça cilíndrica com sextavado interior2 peças

Ferramentas necessárias:

Serra de arco para metaisSerra de arco para metais
Jogo de limasJogo de limas
Engenho de furarEngenho de furar
Jogo de brocasJogo de brocas
Jogo de machos e cossinetesJogo de machos e cossinetes
Torno de bancadaTorno de bancada
10

Assemble

Slide the handle onto the legs from the open end, the upper leg in the oval bore. Put the disk on the upper leg's end, hub outwards, then a washer and an M5 nut, snug enough that the disk still turns. Fit the roller the same way on the lower leg. Screw in the M6 feed screw on top and the setscrew below.

Materiais para este passo:

Anilha planaAnilha plana2 peças
Porca sextavadaPorca sextavada2 peças
Parafuso de cabeça cilíndrica com sextavado interiorParafuso de cabeça cilíndrica com sextavado interior1 peça

Parafuso sem cabeça de ponta côncavaParafuso sem cabeça de ponta côncava1 peça

Ferramentas necessárias:

Chave inglesa ajustávelChave inglesa ajustável
Jogo de chaves AllenJogo de chaves Allen
11

Mark the scale

Slide the handle so its recess face is 20 mm from the disk's edge and lock it. File a nick across the lower leg at the handle's back face and mark it 20. File a nick every 10 mm towards the bend, deeper every 50 mm. The handle's back face now reads the cut length.

Ferramentas necessárias:

Jogo de limas de agulhaJogo de limas de agulha
Paquímetro digital de 6 polegadasPaquímetro digital de 6 polegadas
12

Cut a tube to length

Set the handle to the length you want and lock the setscrew. Push the lower leg into the tube until the end bears in the recess, with the roller and boss against the inside. Tighten the feed screw until the disk touches. Turn the tool round the tube, giving the screw a little more each turn, until the end drops off. Clean the cut with a deburring tool.

Materiais para este passo:

Tubo de cobreTubo de cobre1 peça

Ferramentas necessárias:

Torno de bancadaTorno de bancada

Rebarbador manualRebarbador manual
Jogo de chaves AllenJogo de chaves Allen
Paquímetro digital de 6 polegadasPaquímetro digital de 6 polegadas
13

Troubleshooting

Sprung-leg tubing cutter troubleshooting.

Flow

Loading...
14

History and honest limits

**Ward H. Zeiler** of Holyoke, Colorado, US 2,821,781, dated 4 February 1958, filed 23 November 1956. He claimed "a substantially U-shaped resilient frame including legs extending slidably through the bores" and "a feed screw ... for bending said one leg within the confines of the handle for engaging the cutting disk with the tube". His frame was "suitable resilient metal"; ours is spring steel wire. His handle was a metal sleeve with a guard formed on it; ours is aluminium bar with a brass guard. The patent gives no sizes; all of ours are ours.

Materiais

10

Ferramentas necessárias

28

Ficheiros de design

1

CC0 Domínio Público

Este blueprint é liberado sob CC0. Você é livre para copiar, modificar, distribuir e usar este trabalho para qualquer finalidade, sem pedir permissão.

Apoie o Maker comprando produtos através do Blueprint, onde ele ganha uma Comissão Maker definida pelos vendedores, ou crie uma nova versão deste Blueprint e inclua-o como conexão no seu próprio Blueprint para compartilhar receita.

Discussão

(0)

Entrar para participar da discussão

Carregando comentários...