
Electrolysis of Water — Splitting the Molecule That Fooled Chemistry for Centuries
For most of recorded history, water was considered an element — one of the four classical elements of Aristotle, and a substance so fundamental that its decomposition seemed inconceivable. In 1800, just weeks after Alessandro Volta announced his invention of the voltaic pile (the first true battery), William Nicholson and Anthony Carlisle in London connected Volta's device to two wires dipping into water and watched in astonishment as streams of gas bubbles rose from both electrodes. They had split water into its components: hydrogen and oxygen.
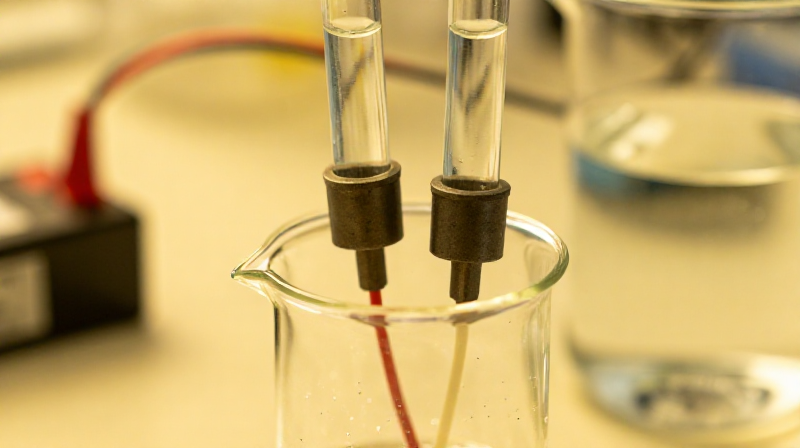
The chemistry is deceptively simple: 2H₂O → 2H₂ + O₂. At the cathode (negative electrode), water molecules gain electrons and release hydrogen gas: 2H₂O + 2e⁻ → H₂↑ + 2OH⁻. At the anode (positive electrode), water molecules lose electrons and release oxygen gas: 2H₂O → O₂↑ + 4H⁺ + 4e⁻. The volume of hydrogen produced is exactly twice the volume of oxygen — reflecting the 2:1 ratio of hydrogen to oxygen atoms in each water molecule (H₂O).
Pure water conducts electricity poorly, so a small amount of electrolyte (sodium hydroxide or sulfuric acid) is added to carry the current. The electrolyte is not consumed — it merely provides ions to transport charge through the solution while the water itself is decomposed.
This single experiment — achievable with a battery, two electrodes, and a beaker of water — proved that water was a compound, launched the field of electrochemistry, and eventually led to industrial processes that produce millions of tonnes of hydrogen, chlorine, and aluminium by electrolysis every year.
SAFETY NOTE: Hydrogen gas is flammable and forms explosive mixtures with air. Do not perform near open flames. The quantities produced in this demonstration are small and safe in a ventilated space, but never collect hydrogen in sealed containers without proper venting.
Instructions
Prepare safety equipment and workspace
Prepare safety equipment and workspace
Put on chemical splash goggles and nitrile gloves. Work in a well-ventilated area away from open flames — hydrogen gas is flammable. The quantities produced in this demonstration are small and safe, but good practice demands caution. Ensure the DC power supply or battery is disconnected until the apparatus is fully assembled. Keep a fire extinguisher accessible.
Tools needed:
 Chemical Splash Goggles
 Nitrile Rubber Gloves (Thick)
Prepare the electrolyte solution
Prepare the electrolyte solution
Dissolve 5 g of sodium hydroxide (NaOH) in 500 ml of distilled water in a glass beaker. Stir until fully dissolved. The sodium hydroxide provides ions (Na⁺ and OH⁻) that carry the electric current through the solution — pure distilled water is a poor conductor because it contains very few ions. The electrolyte is not consumed by the reaction; it merely enables the current to flow while the water molecules themselves are split. Nicholson and Carlisle used ordinary tap water, which contained enough dissolved salts to conduct.
Materials for this step:
 Sodium Hydroxide (Lab Grade, 500g)5 g
 Distilled Water (1 Liter)500 ml
Tools needed:
 Digital Precision Scale
 Glass Beaker (Borosilicate, 500ml)
 Glass Stirring Rod (25cm)
Position the graphite electrodes
Position the graphite electrodes
Place two graphite electrodes upright in the beaker, separated by about 5 cm. Graphite is ideal because it is electrically conductive, chemically inert in alkaline solution, and inexpensive. Nicholson and Carlisle used platinum wires — platinum remains the gold standard for electrochemistry because it catalyses the electrode reactions and resists corrosion, but graphite works well for demonstration. Secure the electrodes with clips or by resting them against the beaker rim.
Materials for this step:
 Graphite Electrode2 pieces
Fill test tubes with electrolyte and invert over electrodes
Fill test tubes with electrolyte and invert over electrodes
Fill two test tubes completely with electrolyte solution — ensuring no air bubbles remain. Cover each tube mouth with a thumb, invert, and lower into the beaker, positioning one tube over each electrode. The test tube mouths must be below the surface of the electrolyte. When you release your thumb underwater, the tubes remain full because atmospheric pressure holds the water in place. As gases form at the electrodes, they will rise into the tubes and displace the water downward — this is the classic 'displacement of water' gas collection method.
Tools needed:
 Test Tube (Borosilicate)
 Test Tube Holder
Connect the electrodes to the DC power supply
Connect the electrodes to the DC power supply
Using alligator clip leads, connect one graphite electrode to the negative terminal (cathode) and the other to the positive terminal (anode) of a DC power supply. Set the voltage to 9–12 V DC. Do NOT turn on the power yet — ensure all connections are secure and the electrodes are stable. In 1800, Nicholson and Carlisle used Volta's pile (a stack of alternating zinc and copper discs separated by brine-soaked cardboard) — the world's first battery, providing roughly 6–10 volts.
Tools needed:
 DC Power Supply (Bench)
 Alligator Clip Test Leads (10-Pack, 5 Colors)
Turn on the power and observe gas evolution
Turn on the power and observe gas evolution
Switch on the DC power supply. Within seconds, streams of tiny bubbles appear at both electrodes. The cathode (negative) produces hydrogen gas — the bubbles are small and rapid. The anode (positive) produces oxygen gas — the bubbles are slightly larger and about half as frequent. This is the moment Nicholson and Carlisle witnessed on 2 May 1800 — the first deliberate decomposition of water by electricity, proving definitively that water was H₂O, a compound of two gases.
Observe the 2:1 volume ratio of hydrogen to oxygen
Observe the 2:1 volume ratio of hydrogen to oxygen
Watch the gas levels in the two inverted test tubes as they fill. The tube over the cathode fills approximately twice as fast as the tube over the anode. This 2:1 ratio is a direct, visible demonstration of water's molecular formula: each water molecule (H₂O) contains two hydrogen atoms and one oxygen atom. When the cathode tube is half full, the anode tube should be approximately one quarter full. This stoichiometric proof was one of the most elegant confirmations in the history of chemistry.
Collect a full tube of hydrogen gas
Collect a full tube of hydrogen gas
Continue electrolysis until the cathode tube is nearly full of gas (the water level has dropped to near the tube mouth). This takes 15–30 minutes depending on the current. The collected gas is nearly pure hydrogen — colourless, odourless, and the lightest substance in the universe. While the tube is still inverted underwater, slide a small piece of card or glass plate under its mouth to seal it, then lift the tube out of the water, keeping it inverted (hydrogen is lighter than air and will escape upward if the tube is turned right-side up).
Test the hydrogen with the squeaky pop test
Test the hydrogen with the squeaky pop test
Hold the inverted test tube of hydrogen with the open end pointing slightly downward. Remove the card and immediately bring a lit wooden splint to the mouth of the tube. A sharp, high-pitched 'pop' or 'bark' confirms hydrogen: the gas ignites and reacts explosively with oxygen in the air — 2H₂ + O₂ → 2H₂O. The hydrogen burns with an almost invisible pale blue flame. This 'squeaky pop' test has been the standard hydrogen identification test since Cavendish first isolated the gas in 1766.
Collect and test the oxygen gas
Collect and test the oxygen gas
Collect a tube of oxygen from the anode in the same way. To test: insert a glowing (not burning) wooden splint into the tube. The splint reignites with a bright flame — oxygen does not burn itself but vigorously supports combustion. This 'glowing splint' test confirms oxygen. Priestley first observed this relighting effect in 1774. Together, the two gas tests confirm that water has been decomposed into exactly two gases: flammable hydrogen and combustion-supporting oxygen.
Observe the electrode reactions
Observe the electrode reactions
After prolonged electrolysis, examine the electrodes. The cathode may have developed small bubbles adhering to its surface — residual hydrogen. The anode surface may appear slightly eroded if graphite is used (oxygen can slowly oxidise carbon to CO₂ at the anode — this is why platinum is preferred for precise work). The solution near the cathode is slightly more alkaline (OH⁻ produced), while the solution near the anode is slightly more acidic (H⁺ produced). The electrolyte itself (NaOH) is unchanged in total — it merely carried the current.
Disconnect and clean up
Disconnect and clean up
Turn off the power supply and disconnect the electrodes. The electrolyte solution can be neutralised with a small amount of vinegar (if alkaline) or sodium bicarbonate (if acidic) and poured down the drain. Rinse the electrodes and glassware with distilled water. The graphite electrodes can be reused indefinitely. This single experiment — first performed with a voltaic pile and two platinum wires in a London workshop in 1800 — founded the field of electrochemistry and eventually led to industrial processes that produce hydrogen for fuel cells, chlorine for water treatment, and aluminium from bauxite ore.
Materials
3- Placeholder
- Placeholder
- 2 piecesPlaceholder
Tools Required
9- Placeholder
- Placeholder
- Placeholder
- Placeholder
- Placeholder
- Placeholder
- Placeholder
- Placeholder
Connected Blueprint Materials
Related Blueprints
These blueprints share knowledge with this one — techniques, materials, or principles that connect them in the learning graph.
Related blueprints
Other builds that share materials, tools, or techniques with this one.
CC0 Public Domain
This blueprint is released under CC0. You are free to copy, modify, distribute, and use this work for any purpose, without asking permission.
Support the Maker by purchasing products through their Blueprint where they earn a Maker Commission set by Vendors, or create a new iteration of this Blueprint and include it as a connection in your own Blueprint to share revenue.