KUNST
SCHÖNHEIT & WELLNESS
HANDWERK
KULTUR & GESCHICHTE
UNTERHALTUNG
UMFELD
ESSEN & GETRÄNKE
REVERSE ENGINEERING
WISSENSCHAFTEN
SPORT
TECHNOLOGIE
WEARABLES
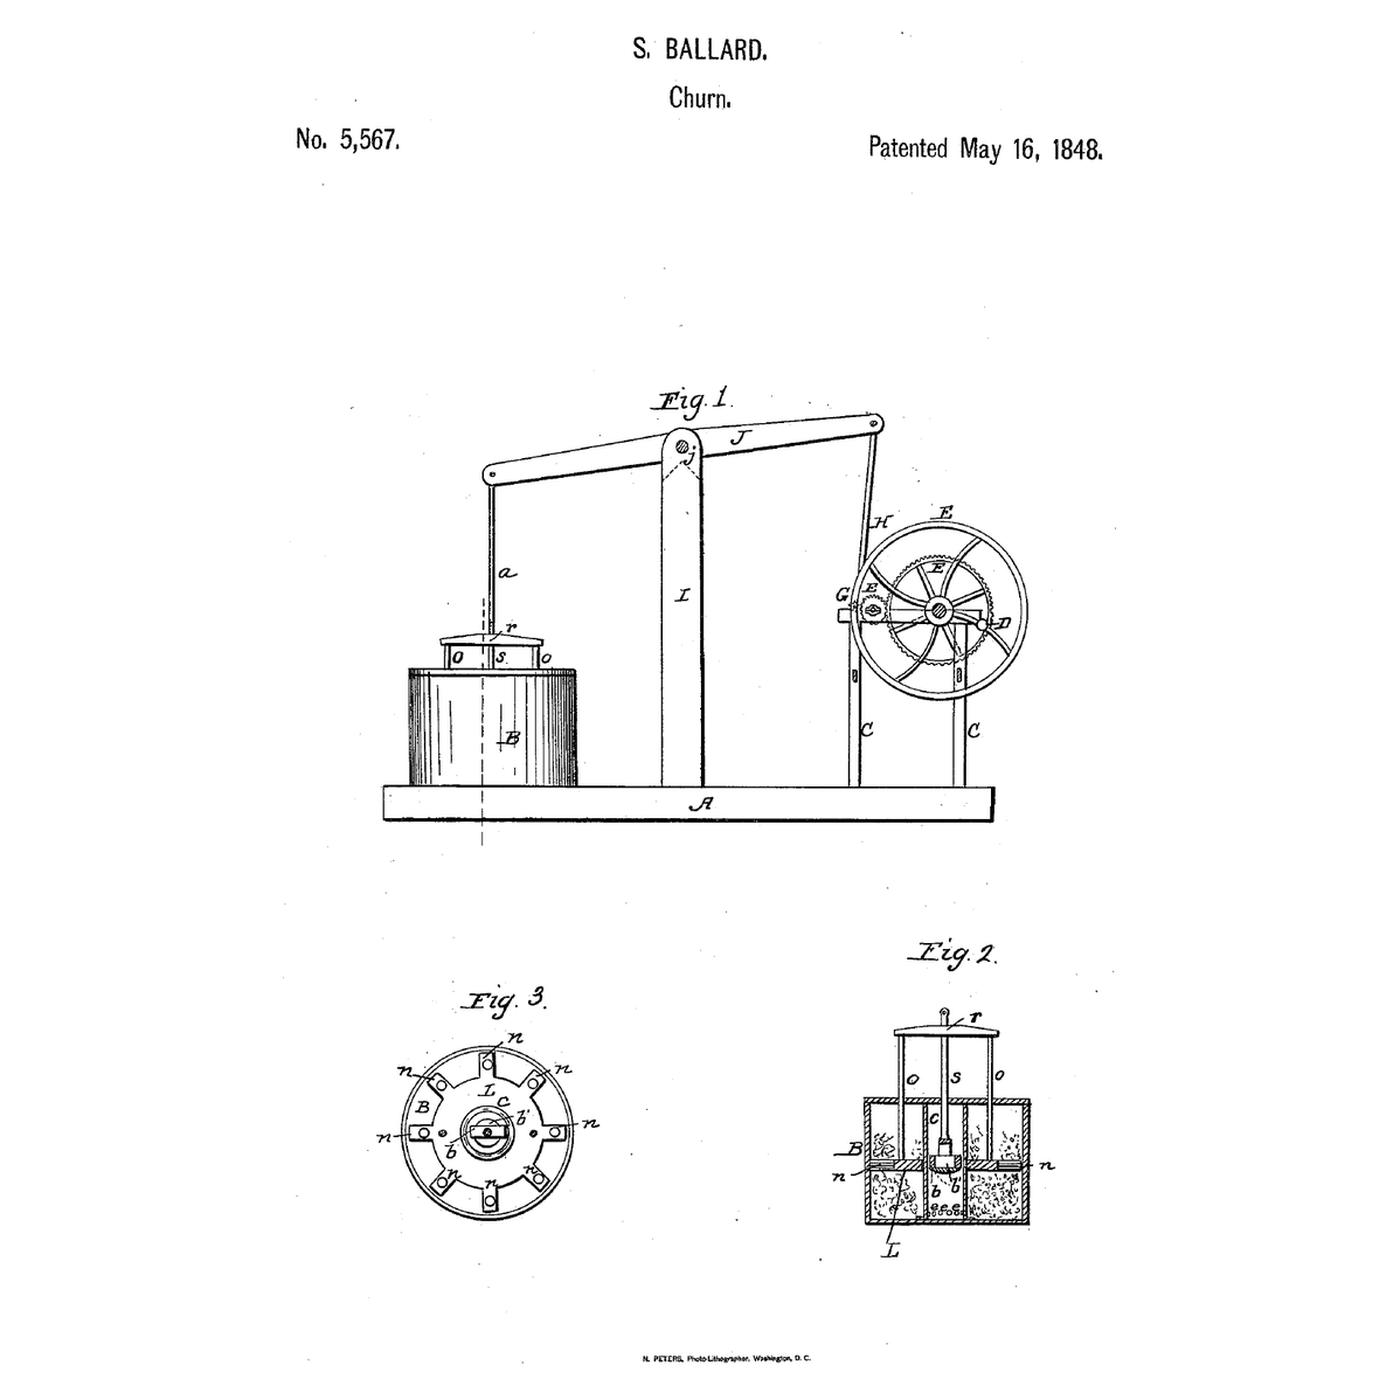


Air-Pump Annular Dasher Churn: A Pump in the Middle, a Ring Dasher Round It
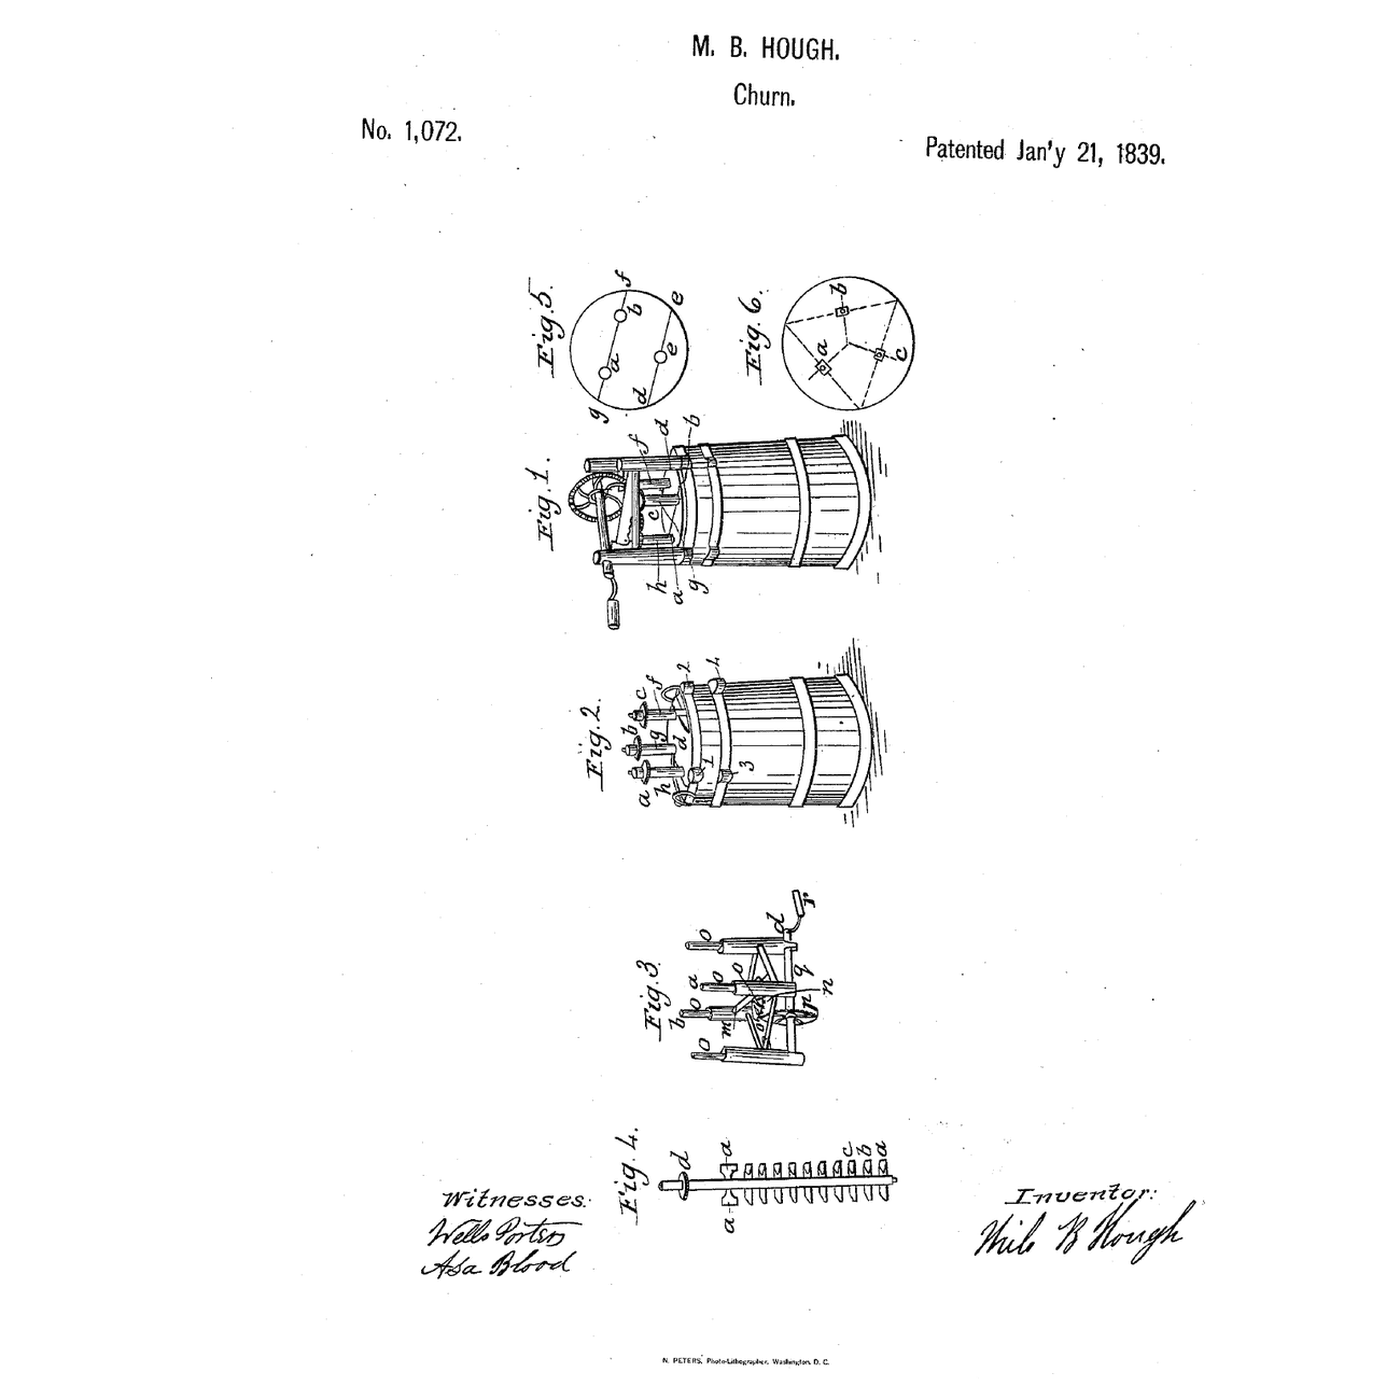
Ballard combined "an air pump with the reciprocating dasher of the common upright tub or barrel churn."
Stephen Ballard of Meigs Creek, Ohio, received US 5,567, dated 16 May 1848, for an atmospheric churn: a pump cylinder fixed upright in the middle of the tub, closed at the bottom, with valves round its lower edge opening outward and a piston whose valve opens downward, "in the manner of a common pump"; and an annular dasher with radial arms that slides over the cylinder, joined by rods to the piston rod's crosshead. A working beam on a standard, driven through cog wheels, a balance wheel, crank and pitman, works both.
This rung works out the air pumped, then prints the cylinder, piston, ring dasher and crosshead, works them by a hand beam, and makes butter.
Erfahren
About 6 hours, plus printing
Anweisungen
1
1
Air pumped
Air pumped
Jupyter-Notebook wird geladen …
2
2
An up-and-down dasher before it
An up-and-down dasher before it
The embedded blueprint improves the common upright dash. Ballard puts a pump inside the dasher's ring.
3
3
Read US 5,567
Read US 5,567
"Within the cylinder a bucket or piston (b) is fitted in the manner of a common pump, but with the valve (b') of the piston opening downward, in order that when the piston rises the air may pass down through it into the lower part of the cylinder to be forced out through the valves (e e e e) around the bottom of the cylinder into the surrounding cream when the piston is depressed."
4
4
Print the parts
Print the parts
Print the pump cylinder upright on its base, the piston, the ring dasher with its eight arms and the crosshead. Print in PETG at 0.2 mm layers, 30 % infill, 4 walls; wash before first use.
Materialien für diesen Schritt:
 PETG-Filament1 Stück
Benötigte Werkzeuge:
 FDM-3D-Drucker
5
5
Print the pump cylinder
Print the pump cylinder
The pump cylinder, printed as step 4 describes.
6
6
Print the piston
Print the piston
The piston, printed as step 4 describes.
7
7
Print the dasher
Print the dasher
The dasher, printed as step 4 describes.
8
8
Print the crosshead
Print the crosshead
The crosshead, printed as step 4 describes.
9
9
Valves
Valves
Cut a strip of thin leather and glue it round the outside of the cylinder along its top edge only, over the six ports near the foot, so it lifts to let air out and closes against cream. Cut a leather disc to lie on top of the piston over its four holes, held at the centre by the rod, so air passes down but not up. Fit a leather cup washer in the piston's groove.
Materialien für diesen Schritt:
 Lederstreifen1 Stück
 Holzleim1 Stück
Benötigte Werkzeuge:
 Schraubendreher-Satz
10
10
Tub, rods and beam
Tub, rods and beam
Screw the cylinder's base to the centre of a food-grade bucket's floor, sealed with silicone. Thread an M8 rod through the crosshead and piston with nuts, slide the ring dasher over the cylinder, and join it to the crosshead by two 4 mm steel rods. Stand a pine post beside the bucket, pivot a pine beam on it, and hang the crosshead from the beam's end so a hand on the other end works piston and dasher together.
Materialien für diesen Schritt:
 20-Liter-Eimer1 Stück
 Silikondichtmasse1 Stück
 Gewindestange1 Stück
 Sechskantmutter1 Stück
 Rundstahl (Baustahl)1 Stück
 Kiefernbrett1 Stück
 Holzschraube #8 x 1"1 Stück
 Maschinenschrauben1 Stück
Benötigte Werkzeuge:
 Bügelsäge (Metallsäge)
 Akkubohrschrauber
 BohrersatzSchraubendreher-Satz
 Rollgabelschlüssel
 Handsäge
11
11
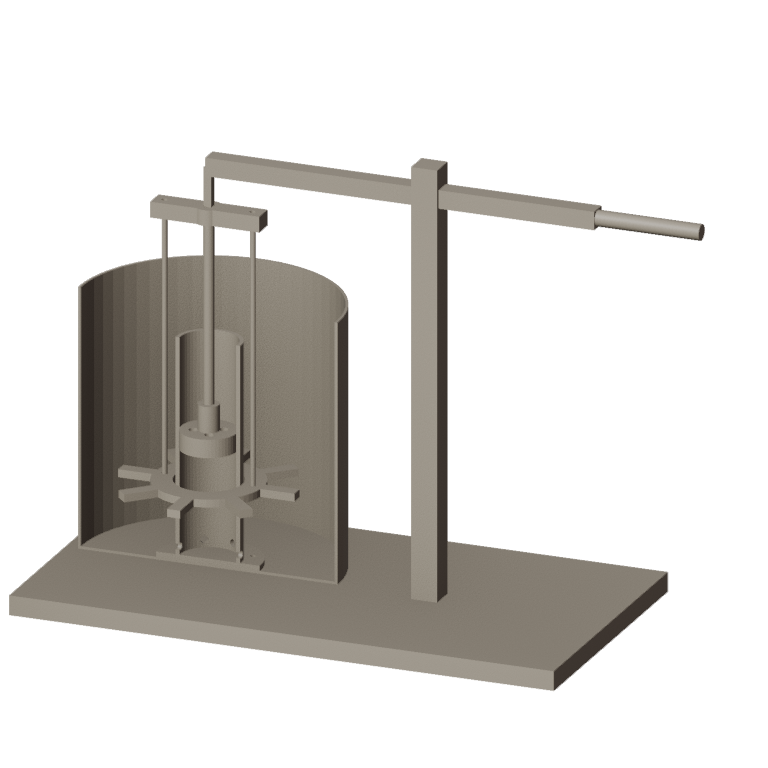
The build in 3D
The build in 3D
FreeCAD model of this build, not of the patent: the tub and pump cylinder cut away to show the piston and the valve ports round the cylinder's foot, the ring dasher on the cylinder, its rods to the crosshead, and the hand beam on its standard.
12
12
Pump and make butter
Pump and make butter
Let the heavy cream stand until it reaches about 15 °C, checked with the thermometer. Pour in 1.5 litres, enough to cover the ports. Work the beam steadily; bubbles should rise on each down-stroke. Time until the butter comes. Pour off the buttermilk, add cold water, churn a little and pour off again until it runs clear; work in a pinch of salt and weigh the butter.
Materialien für diesen Schritt:
 Schlagsahne1500 ml
 Grobes Meersalz1 Stück
 Wasser1 Stück
Benötigte Werkzeuge:
 Einsteck-Fühlerthermometer
 Stoppuhr
 Digitale Küchenwaage
 Große Rührschüssel aus Edelstahl
13
13
No bubbles, cream in the pump
No bubbles, cream in the pump
Air-pump annular dasher churn troubleshooting.
Flow
Loading...
14
14
History and honest limits
History and honest limits
**Stephen Ballard** of Meigs Creek, Morgan County, Ohio, received US 5,567, dated 16 May 1848. The cylinder was held to the bottom by a button, screw or other means for ready removal; the machine could be worked by "manual, dog, water, or other power." He wrote that the air acts "chemically by imparting its oxygen to acidify the cream"; that is his explanation, not a measured fact. He claimed "the combination of the reciprocating annular dasher and air pump with the tub or barrel to contain the cream."
**Honest limits.** A bucket and printed parts stand in for his tub and pump, and a hand beam for his cog wheels, balance wheel, crank and pitman. FDM prints hold food in their layer lines, so wash well and replace when worn. Your times and weights are the result.
Materialien
14- 1 StückPlatzhalter
- 1 StückPlatzhalter
- 1 StückPlatzhalter
- 1 StückPlatzhalter
- 1 StückPlatzhalter
- 1 StückPlatzhalter
- 1 StückPlatzhalter
- 1 StückPlatzhalter
- 1 StückPlatzhalter
- 1 StückPlatzhalter
- 1 StückPlatzhalter
- 1500 mlPlatzhalter
- 1 StückPlatzhalter
- 1 StückPlatzhalter
Benötigte Werkzeuge
11- Platzhalter
- Platzhalter
- Platzhalter
- 1 vendor sell this, none ship to you yetPlatzhalter
- Platzhalter
- Platzhalter
- Platzhalter
- Platzhalter
- Platzhalter
- Platzhalter
- Platzhalter
Designdateien
5Dieser Bauplan stellt her

Verwandte Blueprints
Diese Blueprints teilen Wissen — Techniken, Materialien oder Prinzipien


CC0 Gemeinfrei
Dieser Blueprint ist unter CC0 veröffentlicht. Sie dürfen dieses Werk für jeden Zweck frei kopieren, ändern, verbreiten und verwenden, ohne um Erlaubnis zu fragen.
Unterstützen Sie den Maker, indem Sie Produkte über seinen Blueprint kaufen, wo er eine Maker-Provision von Anbietern festgelegt, verdient. Oder erstellen Sie eine neue Iteration dieses Blueprints und verbinden Sie ihn in Ihrem eigenen Blueprint, um Einnahmen zu teilen.