Zusammenarbeit
KUNST
SCHÖNHEIT & WELLNESS
HANDWERK
KULTUR & GESCHICHTE
UNTERHALTUNG
UMFELD
ESSEN & GETRÄNKE
REVERSE ENGINEERING
WISSENSCHAFTEN
SPORT
TECHNOLOGIE
WEARABLES
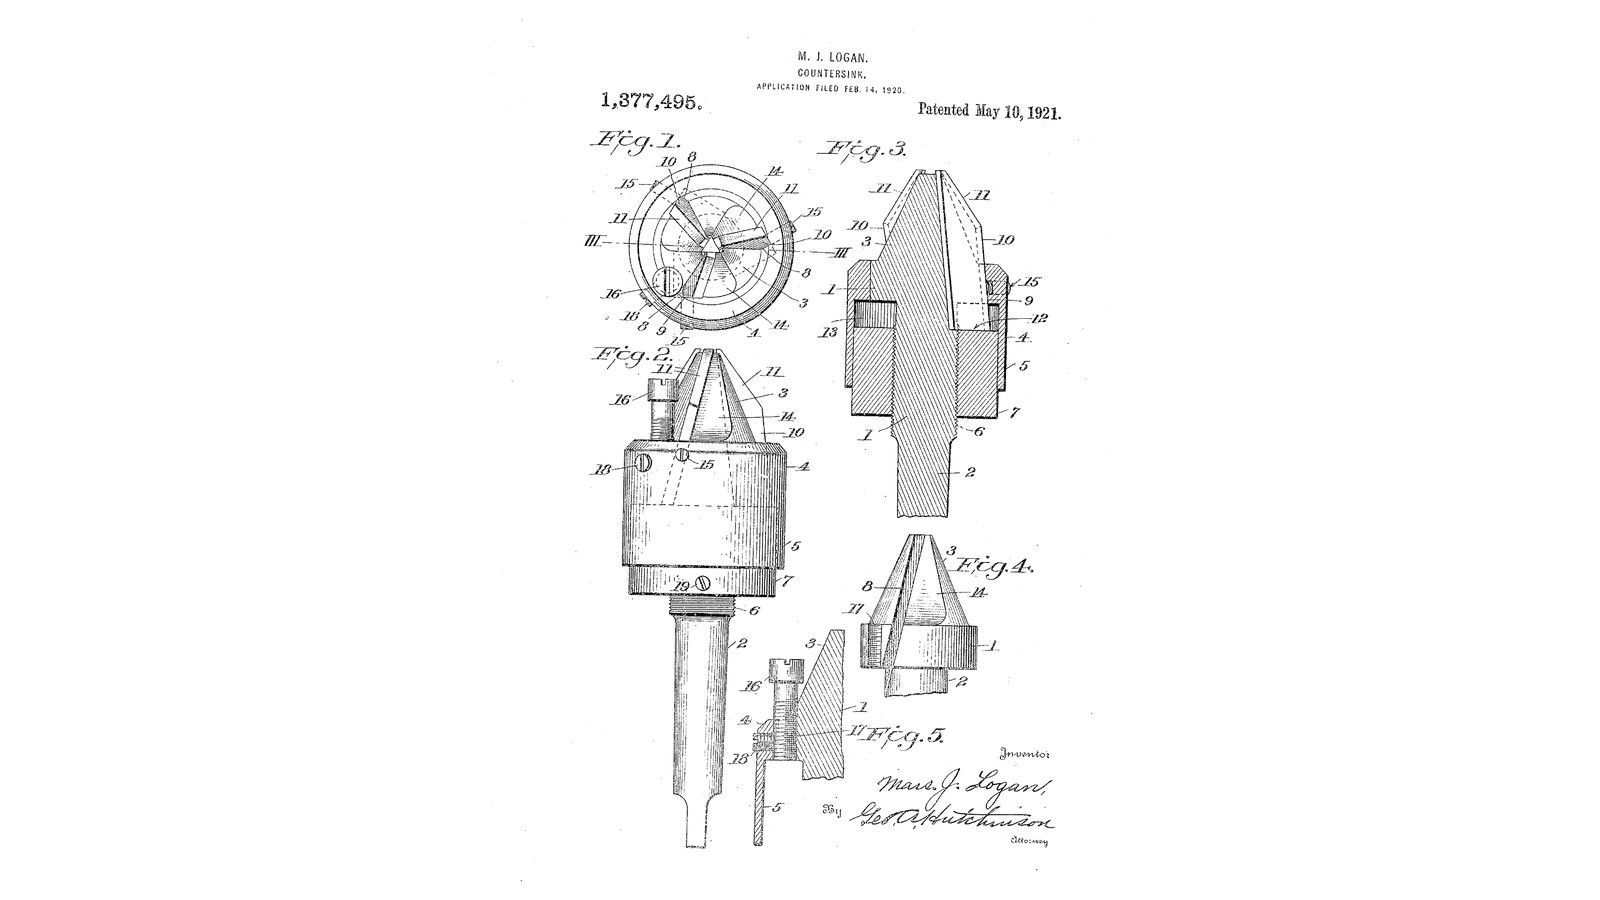


Adjustable-Knife Countersink: Three Knives Set Out Evenly by a Collar and Stopped by a Depth Pin (Logan, 1921)
Marselius J. Logan of Springfield, Virginia, received US 1,377,495, dated 10 May 1921. Three knives sit in grooves along a conical head, their bevelled edges just proud of the cone. A collar screwed along the shank pushes all their back ends at once, so each cuts the same share. When they wear, a turn of the collar sets them out again. Set screws lock them. A stop pin beside them halts every countersink at the same depth.
The patent gives no sizes; every size here is ours.
Erfahren
About 2 days
Anweisungen
1
1
Setting the knives out evenly
Setting the knives out evenly
Jupyter-Notebook wird geladen …
2
2
Read US 1,377,495
Read US 1,377,495
"All of the cutters or knives 10 are made alike in length as well as other dimensions, so that by screwing the collar 7 into contact with the inner ends 12 of all of said cutters, the latter may be evenly adjusted to cut equally, and when their cutting edges 11 become worn down said cutters may be uniformly projected in order to provide the proper clearance."
3
3
Turn the inner member 1 and the sleeve 4
Turn the inner member 1 and the sleeve 4
From 30 mm steel bar turn the inner member: a 90 degree cone 3 26 mm across at its base, a short cylindrical edge under it, and a shank 2 14 mm across, threaded M14 for 20 mm below the head 6 and plain below. From 40 mm bar turn the sleeve: a ring bored 0.03 mm under the head's edge, with a flange 5 30 mm long bored 22 mm, so it leaves an annular space 13 round the shank. Heat the sleeve to 250 C in the oven and drop it over the head's edge; let it cool.
Materialien für diesen Schritt:
 Rundstahl aus Baustahl2 Stück
 Schneidöl1 Stück
Benötigte Werkzeuge:
 Metalldrehmaschine
 Dreibackenfutter für die Drehmaschine
 Drehmeißel
 Bohrstange
 Abstechstahl
 Gewindeschneidsatz
 Backofen
 Schweißerhandschuhe
 Digitaler Messschieber 6 Zoll
 Schutzbrille
4
4
Grooves, knives and screws
Grooves, knives and screws
Saw and file three grooves 4 mm square, parallel to the axis, a third of the way round from each other, through the joint of head and sleeve and on into the annular space. File the cone away 14 ahead of each groove for the shavings. Cut three knives 32 mm long from 4 mm square tool steel, exactly alike, and grind each one's top end to the cone's slope with a bevelled cutting edge 11. Harden them (cherry red, water, temper to light straw). Drill and tap M4 through the sleeve over each groove for the set screws 15. Make a collar 7 with an M14 thread to screw up the shank inside the flange, and an M4 set screw 19 to lock it. Drill and tap M5 into the head's edge behind one knife for the stop pin 16, with an M4 set screw 18 to lock it.
Materialien für diesen Schritt:
 Werkzeugstahl-Vierkantstab1 StückRundstahl aus Baustahl1 Stück
 Madenschraube mit Ringschneide5 Stück
 Zylinderschraube mit Innensechskant1 Stück
 Sechskantmutter1 Stück
Benötigte Werkzeuge:
 Bügelsäge (Metallsäge)
 Feilensatz
 Schraubstock
 Doppelschleifer
 Esse
 Schmiedezange
 Kleiner Magnet
 Abschreckbottich
 Wasser
 Schleifstein
 Standbohrmaschine
 BohrersatzGewindeschneidsatz
 WindeisenMetalldrehmaschineDigitaler Messschieber 6 Zoll
5
5
Set, lock and countersink
Set, lock and countersink
Slide the knives into their grooves, back ends down in the annular space. Screw the collar up until all three knives' edges stand 0.3 mm out of the cone, and lock it and the knives. Set the stop pin so it touches the work when the countersink is the size wanted, and lock it. Countersink a row of screw holes in hardwood: every one should come out the same.
Benötigte Werkzeuge:
 Innensechskant-SchlüsselsatzDigitaler Messschieber 6 Zoll
 AkkubohrschrauberBohrersatz
 HartholzbrettSchutzbrille
6
6
Troubleshooting
Troubleshooting
Adjustable-knife countersink troubleshooting.
Flow
Loading...
7
7
History and honest limits
History and honest limits
**Marselius J. Logan** of Springfield, Virginia, assignor of one-half to Laurence G. Alexander of Alexandria, Virginia, US 1,377,495, dated 10 May 1921, filed 14 February 1920. He claimed "a flange carried by the head and extending concentrically along the shank in spaced relation thereto, cutters mounted on the head and extending into the space between the same and the flange, and a collar adjustable on the shank within said flange for alining the cutters", and "an adjustable stop". He shows three knives; ours too. He gives no sizes; every size here is ours.
Materialien
6- 2 StückPlatzhalter
- 1 StückPlatzhalter
- 1 StückPlatzhalter
- Platzhalter
- Platzhalter
- 1 StückPlatzhalter
Benötigte Werkzeuge
26- Platzhalter
- Platzhalter
- Platzhalter
- Platzhalter
- Platzhalter
- Platzhalter
- Platzhalter
- Platzhalter
- Platzhalter
- Platzhalter
- Platzhalter
- Platzhalter
- Platzhalter
- Platzhalter
- Platzhalter
- Platzhalter
- Platzhalter
- Platzhalter
- Platzhalter
- Platzhalter
- Platzhalter
- Platzhalter
- Platzhalter
- Platzhalter
- 1 vendor sell this, none ship to you yetPlatzhalter
- Platzhalter
Dieser Bauplan stellt her

Verwandte Blueprints
Diese Blueprints teilen Wissen — Techniken, Materialien oder Prinzipien
CC0 Gemeinfrei
Dieser Blueprint ist unter CC0 veröffentlicht. Sie dürfen dieses Werk für jeden Zweck frei kopieren, ändern, verbreiten und verwenden, ohne um Erlaubnis zu fragen.
Unterstützen Sie den Maker, indem Sie Produkte über seinen Blueprint kaufen, wo er eine Maker-Provision von Anbietern festgelegt, verdient. Oder erstellen Sie eine neue Iteration dieses Blueprints und verbinden Sie ihn in Ihrem eigenen Blueprint, um Einnahmen zu teilen.