Zusammenarbeit
KUNST
SCHÖNHEIT & WELLNESS
HANDWERK
KULTUR & GESCHICHTE
UNTERHALTUNG
UMFELD
ESSEN & GETRÄNKE
REVERSE ENGINEERING
WISSENSCHAFTEN
SPORT
TECHNOLOGIE
WEARABLES
Segment-Rack Zone Churn: A Lever Rocks the Dasher Shaft, a Toothed Tin Band Gathers the Butter at the Surface
Buttercup

Erstellt von

Buttercup

9. November 2026IE
1
0
0
0
0

Segment-Rack Zone Churn: A Lever Rocks the Dasher Shaft, a Toothed Tin Band Gathers the Butter at the Surface

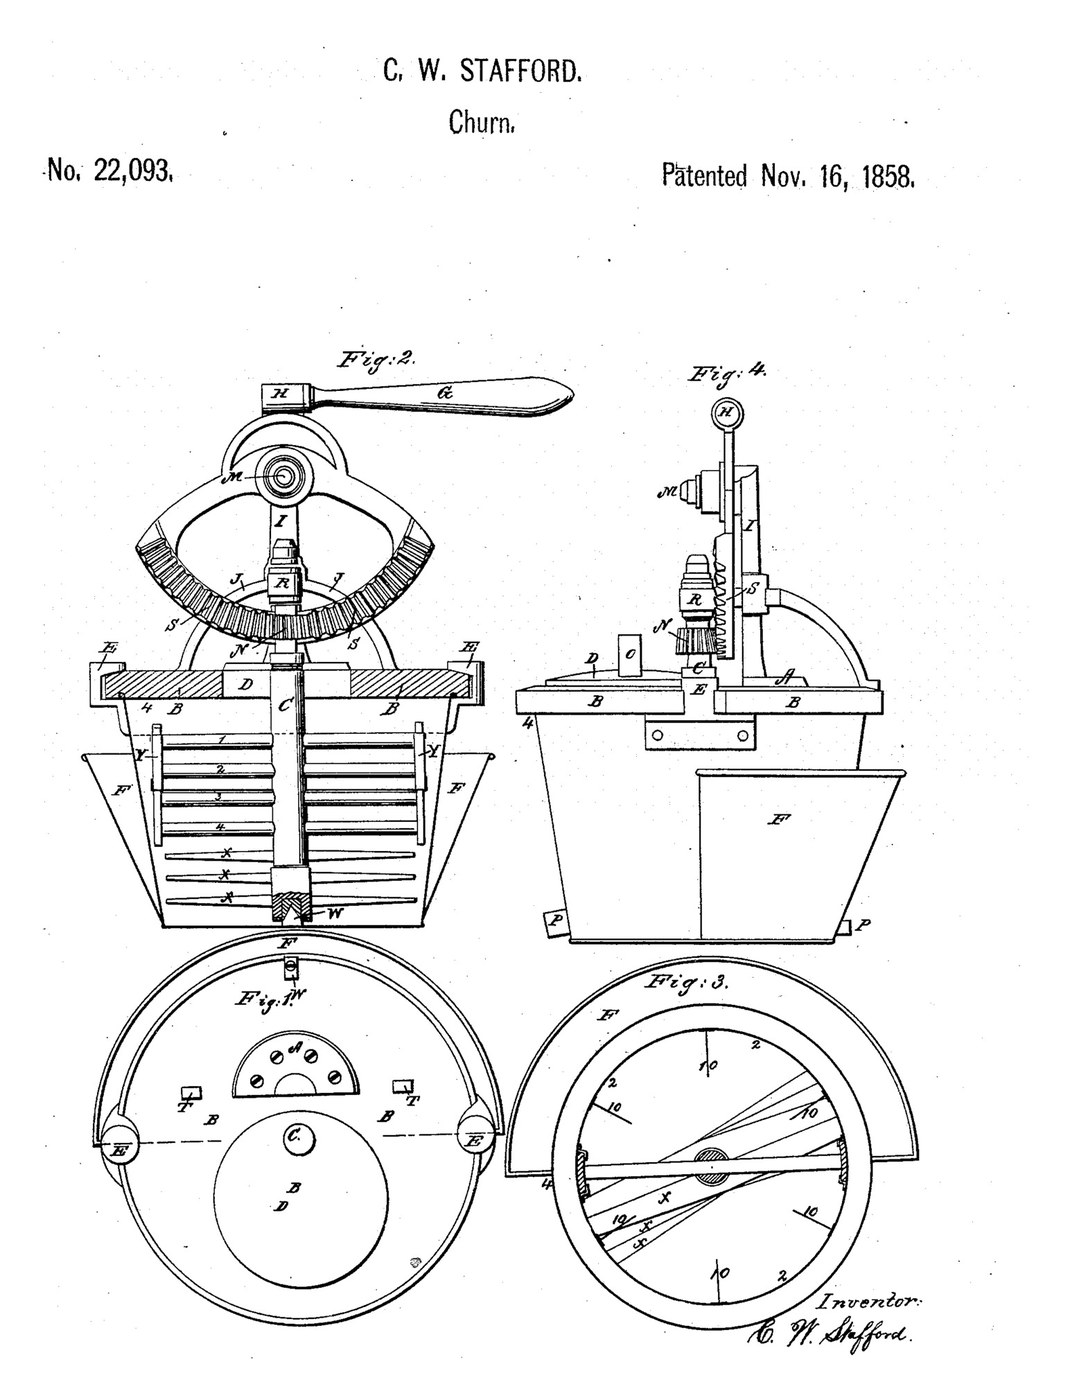
Charles W. Stafford of Burlington, Iowa, received US 22,093, dated 16 November 1858, for a churn worked by a lever: a toothed segment on a pivot turns a pinion on the upright dasher shaft back and forth. Four level arms and three slanted floats beat the cream. A tin band with ten tabs on its inside rides on slides at the arms' ends and is set with its top edge at the cream's surface, where the tabs gather the butter as it forms. The cover twists onto two ears on the rim and has a small hatch. This rung builds it in a 20-litre bucket with printed gears.
Erfahren
About 8 hours, plus printing

Anweisungen

1

Swing, fill and the zone's height

Jupyter-Notebook wird geladen …
2

A toothed segment working a dasher, before it

That segment drove a dasher up and down. Stafford's turns the dasher shaft back and forth.
3

Read US 22,093

"This zone is intended to be raised or lowered along the slide so as to accommodate itself to the quantity of cream in the churn—the upper edge being intended to rise to the surface of the cream or a little higher so that the radial proportions may gather the butter as it is formed."
4

Print the segment S

The toothed segment with its socket H for the lever. Print it flat, teeth up. PETG, 0.2 mm layers, 40 % infill, 4 walls; wash before first use.
DesigndateiSTLCC0 - Free
5

Print the pinion N

The 12-tooth pinion for the shaft's top. PETG, 0.2 mm layers, 40 % infill, 4 walls; wash before first use.
DesigndateiSTLCC0 - Free
6

Print the ear E

An ear hook for the bucket's rim. Print two. PETG, 0.2 mm layers, 40 % infill, 4 walls; wash before first use.
DesigndateiSTLCC0 - Free
7

Print the socket W

The foot socket the shaft stands in. PETG, 0.2 mm layers, 40 % infill, 4 walls; wash before first use.
DesigndateiSTLCC0 - Free
8

Print the zone clip

A clip that holds the zone on a slide. Print two. PETG, 0.2 mm layers, 40 % infill, 4 walls; wash before first use.
DesigndateiSTLCC0 - Free
9

Cover B, ears and hatch D

Cut an 18 mm plywood disc 350 mm across for cover B, with a 17 mm hole in the middle and a 110 mm hole 106 mm off centre. Glue two 12 mm plywood rings under it, 292/264 mm and 350/312 mm across: the gap between them is the groove that takes the bucket's rim. Screw the two ears to the bucket's wall on opposite sides, hooks over the rim, and cut two 44 mm notches in the cover's edge and outer ring to pass them: drop the cover on and turn it 45 degrees to lock. Cut a 130 mm hatch D from 6 mm plywood with a dowel knob.

Materialien für diesen Schritt:

SperrholzplatteSperrholzplatte2 Stück
HolzleimHolzleim1 Stück
HolzschraubenHolzschrauben8 Stück
HartholzdübelHartholzdübel1 Stück
PETG-FilamentPETG-Filament1 Stück

Benötigte Werkzeuge:

FDM-3D-DruckerFDM-3D-Drucker
StichsägeStichsäge
Lochsägen-SetLochsägen-Set
AkkubohrschrauberAkkubohrschrauber
BohrersatzBohrersatz
SchraubzwingenSchraubzwingen
SchleifpapierSchleifpapier
Schraubendreher-SatzSchraubendreher-Satz
10

Shaft, arms, floats and zone

Screw the socket to the middle of the bucket's floor with an M4 screw and lock nut. Cut the stainless tube (16 mm) to 433 mm. Cut four hardwood arms 248 x 30 x 10 mm and three floats 216 x 40 x 8 mm; bore each 16.5 mm at its middle and the arms 8.4 mm at 118 mm each side. Fix the arms on the shaft 115, 140, 165 and 190 mm above its foot, all in line, and the floats 35, 60 and 85 mm up, each an eighth of a turn round more than the last and slanted 25 degrees, with M4 screws across. Push an 8 mm stainless rod 200 mm long through each end of the arms as the slides. Cut a tinplate strip 60 x 810 mm, roll it into a 253 mm band and screw the lap with M3 screws; screw ten tinplate tabs 26 x 50 mm inside it, evenly spaced. Clip it to the slides at the height the notebook gives.

Materialien für diesen Schritt:

EdelstahlrohrEdelstahlrohr1 Stück
HartholzbrettHartholzbrett1 Stück
EdelstahlstabEdelstahlstab1 Stück
WeißblechtafelWeißblechtafel1 Stück
MaschinenschraubenMaschinenschrauben22 Stück
Sicherungsmutter mit KunststoffeinsatzSicherungsmutter mit Kunststoffeinsatz22 Stück

Benötigte Werkzeuge:
RohrabschneiderRohrabschneider
Bügelsäge (Metallsäge)Bügelsäge (Metallsäge)
HandsägeHandsäge
AkkubohrschrauberAkkubohrschrauber
BohrersatzBohrersatz
BlechschereBlechschere
Feilen (Handfeile)Feilen (Handfeile)
Schraubendreher-SatzSchraubendreher-Satz
RollgabelschlüsselRollgabelschlüssel
Bandmaß (Rollmeter)Bandmaß (Rollmeter)
11

Gears, upright and lever

Stand the shaft in its socket, lay the cover on and lock it. Fix the pinion on the shaft's top with an M4 screw across. Screw a hardwood upright I 44 x 30 mm, 162 mm tall, to the cover from below, its front face 38 mm behind the shaft's centre. Bolt the segment to it with an M12 bolt as pivot M so its teeth mesh with the pinion, and screw a hardwood lever G 340 x 30 x 14 mm on top of its socket.

Materialien für diesen Schritt:

HartholzbrettHartholzbrett1 Stück
HolzschraubenHolzschrauben4 Stück
MaschinenschraubenMaschinenschrauben1 Stück
Sicherungsmutter mit KunststoffeinsatzSicherungsmutter mit Kunststoffeinsatz1 Stück

Sechskantschrauben-SortimentSechskantschrauben-Sortiment1 Stück
UnterlegscheibeUnterlegscheibe2 Stück

Benötigte Werkzeuge:

HandsägeHandsäge
AkkubohrschrauberAkkubohrschrauber
BohrersatzBohrersatz
RollgabelschlüsselRollgabelschlüssel
Schraubendreher-SatzSchraubendreher-Satz
12

The build in 3D

FreeCAD model of this build, the near quarter of the bucket, cover and zone cut away: the shaft with four arms, three slanted floats, the slides and the toothed zone, the cover with its rings, ears and hatch, the upright, the segment and pinion, and the lever.
DesigndateiBLENDCC0 - Free
13

Churn

Stand the bucket in a tub of ice water in warm weather or warm water in cold weather (ours, for his receptacle at the side) until the cream is about 15 °C. Pour in about 12 litres of heavy cream and set the zone's top edge at its surface. Lock the cover and rock the lever back and forth steadily; time it. Look through the hatch: the tabs gather the butter at the surface. When it has come, lift the cover and shaft out, pour off the buttermilk, wash the butter in cold water until it runs clear, work in a pinch of salt and weigh it.

Materialien für diesen Schritt:

SchlagsahneSchlagsahne12 l
CrusheisCrusheis2 kg
Grobes MeersalzGrobes Meersalz1 Stück
WasserWasser1 Stück

Benötigte Werkzeuge:

Vorratsbehälter in LebensmittelqualitätVorratsbehälter in Lebensmittelqualität

Einsteck-FühlerthermometerEinsteck-Fühlerthermometer
StoppuhrStoppuhr
Digitale KüchenwaageDigitale Küchenwaage
Große Rührschüssel aus EdelstahlGroße Rührschüssel aus Edelstahl
14

Troubleshooting

Segment-rack churn troubleshooting.

Flow

Loading...
15

History and honest limits

**Charles W. Stafford** of Burlington, Iowa, US 22,093, 16 November 1858, "Churn". He preferred a tin body, light, cheap and quick to warm or cool, and claimed the general arrangement, the adjustable zone with its projections, the grooved cover with slots and ears, and the two covers. He gave no sizes. Every size and material is ours. His Fig. 4 draws S toothed on its face and N bevelled; ours is a crown-toothed segment with a straight pinion. His water receptacle hangs on the body's side; ours is a tub the bucket stands in.

Materialien

17

Benötigte Werkzeuge

20

Designdateien

6

CC0 Gemeinfrei

Dieser Blueprint ist unter CC0 veröffentlicht. Sie dürfen dieses Werk für jeden Zweck frei kopieren, ändern, verbreiten und verwenden, ohne um Erlaubnis zu fragen.

Unterstützen Sie den Maker, indem Sie Produkte über seinen Blueprint kaufen, wo er eine Maker-Provision von Anbietern festgelegt, verdient. Oder erstellen Sie eine neue Iteration dieses Blueprints und verbinden Sie ihn in Ihrem eigenen Blueprint, um Einnahmen zu teilen.

Diskussion

(0)

Anmelden um an der Diskussion teilzunehmen

Kommentare werden geladen...