Colaboración
ARTE
BELLEZA Y BIENESTAR
ARTESANÍA
CULTURA E HISTORIA
ENTRETENIMIENTO
MEDIO AMBIENTE
COMIDA Y BEBIDAS
INGENIERÍA INVERSA
CIENCIAS
DEPORTES
TECNOLOGÍA
TECNOLOGÍA VESTIBLE
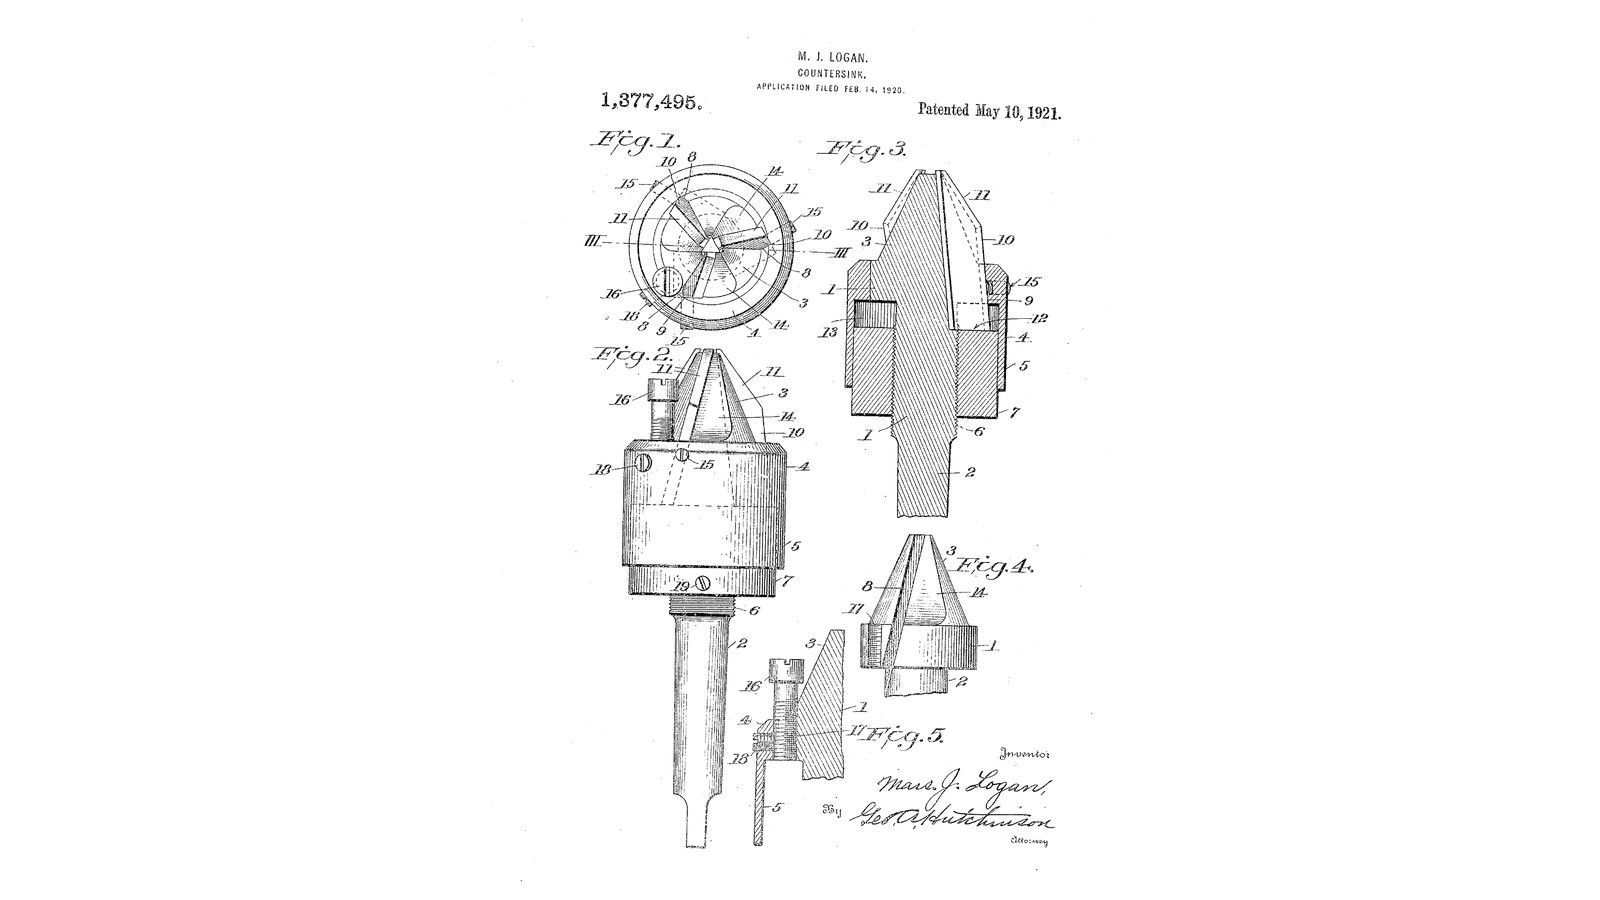


Adjustable-Knife Countersink: Three Knives Set Out Evenly by a Collar and Stopped by a Depth Pin (Logan, 1921)
Marselius J. Logan of Springfield, Virginia, received US 1,377,495, dated 10 May 1921. Three knives sit in grooves along a conical head, their bevelled edges just proud of the cone. A collar screwed along the shank pushes all their back ends at once, so each cuts the same share. When they wear, a turn of the collar sets them out again. Set screws lock them. A stop pin beside them halts every countersink at the same depth.
The patent gives no sizes; every size here is ours.
Avanzado
About 2 days
Instrucciones
1
1
Setting the knives out evenly
Setting the knives out evenly
Cargando el cuaderno de Jupyter…
2
2
Read US 1,377,495
Read US 1,377,495
"All of the cutters or knives 10 are made alike in length as well as other dimensions, so that by screwing the collar 7 into contact with the inner ends 12 of all of said cutters, the latter may be evenly adjusted to cut equally, and when their cutting edges 11 become worn down said cutters may be uniformly projected in order to provide the proper clearance."
3
3
Turn the inner member 1 and the sleeve 4
Turn the inner member 1 and the sleeve 4
From 30 mm steel bar turn the inner member: a 90 degree cone 3 26 mm across at its base, a short cylindrical edge under it, and a shank 2 14 mm across, threaded M14 for 20 mm below the head 6 and plain below. From 40 mm bar turn the sleeve: a ring bored 0.03 mm under the head's edge, with a flange 5 30 mm long bored 22 mm, so it leaves an annular space 13 round the shank. Heat the sleeve to 250 C in the oven and drop it over the head's edge; let it cool.
Materiales para este paso:
 Barra redonda de acero dulce2 piezas
 Aceite de corte1 pieza
Herramientas necesarias:
 Torno de metal
 Plato de torno de 3 mordazas
 Herramienta de corte para torno
 Barra de mandrinar
 Gubia de tronzar
 Juego de machos y terrajas
 Horno
 Guantes de soldador
 Calibre digital de 6 pulgadas
 Gafas de seguridad
4
4
Grooves, knives and screws
Grooves, knives and screws
Saw and file three grooves 4 mm square, parallel to the axis, a third of the way round from each other, through the joint of head and sleeve and on into the annular space. File the cone away 14 ahead of each groove for the shavings. Cut three knives 32 mm long from 4 mm square tool steel, exactly alike, and grind each one's top end to the cone's slope with a bevelled cutting edge 11. Harden them (cherry red, water, temper to light straw). Drill and tap M4 through the sleeve over each groove for the set screws 15. Make a collar 7 with an M14 thread to screw up the shank inside the flange, and an M4 set screw 19 to lock it. Drill and tap M5 into the head's edge behind one knife for the stop pin 16, with an M4 set screw 18 to lock it.
Materiales para este paso:
 Barra cuadrada de acero para herramientas1 piezaBarra redonda de acero dulce1 pieza
 Prisionero de punta cóncava5 piezas
 Tornillo de cabeza cilíndrica con hexágono interior1 pieza
 Tuerca hexagonal1 pieza
Herramientas necesarias:
 Sierra para metales
 Juego de limas
 Tornillo de banco
 Esmeril de banco
 Fragua
 Tenazas de fragua
 Imán pequeño
 Cubo de temple
 Agua
 Piedra de afilar
 Taladro de columna
 Juego de brocasJuego de machos y terrajas
 Volvedor de machosTorno de metalCalibre digital de 6 pulgadas
5
5
Set, lock and countersink
Set, lock and countersink
Slide the knives into their grooves, back ends down in the annular space. Screw the collar up until all three knives' edges stand 0.3 mm out of the cone, and lock it and the knives. Set the stop pin so it touches the work when the countersink is the size wanted, and lock it. Countersink a row of screw holes in hardwood: every one should come out the same.
Herramientas necesarias:
 Juego de llaves AllenCalibre digital de 6 pulgadas
 Taladro inalámbricoJuego de brocas
 Tabla de madera duraGafas de seguridad
6
6
Troubleshooting
Troubleshooting
Adjustable-knife countersink troubleshooting.
Flow
Loading...
7
7
History and honest limits
History and honest limits
**Marselius J. Logan** of Springfield, Virginia, assignor of one-half to Laurence G. Alexander of Alexandria, Virginia, US 1,377,495, dated 10 May 1921, filed 14 February 1920. He claimed "a flange carried by the head and extending concentrically along the shank in spaced relation thereto, cutters mounted on the head and extending into the space between the same and the flange, and a collar adjustable on the shank within said flange for alining the cutters", and "an adjustable stop". He shows three knives; ours too. He gives no sizes; every size here is ours.
Materiales
6- 2 piezasMarcador de posición
- 1 piezaMarcador de posición
- Marcador de posición
- 5 piezasMarcador de posición
- Marcador de posición
- 1 piezaMarcador de posición
Herramientas requeridas
26- Marcador de posición
- Marcador de posición
- Marcador de posición
- Marcador de posición
- Marcador de posición
- Marcador de posición
- Marcador de posición
- Marcador de posición
- Marcador de posición
- Marcador de posición
- Marcador de posición
- Marcador de posición
- Marcador de posición
- Marcador de posición
- Marcador de posición
- Marcador de posición
- Marcador de posición
- Marcador de posición
- Marcador de posición
- Marcador de posición
- Marcador de posición
- Marcador de posición
- Marcador de posición
- Marcador de posición
- 1 vendor sell this, none ship to you yetMarcador de posición
- Marcador de posición
Este plano hace

Blueprints relacionados
Estos blueprints comparten conocimiento — técnicas, materiales o principios
CC0 Dominio público
Este Blueprint se publica bajo CC0. Eres libre de copiar, modificar, distribuir y usar este trabajo para cualquier propósito, sin pedir permiso.
Apoya al Maker comprando productos a través de su Blueprint, donde gana una Comisión del Maker establecida por los vendedores, o crea una nueva iteración de este Blueprint e inclúyela como conexión en tu propio Blueprint para compartir ingresos.