Collaboration
ART
BEAUTÉ ET BIEN-ÊTRE
ARTISANAT
CULTURE ET HISTOIRE
DIVERTISSEMENT
ENVIRONNEMENT
NOURRITURE ET BOISSONS
INGÉNIERIE INVERSE
SCIENCES
SPORTS
TECHNOLOGIE
TECHNOLOGIE PORTABLE
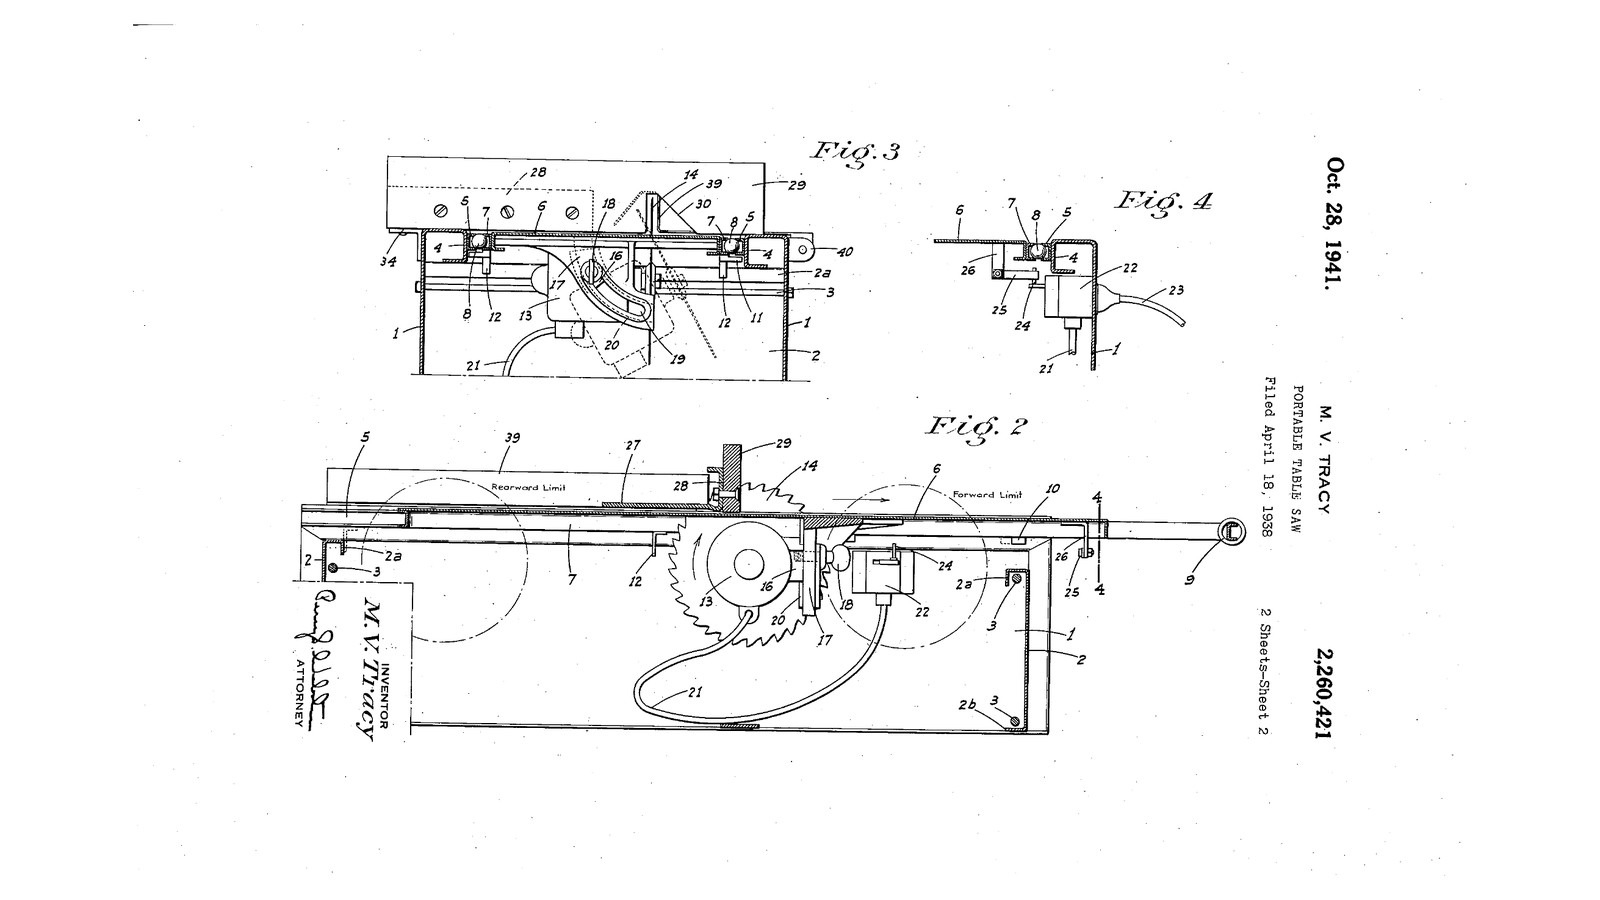


Sliding-Table Saw That Switches Itself: A Hand Saw Under a Table on Balls, Turned On and Off by the Stroke (Tracy, 1941)
Mearl V. Tracy of Sacramento received US 2,260,421, dated 28 October 1941, for a light table saw to take onto a building job. An ordinary electric hand saw hangs under a table that slides on steel balls in channels. The work is held against a fixed fence and the table carries the saw through it. A springy finger on the table trips a snap switch, starting the saw just before it reaches the work and stopping it as the table comes back. One fence on a graduated plate serves as rip fence and mitre gauge.
The patent gives no sizes; every size here is ours, and our box is plywood where his is sheet metal.
Intermédiaire
About 3 days
Consignes
1
1
Where the switch must trip
Where the switch must trip
Chargement du notebook Jupyter…
2
2
Read US 2,260,421
Read US 2,260,421
"The finger 25 is so disposed as to engage trigger 24 and close the switch when the table is advanced and just before the saw reaches the work under which the table slides, and to reengage the trigger and open the switch as the table retracts and approaches a fully retracted position."
3
3
The box frame
The box frame
Make an open-topped box of 18 mm plywood 900 mm long, 450 wide and 300 high, the end panels 2 standing 40 mm lower than the sides 1, glued and screwed. Bolt a steel channel section 5 along the inside top of each side, its open face inwards, as his channels on the beams 4.
Matériaux pour cette étape :
 Panneau de contreplaqué1 pièce
 Profilé en U en acier2 pièces
 Assortiment de boulons à tête hexagonale8 pièces
 Écrou hexagonal8 pièces
 Vis à bois30 pièces
 Colle à bois1 pièce
Outils nécessaires :
 Scie sauteuse
 Perceuse sans fil
 Jeu de forets
 Serre-joint à pompe
 Équerre combinée
 Mètre ruban
 Scie à métaux
 Clé à molette
4
4
The sliding table
The sliding table
Cut the table 6 from 18 mm plywood 600 x 400 mm with a saw slot 15 down its middle, and bolt a steel channel section 7 along each side edge, its open face outwards opposite the box's channel, reaching 100 mm past the table's front for the handle. Lay 10 mm steel balls 8 between each pair of opposed channels, three a side, spaced along, and slide the table in so it runs level with the box's top. Fit a hardwood handle 9 across the angles' front ends, and stops 10, 11 and 12 to limit the stroke to 450 mm.
Matériaux pour cette étape :
Panneau de contreplaqué1 pièceProfilé en U en acier2 pièces Roulements à billes1 pièce
 Planche de bois dur1 pièceAssortiment de boulons à tête hexagonale8 piècesÉcrou hexagonal8 piècesVis à bois12 pièces
Outils nécessaires :
Scie sauteusePerceuse sans filJeu de foretsScie à métaux Jeu de limesClé à moletteÉquerre combinée
5
5
Hang the saw under the table
Hang the saw under the table
Bolt the circular saw by its own base plate under the table, the blade up through the slot, the saw's depth set so the blade stands 10 mm above the thickest work. For angle cuts use the saw's own bevel adjustment, which does what his arcuate bracket 17 did. Tape or lock the saw's trigger on, so the new switch alone controls it.
Matériaux pour cette étape :
 Scie circulaire1 pièceAssortiment de boulons à tête hexagonale4 pièces
Outils nécessaires :
Perceuse sans filJeu de foretsClé à moletteÉquerre combinée6
6
The self-acting switch
The self-acting switch
Screw a lever microswitch rated for the saw's current inside one side panel, its lever 24 pointing up into the path of the table, with an outlet for the saw's plug and a supply cord through the panel, as his switch box 22 and socket; have it wired by an electrician. Bend a finger 25 of spring steel and screw it on a bracket 26 under the table, set so that, as the table goes forward, it flips the lever on 60 mm into the stroke, and as the table comes back it flips it off 40 mm before the end. Check it with the saw unplugged: you should hear the click each way.
Matériaux pour cette étape :
 Microrupteur (à levier)1 pièce
 Feuillard d'acier à ressort1 pièce
 Plat en acier doux1 pièceVis à bois6 pièces
Outils nécessaires :
 Cisaille à tôle
 Étau d'établiPerceuse sans filJeu de forets
 Jeu de tournevis
7
7
Rip fence and mitre gauge
Rip fence and mitre gauge
Cut a half-round steel plate 27 to lie over the front of the box beside the saw, turn its straight edge up as a flange 28 and bolt a hardwood fence 29 to it, notched 30 for the blade. Pivot a link 31 on top of the plate and a link 32 under it at the centre of its arc; pivot a third link 33 on 31's end; take 32 and 33 back to a flange on the side of the box. Mark the plate in degrees and drill rows of holes along the arcs, and set the fence with a pin through link 31 into a hole, clamped by two wing-nut clamps 35, 36.
Matériaux pour cette étape :
 Tôle d'acier doux1 piècePlanche de bois dur1 piècePlat en acier doux2 pièces
 Barre ronde en acier doux1 pièceAssortiment de boulons à tête hexagonale6 pièces
 Écrou papillon2 pièces
Outils nécessaires :
Cisaille à tôleScie à métauxÉtau d'établi Perceuse à colonneJeu de forets
 Rapporteur
 Pointe à tracer
 PointeauJeu de limes
8
8
Cut
Cut
With the table fully back, hold a board against the fence with one hand and push the handle with the other. The saw starts by itself before the blade reaches the board, cuts through, and stops as you bring the table back.
Outils nécessaires :
 Lunettes de sécurité
 Protection auditive (casque, SNR 30 dB)
9
9
Troubleshooting
Troubleshooting
Sliding table saw troubleshooting.
Flow
Loading...
10
10
History and honest limits
History and honest limits
**Mearl V. Tracy** of Sacramento, California, assignor of one-half to Marion M. Tracy, US 2,260,421, dated 28 October 1941, filed 18 April 1938. His one claim is the switch: a snap switch with a trigger moved one way or the other by "a resilient finger mounted on the table" that then passes and leaves the trigger, near but before each end of the stroke. He removed the hand saw's shoe and fixed its mounting block on an arcuately slotted bracket; modern saws differ, so we mount it by its base plate and use its own bevel adjustment. His box is sheet metal with the channels on bent beams; ours is plywood with steel channel sections. He gives no sizes; every size here is ours.
Matériaux
15- 1 pièceEspace réservé
- 2 piècesEspace réservé
- Espace réservé
- 16 piècesEspace réservé
- 48 piècesEspace réservé
- 1 pièceEspace réservé
- 1 pièceEspace réservé
- 1 pièceEspace réservé
- 1 pièceEspace réservé
- 1 pièceEspace réservé
- 1 pièceEspace réservé
- 2 piècesEspace réservé
- 1 pièceEspace réservé
- 1 pièceEspace réservé
- 2 piècesEspace réservé
Outils requis
18- 1 vendor sell this, none ship to you yetEspace réservé
- 1 vendor sell this, none ship to you yetEspace réservé
- Espace réservé
- Espace réservé
- Espace réservé
- 1 vendor sell this, none ship to you yetEspace réservé
- Espace réservé
- Espace réservé
- Espace réservé
- Espace réservé
- Espace réservé
- Espace réservé
- Espace réservé
- Espace réservé
- Espace réservé
- Espace réservé
- Espace réservé
- Espace réservé
Ce plan fabrique

Blueprints liés
Ces blueprints partagent des connaissances — techniques, matériaux ou principes
CC0 Domaine public
Ce blueprint est publié sous CC0. Vous êtes libre de copier, modifier, distribuer et utiliser ce travail pour tout usage, sans demander la permission.
Soutenez le Maker en achetant des produits via son Blueprint où il perçoit une Commission Maker définie par les Vendeurs, ou créez une nouvelle itération de ce Blueprint et incluez-le comme connexion dans votre propre Blueprint pour partager les revenus.