アート
美容とウェルネス
工芸
文化と歴史
エンターテインメント
環境
食品と飲料
リバースエンジニアリング
科学
スポーツ
テクノロジー
ウェアラブル
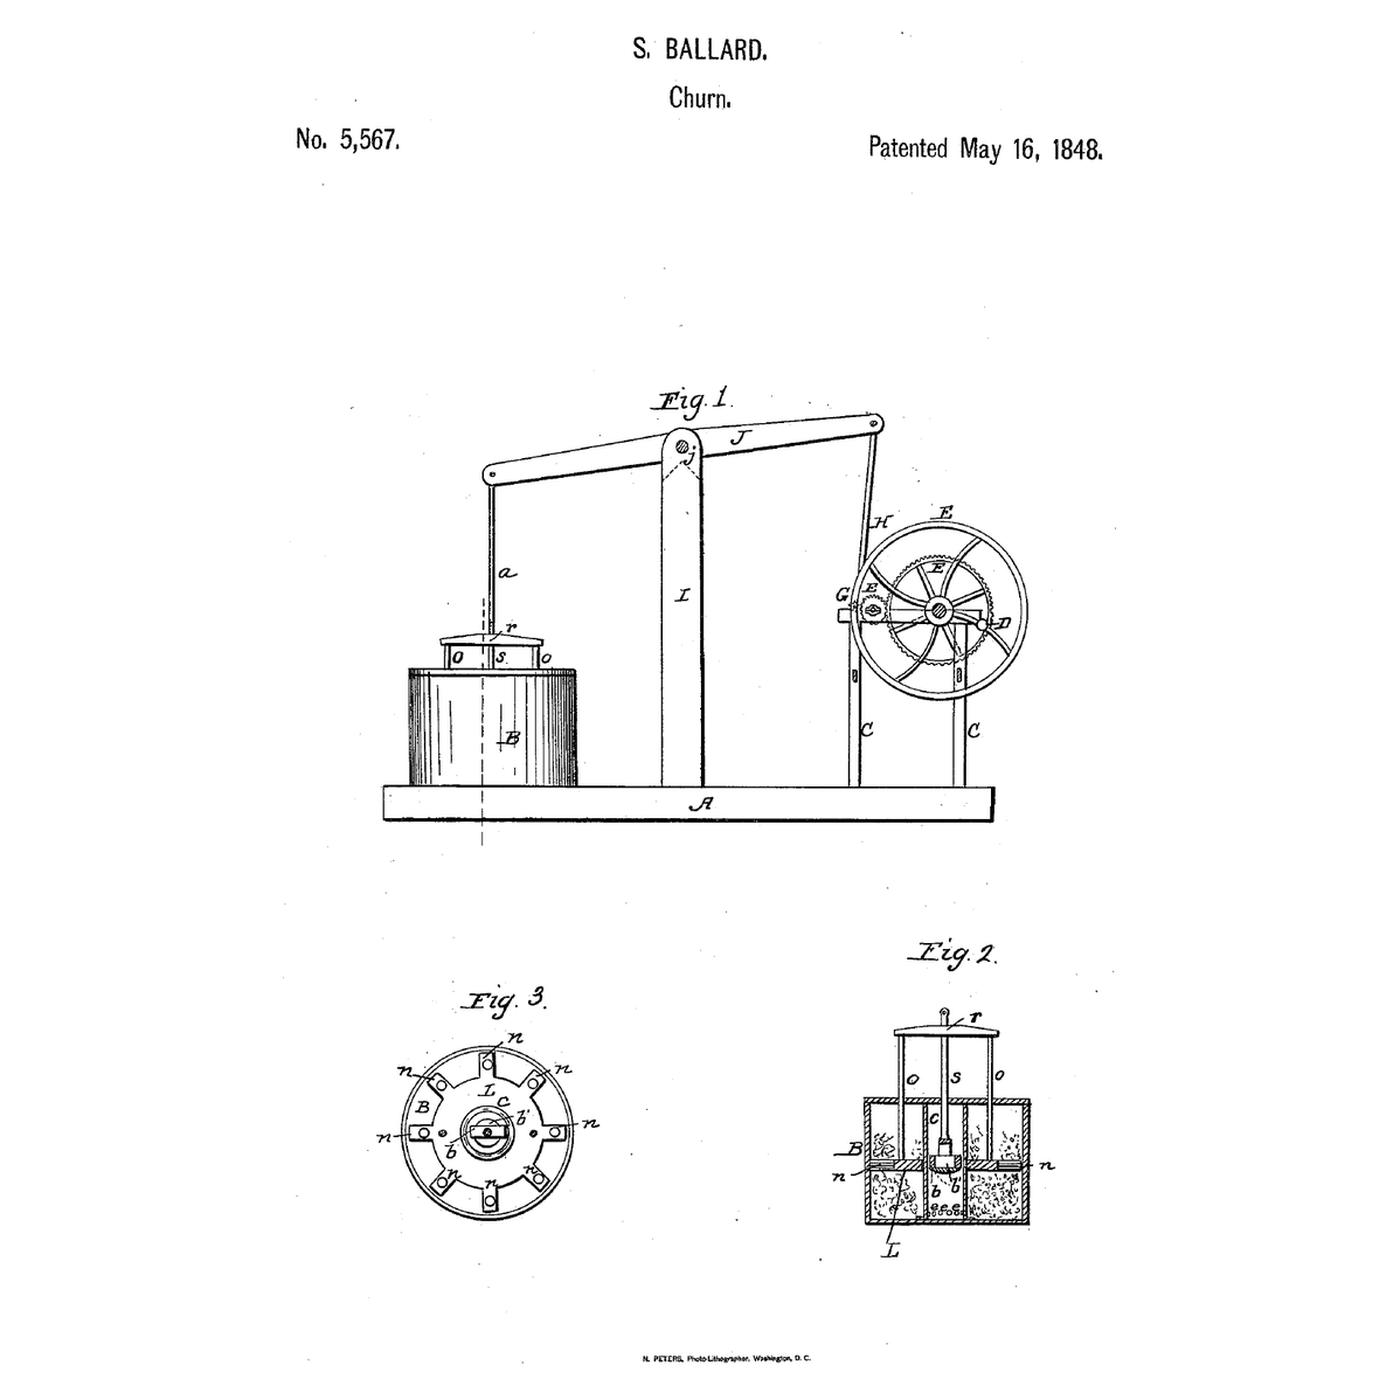


Air-Pump Annular Dasher Churn: A Pump in the Middle, a Ring Dasher Round It
Ballard combined "an air pump with the reciprocating dasher of the common upright tub or barrel churn."
Stephen Ballard of Meigs Creek, Ohio, received US 5,567, dated 16 May 1848, for an atmospheric churn: a pump cylinder fixed upright in the middle of the tub, closed at the bottom, with valves round its lower edge opening outward and a piston whose valve opens downward, "in the manner of a common pump"; and an annular dasher with radial arms that slides over the cylinder, joined by rods to the piston rod's crosshead. A working beam on a standard, driven through cog wheels, a balance wheel, crank and pitman, works both.
This rung works out the air pumped, then prints the cylinder, piston, ring dasher and crosshead, works them by a hand beam, and makes butter.
上級者
About 6 hours, plus printing
手順
1
1
Air pumped
Air pumped
Jupyter ノートブックを読み込み中…
2
2
An up-and-down dasher before it
An up-and-down dasher before it
The embedded blueprint improves the common upright dash. Ballard puts a pump inside the dasher's ring.
3
3
Read US 5,567
Read US 5,567
"Within the cylinder a bucket or piston (b) is fitted in the manner of a common pump, but with the valve (b') of the piston opening downward, in order that when the piston rises the air may pass down through it into the lower part of the cylinder to be forced out through the valves (e e e e) around the bottom of the cylinder into the surrounding cream when the piston is depressed."
4
4
Print the parts
Print the parts
Print the pump cylinder upright on its base, the piston, the ring dasher with its eight arms and the crosshead. Print in PETG at 0.2 mm layers, 30 % infill, 4 walls; wash before first use.
このステップの材料:
 PETGフィラメント1 個
必要な工具:
 FDM 3D プリンター
5
5
Print the pump cylinder
Print the pump cylinder
The pump cylinder, printed as step 4 describes.
6
6
Print the piston
7
7
Print the dasher
8
8
Print the crosshead
9
9
Valves
Valves
Cut a strip of thin leather and glue it round the outside of the cylinder along its top edge only, over the six ports near the foot, so it lifts to let air out and closes against cream. Cut a leather disc to lie on top of the piston over its four holes, held at the centre by the rod, so air passes down but not up. Fit a leather cup washer in the piston's groove.
このステップの材料:
 革の細帯1 個
 木工用接着剤1 個
必要な工具:
 ドライバーセット
10
10
Tub, rods and beam
Tub, rods and beam
Screw the cylinder's base to the centre of a food-grade bucket's floor, sealed with silicone. Thread an M8 rod through the crosshead and piston with nuts, slide the ring dasher over the cylinder, and join it to the crosshead by two 4 mm steel rods. Stand a pine post beside the bucket, pivot a pine beam on it, and hang the crosshead from the beam's end so a hand on the other end works piston and dasher together.
このステップの材料:
 20 リットルのバケツ1 個
 シリコーンシーラント1 個
 全ねじ棒1 個
 六角ナット1 個
 軟鋼丸棒1 個
 松板1 個
 #8 × 1 インチ木ねじ1 個
 小ねじ1 個
必要な工具:
 金切りのこ(ハクソー)
 コードレスドリル
 ドリルビットセットドライバーセット
 モンキーレンチ
 手のこぎり
11
11
The build in 3D
The build in 3D
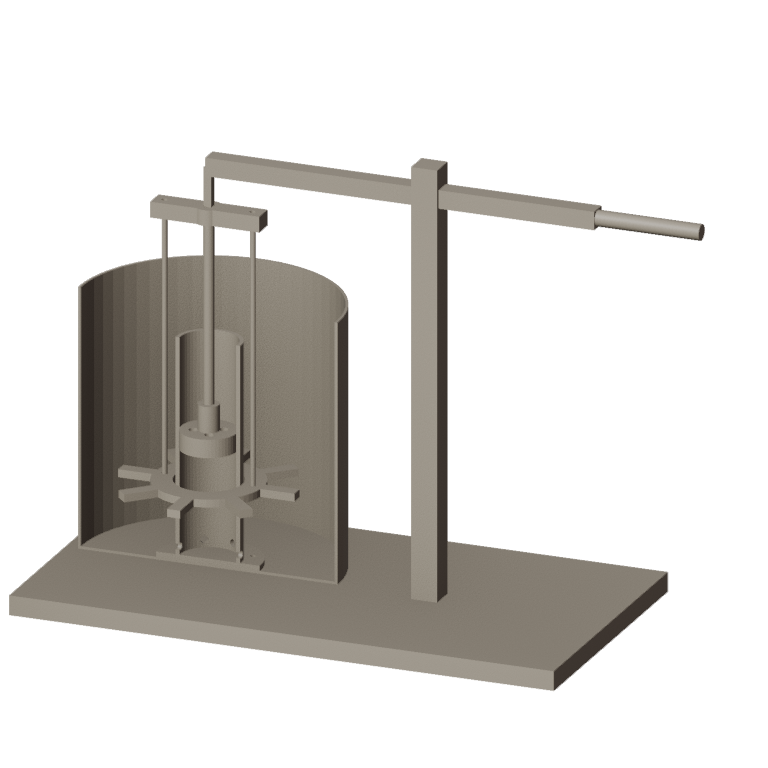
FreeCAD model of this build, not of the patent: the tub and pump cylinder cut away to show the piston and the valve ports round the cylinder's foot, the ring dasher on the cylinder, its rods to the crosshead, and the hand beam on its standard.
12
12
Pump and make butter
Pump and make butter
Let the heavy cream stand until it reaches about 15 °C, checked with the thermometer. Pour in 1.5 litres, enough to cover the ports. Work the beam steadily; bubbles should rise on each down-stroke. Time until the butter comes. Pour off the buttermilk, add cold water, churn a little and pour off again until it runs clear; work in a pinch of salt and weigh the butter.
このステップの材料:
 生クリーム1500 ml
 粗い海塩1 個
 水1 個
必要な工具:
 差しっぱなしのプローブ温度計
 ストップウォッチ
 デジタルキッチンスケール
 ステンレス鋼の大きな混ぜ鉢
13
13
No bubbles, cream in the pump
No bubbles, cream in the pump
Air-pump annular dasher churn troubleshooting.
Flow
Loading...
14
14
History and honest limits
History and honest limits
**Stephen Ballard** of Meigs Creek, Morgan County, Ohio, received US 5,567, dated 16 May 1848. The cylinder was held to the bottom by a button, screw or other means for ready removal; the machine could be worked by "manual, dog, water, or other power." He wrote that the air acts "chemically by imparting its oxygen to acidify the cream"; that is his explanation, not a measured fact. He claimed "the combination of the reciprocating annular dasher and air pump with the tub or barrel to contain the cream."
**Honest limits.** A bucket and printed parts stand in for his tub and pump, and a hand beam for his cog wheels, balance wheel, crank and pitman. FDM prints hold food in their layer lines, so wash well and replace when worn. Your times and weights are the result.
材料
14- 1 個プレースホルダー
- 1 個プレースホルダー
- 1 個プレースホルダー
- 1 個プレースホルダー
- 1 個プレースホルダー
- 1 個プレースホルダー
- 1 個プレースホルダー
- 1 個プレースホルダー
- 1 個プレースホルダー
- プレースホルダー
- 1 個プレースホルダー
- 1500 mlプレースホルダー
- 1 個プレースホルダー
- 1 個プレースホルダー
必要な工具
11- プレースホルダー
- プレースホルダー
- プレースホルダー
- 1 vendor sell this, none ship to you yetプレースホルダー
- プレースホルダー
- プレースホルダー
- プレースホルダー
- プレースホルダー
- プレースホルダー
- プレースホルダー
- プレースホルダー
設計ファイル
5この設計図で作るもの

関連ブループリント
これらのブループリントは知識を共有しています — 技術、材料、原理


CC0 パブリックドメイン
このブループリントはCC0で公開されています。許可を求めずに、自由にコピー、修正、配布、あらゆる目的で使用できます。
メイカーを応援するには、ブループリント経由で製品を購入してください。メイカーには メイカーコミッション がベンダーにより設定されています。または、このブループリントの新しいイテレーションを作成し、自分のブループリントにコネクションとして含めて収益を共有できます。