Making Standardised Roman Bricks (Lateres) — The Building Block of Imperial Architecture
The Roman fired brick — later called later (plural lateres) — was one of the most important standardised manufactured products of antiquity. Unlike the irregular, locally-variable bricks produced by earlier civilisations, Roman bricks were made to consistent dimensions controlled by law and stamped with production information — the brickmaker's name, the estate or figlina (brickyard) of origin, and the date — creating what is essentially a quality-controlled industrial product manufactured at scale across the empire.
Roman bricks differ from modern bricks in their proportions: they are thinner and wider. The most common type, the bessalis (two-thirds of a Roman foot), measures approximately 20 × 20 × 4 cm — a nearly square, very flat tile. The sesquipedalis (one-and-a-half Roman feet) measures approximately 44 × 44 × 6 cm; the bipedalis (two Roman feet) is approximately 59 × 59 × 6 cm. These flat proportions were ideal for the Romans' preferred building technique — opus mixtum (mixed masonry), in which horizontal courses of brickwork alternate with sections of concrete or stone rubble. The flat bricks act as levelling courses and as visible facing; the concrete core provides bulk and thermal mass.
Roman brickmaking was a sophisticated industrial operation. The major figlinae (brickyards) on the banks of the Tiber outside Rome were enormous enterprises — some employing hundreds of workers — that supplied the entire city's building programme. Imperial brickyards (the figlinae Domitianae, later the figlinae Caesaris) were owned by the emperor himself. Brick stamps (figulinae inscriptiones) are an invaluable chronological tool for archaeologists: because the stamps record the consul's name (used for dating), any building with stamped bricks can often be dated to within a year of the consul's term.
Maagizo
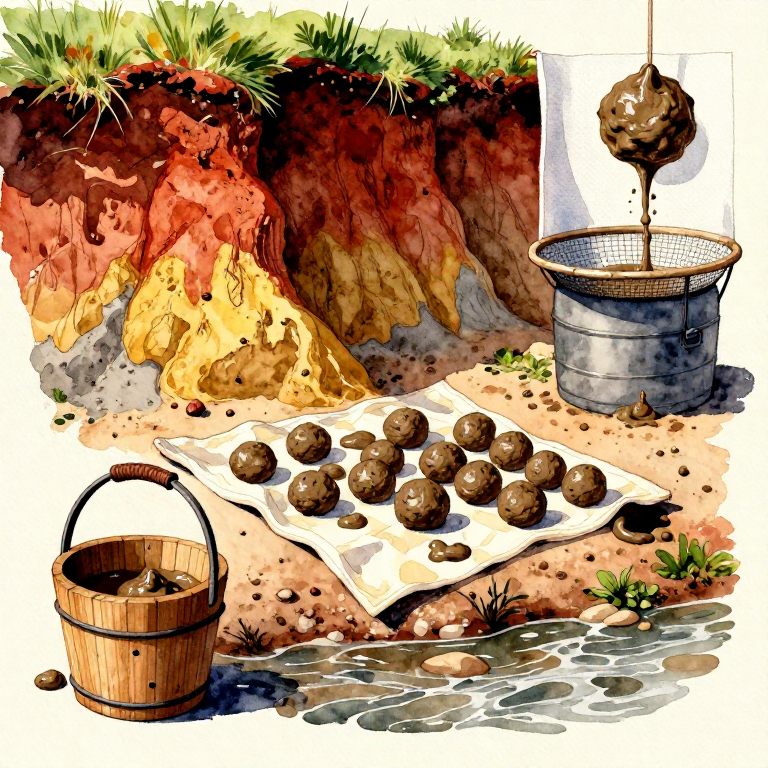
Select and excavate alluvial brick clay
Select and excavate alluvial brick clay
Roman brickmakers specifically sought alluvial clay from riverbanks and floodplains — clay deposited by rivers over thousands of years is naturally mixed with fine sand and organic material that improves workability and reduces shrinkage cracking. The major Roman figlinae were all located on the Tiber riverbanks for this reason. Dig into the bank below the topsoil to reach the grey or brown alluvial clay layer. Test a handful: it should feel smooth and slightly gritty (from the natural sand component), roll easily into a coil, and hold its shape when bent around a finger without cracking. Avoid pure plastic clay (too smooth, too sticky) or sandy loam (too granular, no cohesion). Collect 300–500 kg for a batch of 200–300 bricks.
Vifaa kwa hatua hii:
 Clay400 kg
Zana zinazohitajika:
 Shovel
Weather the clay through the winter freeze-thaw cycle
Weather the clay through the winter freeze-thaw cycle
Roman figlinae practice was to excavate clay in autumn and leave it exposed in flat heaps through the winter. The freeze-thaw cycling breaks down clay clods into a fine, homogeneous paste far more thoroughly than any manual kneading can achieve. Winter rains also wash out soluble salts (which cause efflorescence and spalling after firing) and leach organic matter. The weathered spring clay was considered significantly superior to freshly dug material — Vitruvius explicitly recommends a two-year weathering period for brickmaking clay. In practice, a single winter's exposure produces a marked improvement. If the season does not allow for weathering, dig the clay and spread it in thin layers on a flat area, wetting and turning it weekly for at least four weeks.
Temper the clay with fine sand
Temper the clay with fine sand
Mix temper (non-plastic aggregate) into the weathered clay to control shrinkage and prevent cracking during drying and firing. Fine river sand is the standard temper — add approximately 15–25% by volume to the clay (less than for coarser modern bricks because the natural sand content of alluvial clay is already significant). Some Roman brickyards added crushed fired brick (grog) at 10–15% as additional temper — grog is more dimensionally stable than sand during firing because it has already been through the firing cycle. Spread the clay on a flat surface, add measured sand, and mix by treading (oxen were used in large operations) until the mixture is completely uniform with no pockets of unmixed clay or sand.
Vifaa kwa hatua hii:
 Coarse Sand60 kg
Prepare the standardised wooden brick mould
Prepare the standardised wooden brick mould
Build the brick mould to Roman standard dimensions. For the bessalis (the most common Roman brick): internal dimensions 20 × 20 cm × 4 cm deep. The mould is a bottomless rectangular frame of dense, smooth hardwood — boxwood or cherry is ideal — with internal faces planed perfectly flat. The frame thickness should be at least 3 cm of hardwood to resist the compression forces of pressing clay. Sand the internal faces to 240 grit and coat with raw linseed oil to close the pores. Before each use, wet the mould or dust it with fine sand to prevent clay from sticking. A gang mould (forming 4–6 bricks simultaneously) dramatically increases production rate and is consistent with Roman industrial practice.
Vifaa kwa hatua hii:
 Hardwood Block2 vipande
 Iron Nails16 vipande
Zana zinazohitajika:
 Hand Saw
Press and form the green bricks
Press and form the green bricks
Place the wetted mould on a flat wooden pallet or sanded flat stone. Take a lump of clay slightly larger than the mould volume and throw it forcefully into the mould — the impact drives the clay into all corners without air pockets. Press the clay with flat hands, working from the centre outward to expel trapped air. Strike off the excess clay level with the mould top using a wooden strike (a straight-edged board drawn across the mould top in a sawing motion). Lift the mould cleanly straight upward to release — any tilt tears the green brick edge. Place the formed brick carefully on the drying ground. A skilled Roman figulus (brick-moulder) could mould 2,000–3,000 bessales per day in sustained production.
Apply the brick stamp (officinator mark) before the clay stiffens
Apply the brick stamp (officinator mark) before the clay stiffens
While the clay is still fresh (within 30 minutes of moulding), press a carved wooden or ceramic stamp into the brick face. The Roman brick stamp (signacula) typically records: the name of the figlina (brickyard) in genitive case, the name of the officinator (production manager), the name of the reigning consul (for dating), and sometimes the estate owner. The stamp is a curved arc of text conforming to a semi-circular stamp, or a rectangular panel stamp. The text must be carved in relief (projecting from the stamp face) so that it leaves an impressed (sunken) inscription in the clay. Press the stamp firmly and evenly to achieve a clear, uniform impression — stamps are one of the most valuable chronological tools in Roman archaeology.
Dry the green bricks for 14-21 days under shade
Dry the green bricks for 14-21 days under shade
Dry the moulded bricks in a sheltered, shaded location with good air circulation — never in direct sun or rain. Vitruvius recommends a two-year drying period for premium bricks (to allow complete shrinkage before firing), but commercial operations dried bricks for 2–4 weeks depending on weather. Lay the bricks in a single layer initially; after 3–5 days (when the surface is leather-hard and the brick will not distort), turn each brick on its side to expose the base to drying air. After another 3–5 days, stand the bricks on edge. A fully dried bessalis should have lost approximately 8–10% of its green volume (linear shrinkage of 2–3% in each dimension) and ring with a dull tap. Any darker patches indicate residual moisture — do not fire until uniformly dry throughout.
Construct the up-draught kiln for firing
Construct the up-draught kiln for firing
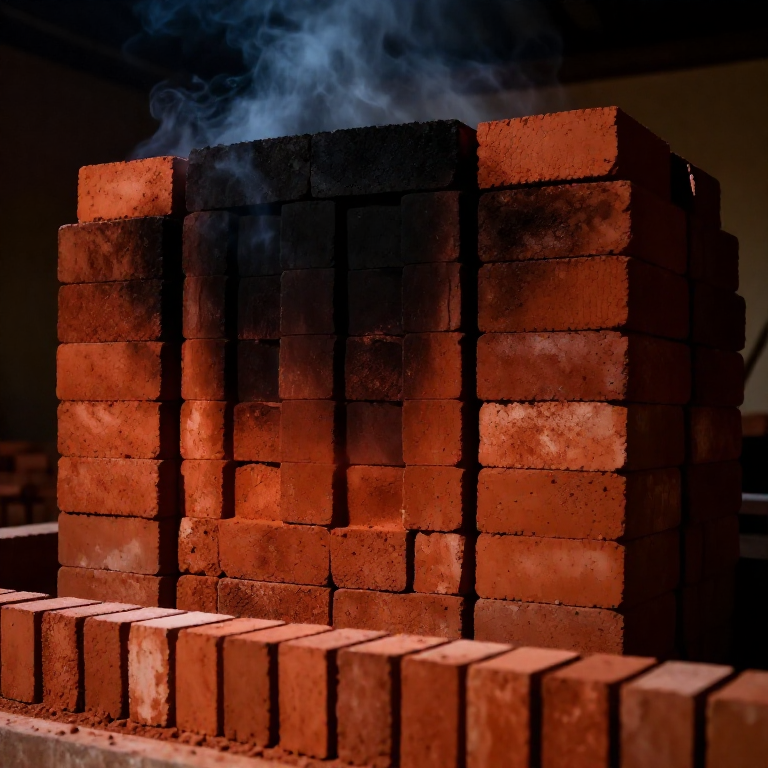
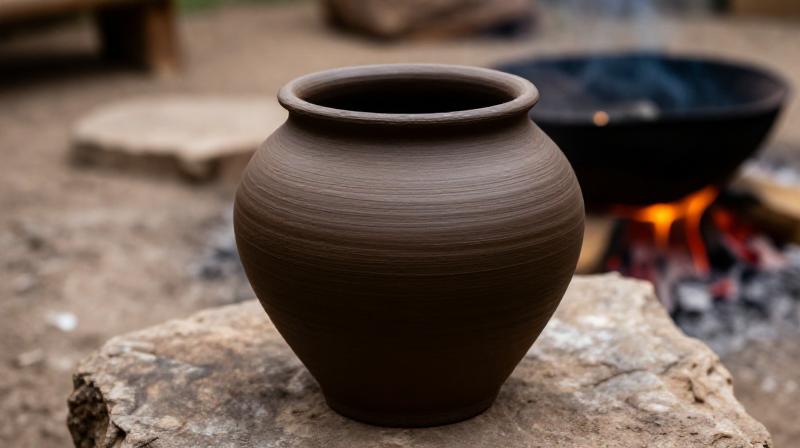
Roman figlinae used permanent up-draught kilns (fornaces) with a fire chamber below and a firing chamber above, separated by a perforated clay floor (the suspensura). Build the kiln in fired brick: a circular or rectangular firing chamber approximately 2 metres diameter, 1.5 metres tall, with a stoking pit and fire tunnels at the base. The perforated suspensura floor (clay slabs with multiple 5 cm holes) allows heat to rise from the fire chamber through the holes into the stacking chamber where the bricks sit. A temporary clay-plastered dome (the crown) is built over the loaded kiln to retain heat. The Roman fornax achieved temperatures of 900–1100°C in the firing chamber — hot enough to sinter the clay particles into a durable ceramic.
Vifaa kwa hatua hii:
 Refractory Clay50 kg
 Charcoal80 kg
Load the kiln in an open-stacked pattern
Load the kiln in an open-stacked pattern
Stack the dried bricks in the kiln firing chamber in an open herringbone or wicket pattern — bricks leaning against each other in pairs or laid in a crossing pattern with 2–3 cm gaps between adjacent bricks for heat and gas circulation. Do not lay bricks flat in tight horizontal courses — poor gas circulation produces unevenly fired, spotted bricks. Load the largest and heaviest bricks toward the bottom (where they will receive greatest heat), and thinner decorative tiles higher up. Leave the bottom 30 cm of the firing chamber free of bricks to allow the floor gases to distribute evenly before rising through the load. A Roman fornax of 2-metre diameter can hold 500–800 bessales per firing.
Fire through a slow pre-heat phase, then maximum temperature
Fire through a slow pre-heat phase, then maximum temperature
Fire the kiln in two distinct phases. Phase 1 (0–12 hours): Low fire, 200–400°C, very slow temperature rise to drive out all remaining free water and structural water (bound in the clay mineral lattice up to approximately 600°C). At 573°C, quartz undergoes an abrupt volume change (the α-β quartz inversion) — if temperature rises too fast through this zone, differential expansion cracks bricks. Phase 2 (12–36 hours): Maximum fire, stoke the fuel channels with hardwood billets continuously until the brick stack glows orange-red (approximately 900–1000°C). Maintain maximum temperature for at least 6–8 hours. White streaks of smoke from the crown vents turning clear are a sign that the carbonaceous matter in the clay has burned out — a good indicator that firing is complete.
Zana zinazohitajika:
 Chemical Splash Goggles
Cool the kiln over 48-72 hours before unloading
Cool the kiln over 48-72 hours before unloading
Seal all stoking channels and vent holes with clay plugs and allow the kiln to cool naturally for at least 48 hours. Do not open the kiln while it is still above 100°C — rapid cooling through the 573°C quartz inversion on the way down causes the same cracking risk as rapid heating. The kiln exterior may feel warm to the touch throughout this period. After 48–72 hours, carefully remove the temporary crown dome and allow the remaining heat to dissipate for several more hours before unloading. Test the temperature by sprinkling water on the top bricks — if it evaporates instantly, wait longer; if it dries in a few seconds, it is safe to handle with leather work gloves.
Sort, test, and grade the fired lateres
Sort, test, and grade the fired lateres
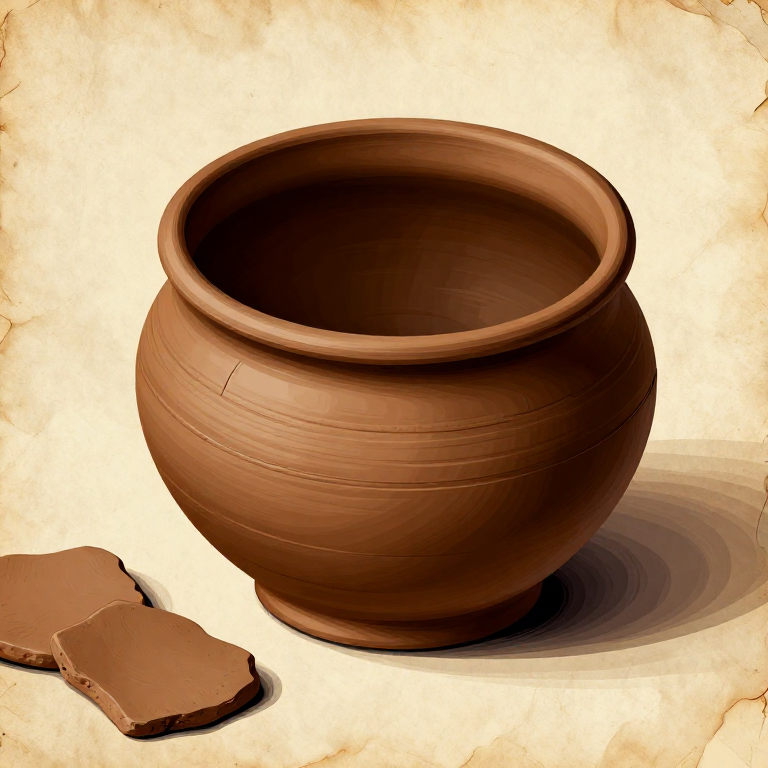
Unload the kiln and sort bricks into grades. Tap each brick with a knuckle or small hammer — a clear ring indicates a well-fired, dense brick (Grade 1: structural use in load-bearing walls, arches, and vault construction). A dull thud indicates under-firing — the clay did not fully sinter and the brick will absorb water and soften (Grade 2: use in interior partitions not exposed to moisture). Discard any bricks with visible cracks wider than 1 mm. Check dimensions against the standard mould size — Roman quality control expected bricks to match the standard within 5 mm after shrinkage. Record the firing batch, temperature achieved, and yield rate. A typical Roman fornax firing of bessales yields 60–75% Grade 1 bricks, 15–20% Grade 2, and 5–15% rejects.
Zana zinazohitajika:
 Hammer (2 kg)
Quarter the bipedales into triangular bessales for facing use
Quarter the bipedales into triangular bessales for facing use
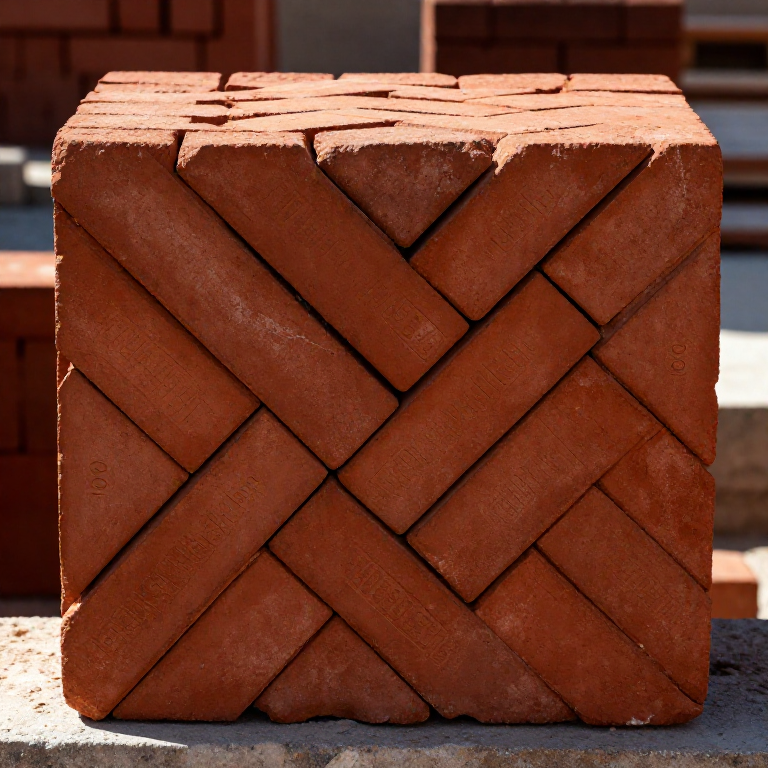
The large bipedalis (approximately 59 × 59 × 6 cm) was commonly fired whole and then cut in half or quartered on site to produce triangular pieces used as the visible facing in opus reticulatum and opus latericium walls. Quartering produces four right-angled triangular pieces, each approximately 29 × 29 × 41 cm — the triangular shape allows the brick point to be pushed deep into the concrete core while the hypotenuse face is exposed as the wall face. Score the cut lines on the brick face with an iron scribing tool, then place the brick on a firm edge and strike sharply with a broad iron chisel and hammer. A clean break follows the scored line. The triangular pieces are then laid point-inward in lime mortar over a concrete core to produce the characteristic diagonal-patterned Roman brick facing visible in remains across the empire.
Zana zinazohitajika:
Hammer (2 kg)Vifaa
6- Kishikilia Nafasi
- 2 vipandeKishikilia Nafasi
- 16 vipandeKishikilia Nafasi
- 50 kgKishikilia Nafasi
Vifaa vya Michoro Iliyounganishwa
Blueprint zinazohusiana
Blueprint hizi zinashiriki maarifa — mbinu, vifaa au kanuni
Related blueprints
Other builds that share materials, tools, or techniques with this one.

CC0 Umma Wote
Mchoro huu umetolewa chini ya CC0. Uko huru kunakili, kubadilisha, kusambaza, na kutumia kazi hii kwa madhumuni yoyote, bila kuomba ruhusa.
Saidia Mtengenezaji kwa kununua bidhaa kupitia Mchoro wao ambapo wanapata Kamisheni ya Mtengenezaji iliyowekwa na Wachuuzi, au unda marudio mapya ya Mchoro huu na uiunganishe kama kiungo katika Mchoro wako kuchangia mapato.