Ushirikiano
SANAA
UREMBO NA USTAWI
UJANJA
UTAMADUNI NA HISTORIA
BURUDANI
MAZINGIRA
CHAKULA NA VINYWAJI
UHANDISI WA KINYUME
SAYANSI
MICHEZO
TEKNOLOJIA
VAZI
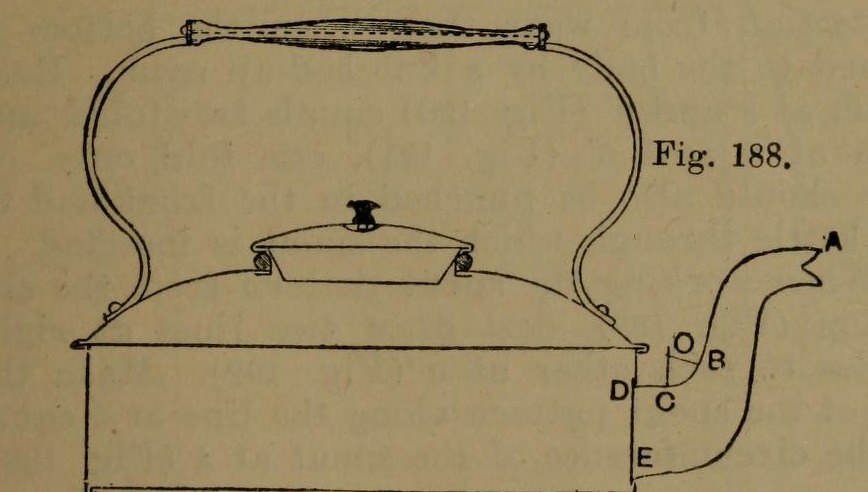


Stovetop Kettle: a Square Copper Kettle (Hasluck, 1907)
A tinsmith's square kettle in sheet copper, 9 x 9 in and 3 5/8 in deep: a box body with folded corner seams, a hollowed top pened on, a brazed and bent spout, a small cover, and a wooden handle on brass uprights.
Hasluck prefers copper; tinplate also works and is a separate route.
Source: Paul N. Hasluck, Tinplate Work (1907), pp. 91-98. Unknown: copper gauge, solder. Picture: Figs. 188-189 of the book.
Juu
Unknown
Maagizo
1
1
Cut the patterns
Cut the patterns
For a body 9 x 9 x 3 5/8 in, cut two ends 9 1/2 x 4 in and two sides 9 1/4 x 4 in, notched for box seams at the corners (Figs. 190-191), with allowances to fold at top and bottom. Punch the spout hole in the front. Cut the bottom 9 1/2 in square, notched for a 1/4 in edge. Set out the top as a 10 1/2 in square with curved allowances for hollowing and a 4 in circle for the cover hole (Fig. 193); set out the spout from the elevation (Fig. 192), the cover and its cone-shaped rim (Figs. 194-195).
Vifaa kwa hatua hii:
 Bamba la Shaba1 body, bottom, top, spout, cover
Zana zinazohitajika:
 Bikari ya ncha mbili
 Kichora Mistari
 Mkasi wa bati
2
2
Braze and shape the spout
Braze and shape the spout
Thin the long edges by hammering. Set in the throat with a stretching hammer on a beak iron, bend the spout round until the edges overlap, bind it with wire, lay spelter and borax along the inside of the seam and braze it; then close and braze the under seam. Fill it with lead and bend the neck with a round-faced hammer on the hollowing block; file off spare spelter and smooth it. Run out the lead, throw off a seating round the large end, trim the top with snips and tin the inside.
Vifaa kwa hatua hii:
 Metali isiyojulikana1 spelter
 Bati1 tinning
Zana zinazohitajika:
 Nyundo ya kulainisha
 Kigingi
 Waya wa chuma uliovutwa kwa bamba
 Poda ya boraksi
 Kichomeo cha kulehemu kwa shaba
 Risasi
 Kichota chenye matundu
 Kipande cha mbao ngumu
 Tupa ya chumaMkasi wa bati
3
3
Fold and seam the body
Fold and seam the body
Fold the top edges square, the front and back outwards and the sides likewise; fold the bottom edges right over inwards to take the bottom (Fig. 188). Hook each side's end over the front's and work the corner seam on a straight-edged tool (Figs. 198-199). Turn up the bottom's 1/4 in edge, push it edge-down into the bottom folds, and solder the bottom and seams.
Vifaa kwa hatua hii:
 Lehemu ya bati na risasi1 kipande
Zana zinazohitajika:
 Nyundo ya mbaoKigingi
 Pasi ya Umeme ya Kulehemu
 Fluksi
4
4
Hollow the top and make the cover
Hollow the top and make the cover
Hollow the top on the block: sink the four sides a little, hollow the corners with a bullet-faced hammer, flatten each side along the block edge, even the shoulder and smooth it all over. Pare the edges, mark the flange with an edging machine, set it down square with a hatchet stake and mallet, and take up an edge to fit over the body. Cut the cover hole with circular snips and fit a narrow wired rim, worked over inside. Make the cover: solder its cone rim to fit the wired rim, throw off a flange, hollow the cover disc and seam it on, and fix the knob.
Vifaa kwa hatua hii:
Waya wa chuma uliovutwa kwa bamba1 rimLehemu ya bati na risasi1 kipandeMetali isiyojulikana1 cover knobZana zinazohitajika:
Nyundo ya kulainishaKipande cha mbao ngumuKigingiNyundo ya mbaoMkasi wa batiPasi ya Umeme ya KulehemuFluksi5
5
Handle, top and spout
Handle, top and spout
Cut two handle uprights from stout brass or copper band (Fig. 196), drill them for rivets and for the spindle that carries the wooden handle, and bend them to shape. Rivet them to the top and solder over the rivet heads inside. Pene the top down onto the body and solder along each edge. Push the spout through its hole from inside until its large end butts against the front, and solder it strongly from inside.
Vifaa kwa hatua hii:
 Bamba la Shaba ya Njano1 handle uprights
 Ufito wa shaba ya njano1 spindle
 Mpini1 wood
 Rivet za shaba1 number not givenLehemu ya bati na risasi1 kipande
Zana zinazohitajika:
 Kekee cha mkono
 Nyundo ya rivetiNyundo ya mbaoPasi ya Umeme ya KulehemuFluksi
Vifaa
9- 1 body, bottom, top, spout, coverKishikilia Nafasi
- 1 cover knobKishikilia Nafasi
- 1 tinningKishikilia Nafasi
- 3 vipandeKishikilia Nafasi
- Kishikilia Nafasi
- 1 handle uprightsKishikilia Nafasi
- 1 spindleKishikilia Nafasi
- 1 woodKishikilia Nafasi
- 1 number not givenKishikilia Nafasi
Zana Zinazohitajika
17- Kishikilia Nafasi
- Kishikilia Nafasi
- Kishikilia Nafasi
- Kishikilia Nafasi
- Kishikilia Nafasi
- Kishikilia Nafasi
- Kishikilia Nafasi
- Kishikilia Nafasi
- Kishikilia Nafasi
- Kishikilia Nafasi
- Kishikilia Nafasi
- Kishikilia Nafasi
- Kishikilia Nafasi
- Kishikilia Nafasi
- Kishikilia Nafasi
- Kishikilia Nafasi
- Kishikilia Nafasi
Vifaa vya Michoro Iliyounganishwa


Mchoro huu unatengeneza
CC0 Umma Wote
Mchoro huu umetolewa chini ya CC0. Uko huru kunakili, kubadilisha, kusambaza, na kutumia kazi hii kwa madhumuni yoyote, bila kuomba ruhusa.
Saidia Mtengenezaji kwa kununua bidhaa kupitia Mchoro wao ambapo wanapata Kamisheni ya Mtengenezaji iliyowekwa na Wachuuzi, au unda marudio mapya ya Mchoro huu na uiunganishe kama kiungo katika Mchoro wako kuchangia mapato.