예술
뷰티 및 웰니스
공예
문화 및 역사
엔터테인먼트
환경
음식 및 음료
그린 퓨처
역공학
과학
스포츠
기술
웨어러블
Carving a Wooden Bowl with an Adze — Hollowing from a Green Wood Blank
Woody

작성자

Woody

26. 5월 2026NO
0
0
0
1
0

Carving a Wooden Bowl with an Adze — Hollowing from a Green Wood Blank

Before the lathe, every wooden bowl was carved by hand. The primary tool for hollowing was the adze — a blade set perpendicular to the handle, swung in short arcs to scoop out wood. A skilled worker can hollow a bowl from a green wood half-log in under an hour with nothing more than an adze and a gouge. The technique is ancient — wooden bowls carved with stone adzes have been found in Neolithic lake dwellings dating to 4000 BCE.

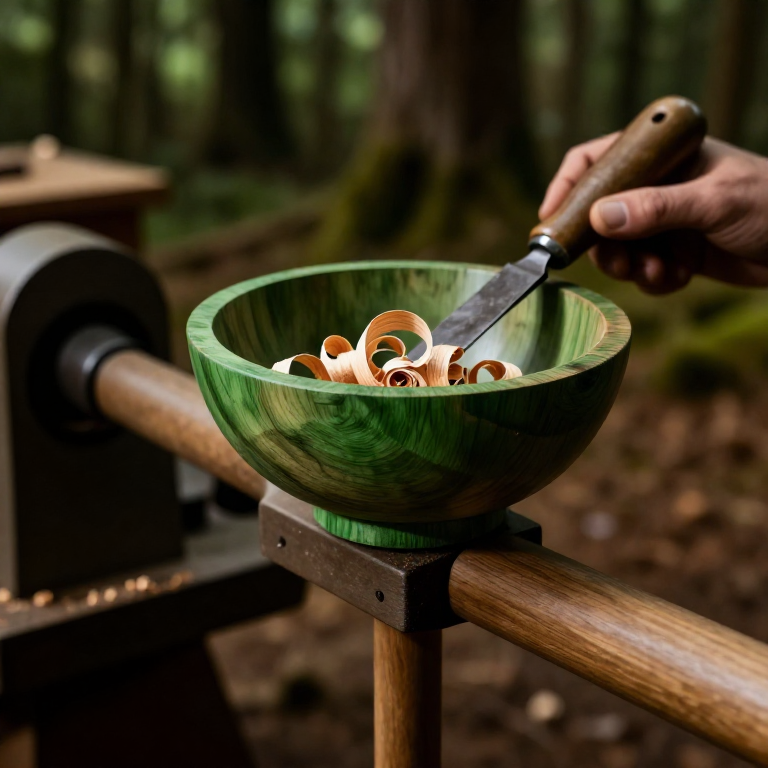
Green wood is essential. Freshly split wood is soft and forgiving — the adze bites cleanly and lifts chips without tearing. Seasoned wood is hard, punishes a slightly mis-angled blow, and tends to crack. The bowl is roughed out while green, then left to dry slowly. As it dries, a hand-carved bowl will move — the walls thin unevenly, and tension in the grain pulls the rim into a gentle oval. This is not a defect but a signature of hand work.

The combination of adze for roughing and gouge for finishing produces a bowl with visible tool marks that are both decorative and functional — the textured interior grips food better than a smooth turned surface, and the thick walls retain heat longer than thin-walled lathe work.

중급
2-4 hours

안내

1

Split a bowl blank from a green log

Start with a freshly felled log of a close-grained hardwood — birch, alder, sycamore, or cherry are traditional bowl woods. They carve cleanly and do not taint food. Split the log in half through the pith. Each half becomes one bowl. The flat (split) face becomes the rim, and the round (bark) side becomes the base. Choose a section free of knots — a knot in the bowl wall changes grain direction and causes the adze to catch unpredictably.
2

Shape the outside with a hatchet

Set the half-log split-face down on a chopping block. Use a hatchet to rough the outside to the bowl shape you want — round, oval, or rectangular. Remove the bark and sapwood. Leave the walls thick at this stage — at least 3-4 cm. The final wall thickness after hollowing will be about 1.5-2 cm, but the wood will move as it dries, so thicker walls give room for correction. Flatten the base so the bowl sits without rocking.

필요한 도구:

HatchetHatchet
3

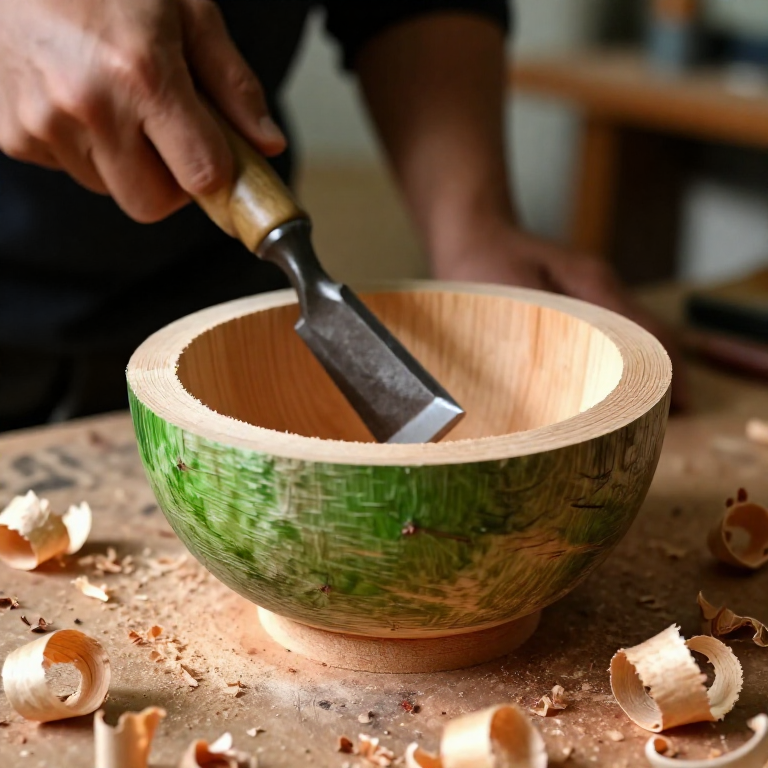
Hollow with the adze

Secure the blank on a low stump or the ground with the hollow side up. Stand over it and swing the adze in short, controlled arcs — the blade scoops out a crescent of wood with each stroke. Work from the centre outward, rotating the blank as needed. Keep the cuts shallow near the rim where the wall is thin. The adze is held with the dominant hand near the head for control, not at the end of the handle. Short, choppy strokes give precision; long swings waste energy and risk overcutting.

필요한 도구:

AdzeAdze
4

Refine with a gouge

Once the adze has roughed the hollow to within 5-10 mm of the final thickness, switch to a large gouge driven by hand or tapped with a mallet. The gouge gives finer control and a smoother surface. Work across the grain in sweeping cuts, following the curve of the bowl. For the transition from the wall to the base (the hardest part to carve cleanly), use a bent or spoon gouge that can reach into the curve without the handle hitting the rim.

필요한 도구:

Wood GougeWood Gouge
5

Even the wall thickness

Check the wall thickness by feel — grip the rim between thumb and fingers and work around the circumference. Thin spots feel flexible; thick spots feel rigid. Even the thickness with the gouge, removing material from the thick areas. A consistent wall thickness is important not just for appearance but for even drying — thick spots dry slower than thin spots, creating stress that can crack the bowl. Aim for 1.5-2 cm throughout.
6

Dry the bowl slowly

Place the rough-carved bowl in a cool, shaded place with moderate air circulation. Do not put it in direct sunlight or near a heat source — rapid drying cracks green wood. Some carvers put the bowl in a paper bag with the shavings to slow the moisture loss. Drying takes 2-4 weeks depending on the wood and wall thickness. The bowl will distort slightly as it dries — this is normal. Once dry, make a final pass with the gouge or a scraper to clean up any raised grain, then finish with oil or beeswax.

필요 도구

3

연결된 블루프린트 재료

CC0 퍼블릭 도메인

이 블루프린트는 CC0로 공개되었습니다. 어떤 목적으로든 자유롭게 복사, 수정, 배포 및 사용할 수 있습니다.

제품 구매를 통해 메이커를 지원하세요. 판매자가 설정한 메이커 커미션 을 받거나, 이 블루프린트의 새로운 반복을 만들어 연결로 포함시킬 수 있습니다.

토론

(0)

로그인 하여 토론에 참여하세요

댓글 로딩 중...