ศิลปะ
ความงามและสุขภาพ
งานฝีมือ
วัฒนธรรมและประวัติศาสตร์
ความบันเทิง
สิ่งแวดล้อม
อาหารและเครื่องดื่ม
วิศวกรรมย้อนรอย
วิทยาศาสตร์
กีฬา
เทคโนโลยี
อุปกรณ์สวมใส่
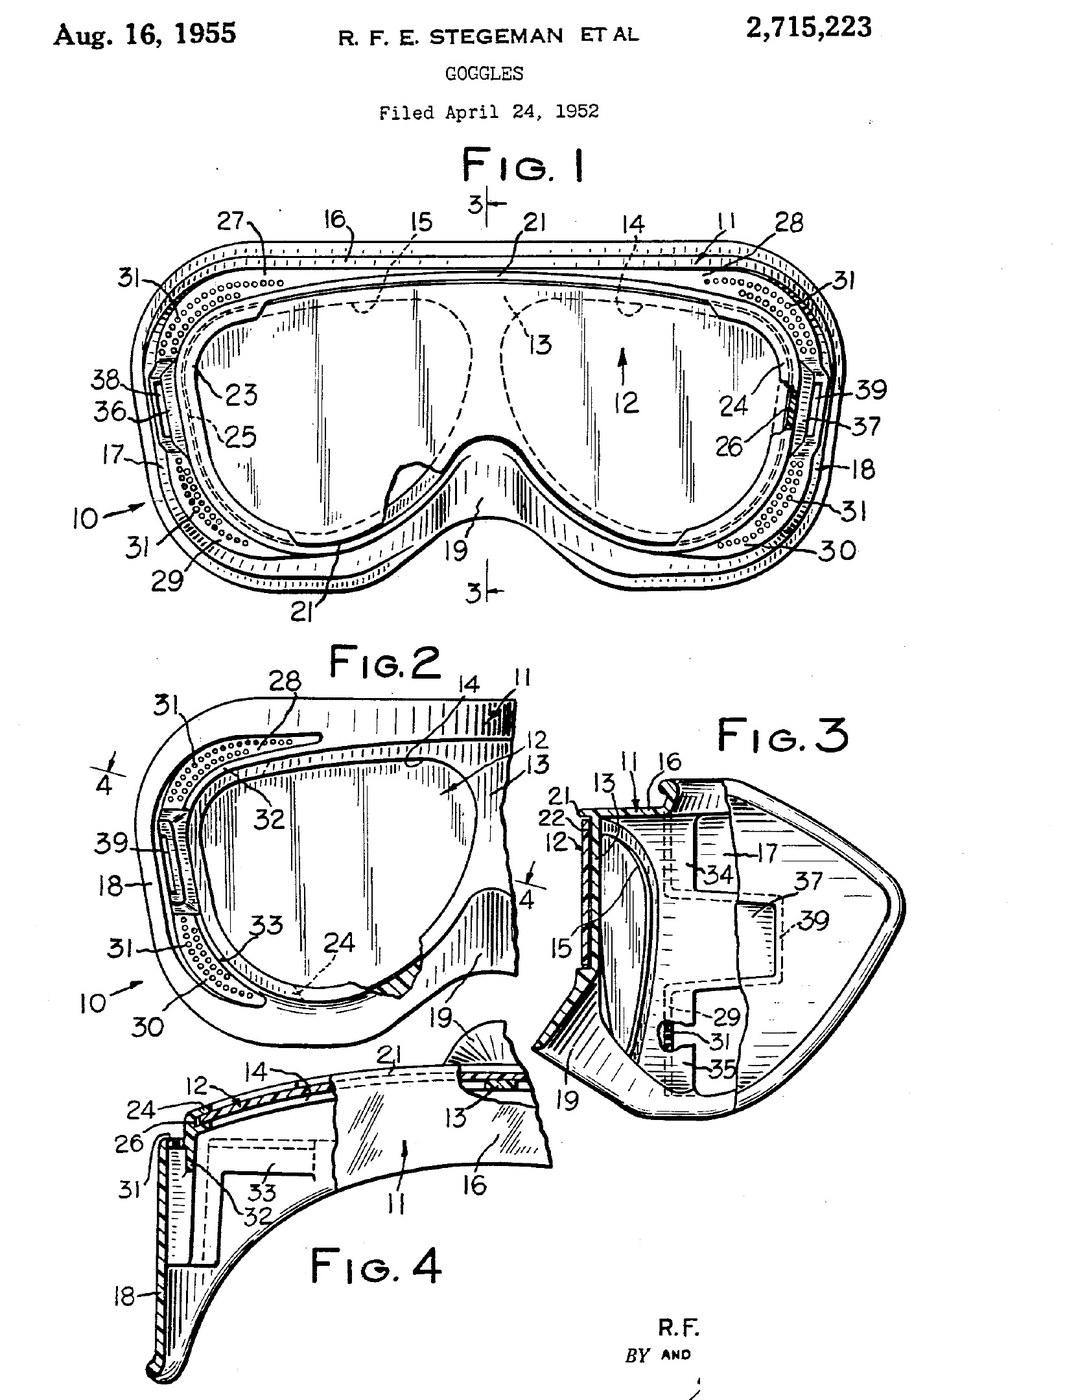


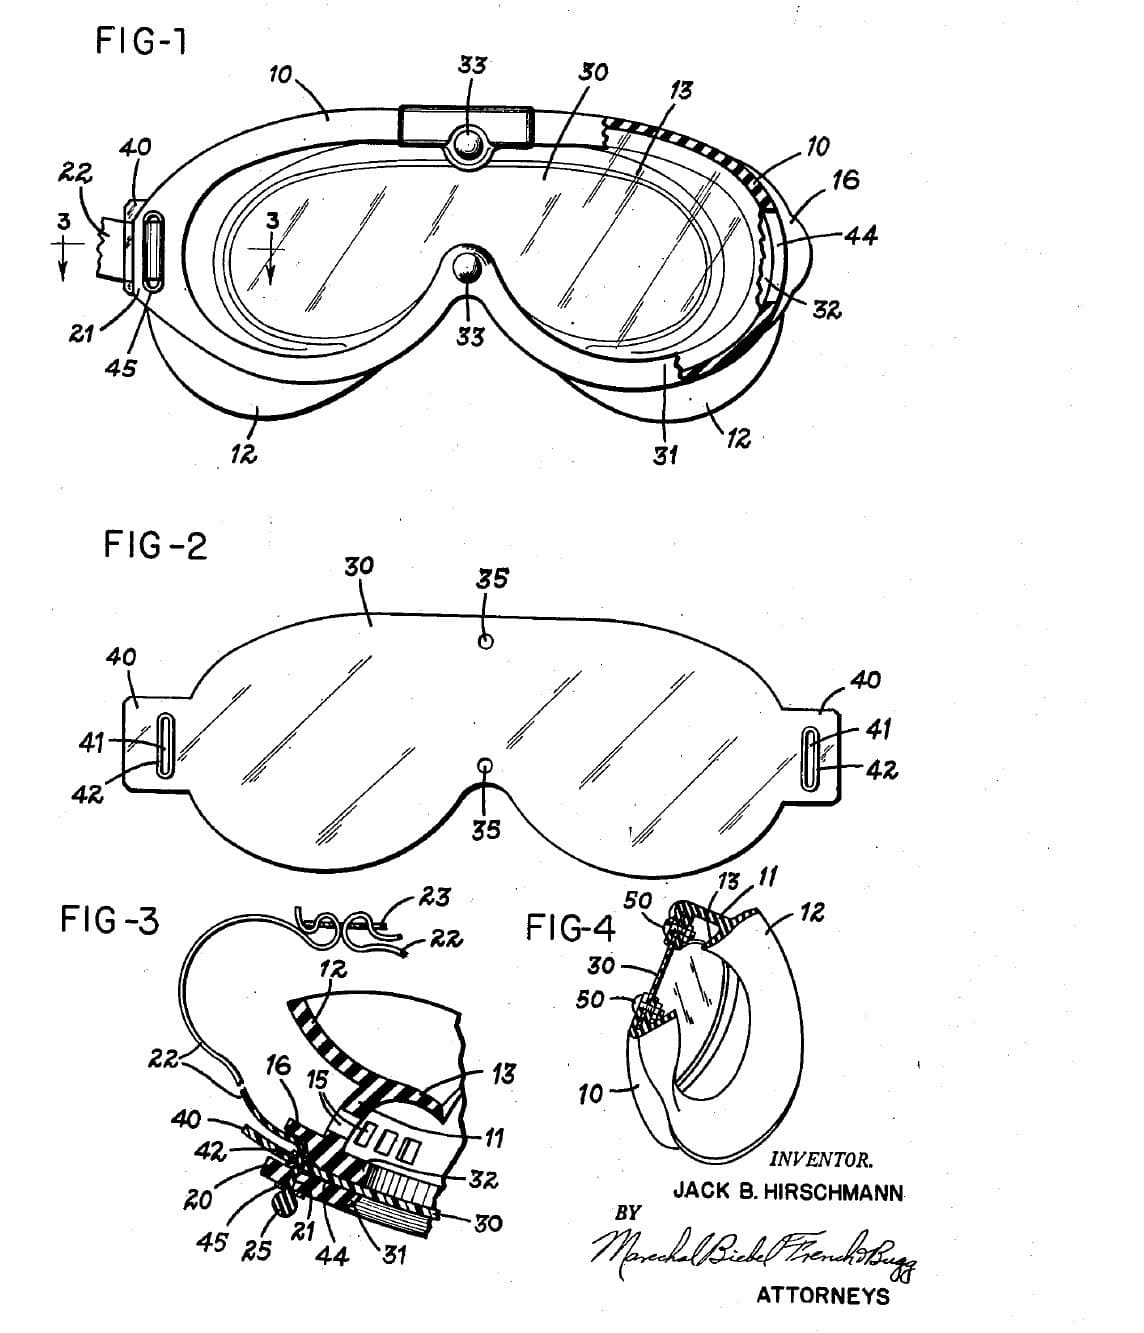
Lab Safety Goggles: Cover-All Body with Baffled Side Vents and a Snap-In Lens (Bausch & Lomb, US 2,715,223, 1955)
Cover-all goggles in two moulded plastic parts: a one-piece body that wraps the eyes and nose, and a flat clear lens panel sprung into a curve across its front. A raised rib round the front hides the lens edge so no particles can get in. The vents sit in set-back panels at the sides, and baffles inside turn the incoming air away from the eyes.
Result: ventilated goggles that keep out flying particles and splash, with a lens that snaps out for replacement.
Source: R. F. E. Stegeman and F. G. Gay (Bausch & Lomb), US 2,715,223 (1955). Unknown: sizes, the moulding and the strap. Picture: the patent drawing.
ระดับกลาง
Unknown
คำแนะนำ
1
1
Mould the body
Mould the body
Mould the body in one piece of plastic such as polystyrene or vinyl acetate. Give it a front wall curved from side to side with two sight openings, and a top wall and side walls running round to a projecting nose piece. Add a continuous rib round the front edge that stands forward of the lens, with overhanging flanges at the two temple ends forming grooves for the lens. Ours: polystyrene, injection moulded. Not given: sizes, the moulding.
วัสดุสำหรับขั้นตอนนี้:
 พอลิสไทรีน1 body
เครื่องมือที่ต้องใช้:
 เครื่องฉีดพลาสติก
 ขนาดที่ไม่ทราบ
2
2
Form the vents, baffles and strap anchors
Form the vents, baffles and strap anchors
In the same moulding, set back panels on the temple and side parts behind the lens plane and pierce them with many small vent holes. Inside, put baffle walls behind the holes so the incoming air is turned away from the eyes. Form an anchor recess with an opening in each side wall for the head strap.
เครื่องมือที่ต้องใช้:
เครื่องฉีดพลาสติก3
3
Cut and fit the lens, add the strap
Cut and fit the lens, add the strap
Cut a flat, transparent lens panel to cover the whole front wall. Put one end in one temple groove, flex the panel and put its other end in the other groove; its own stiffness holds it curved against the front wall, with the rib covering its edge. Fasten a head strap in the two anchor recesses. Ours: clear plastic sheet, elastic cord. Not given: the lens thickness, the strap.
วัสดุสำหรับขั้นตอนนี้:
 แผ่นพลาสติกใส1 lens panel
 เชือกยางยืด1 head strap
เครื่องมือที่ต้องใช้:
 กรรไกรตัดแผ่นโลหะขนาดที่ไม่ทราบ
วัสดุ
3- 1 bodyตัวยึดตำแหน่ง
- 1 lens panelตัวยึดตำแหน่ง
- 1 head strapตัวยึดตำแหน่ง
เครื่องมือที่จำเป็น
3- ตัวยึดตำแหน่ง
- ตัวยึดตำแหน่ง
- ตัวยึดตำแหน่ง
วัสดุจากพิมพ์เขียวที่เชื่อมต่อ


พิมพ์เขียวนี้สร้าง

บลูพริ้นท์ที่เกี่ยวข้อง
บลูพริ้นท์เหล่านี้แบ่งปันความรู้ — เทคนิค วัสดุ หรือหลักการ
CC0 สาธารณสมบัติ
พิมพ์เขียวนี้เผยแพร่ภายใต้ CC0 คุณสามารถคัดลอก แก้ไข แจกจ่าย และใช้งานผลงานนี้เพื่อวัตถุประสงค์ใดก็ได้ โดยไม่ต้องขออนุญาต
สนับสนุนเมกเกอร์โดยซื้อสินค้าผ่านพิมพ์เขียวของพวกเขา ซึ่งพวกเขาจะได้รับ ค่าคอมมิชชันเมกเกอร์ ที่ผู้ขายกำหนด หรือสร้างเวอร์ชันใหม่ของพิมพ์เขียวนี้และรวมเป็นการเชื่อมต่อในพิมพ์เขียวของคุณเพื่อแบ่งรายได้