ศิลปะ
ความงามและสุขภาพ
งานฝีมือ
วัฒนธรรมและประวัติศาสตร์
ความบันเทิง
สิ่งแวดล้อม
อาหารและเครื่องดื่ม
วิศวกรรมย้อนรอย
วิทยาศาสตร์
กีฬา
เทคโนโลยี
อุปกรณ์สวมใส่
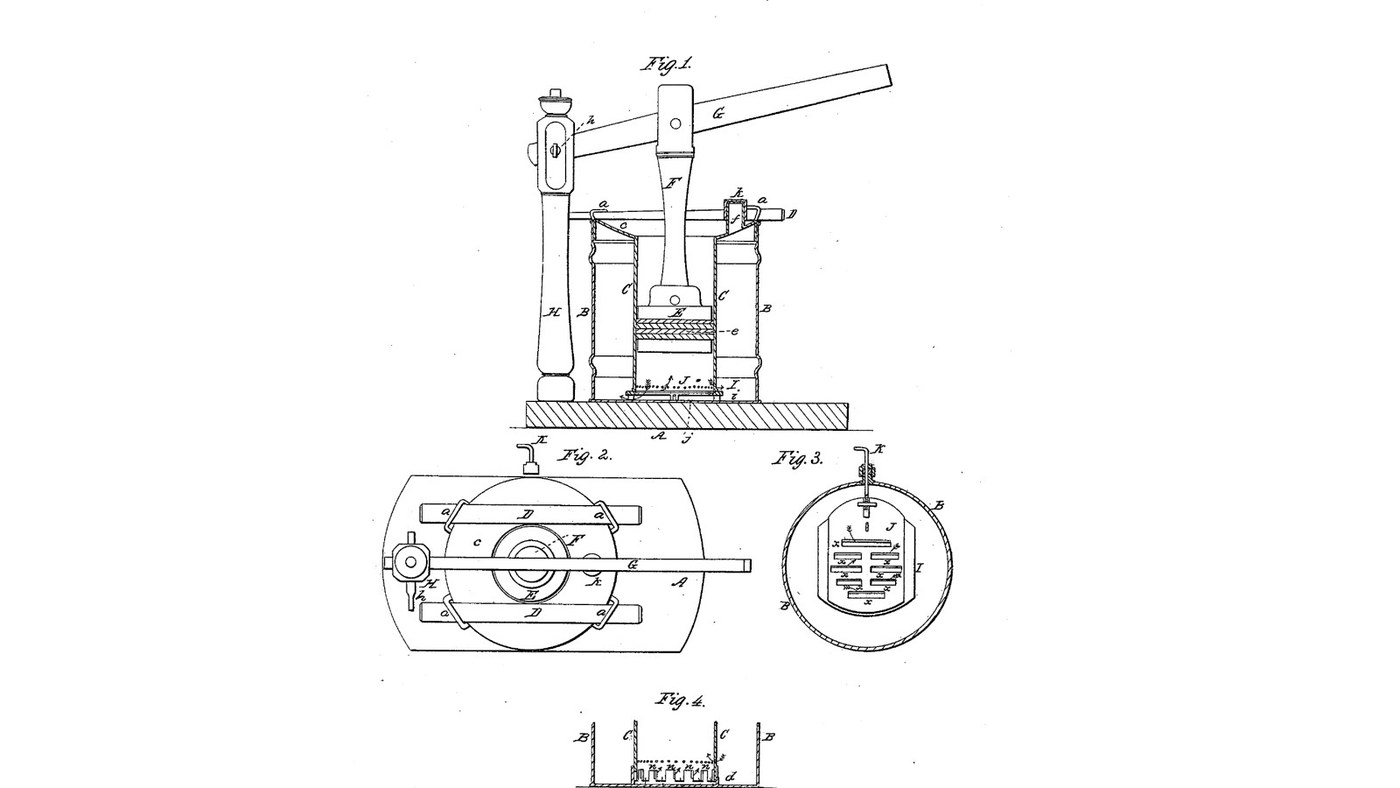

Friction Plunger Churn: Cream Pumped Through Openings You Close a Little More as It Thickens
John J. Lehaye of Reading, Pennsylvania, received US 25,162, dated 16 August 1859, for a churn that works by friction. A hollow cylinder stands inside the cream vessel on two slotted plates. A packed plunger, worked by a long lever, draws the cream from the vessel into the cylinder through the slots and drives it back. A screw rod through a stuffing box in the vessel's side slides the upper plate, so the openings can be narrowed as the churning goes on.
Lehaye gives no sizes; every size here is ours.
ระดับกลาง
About 2 days, plus printing
คำแนะนำ
1
1
How hard the cream is rubbed through the openings
How hard the cream is rubbed through the openings
กำลังโหลดสมุด Jupyter…
2
2
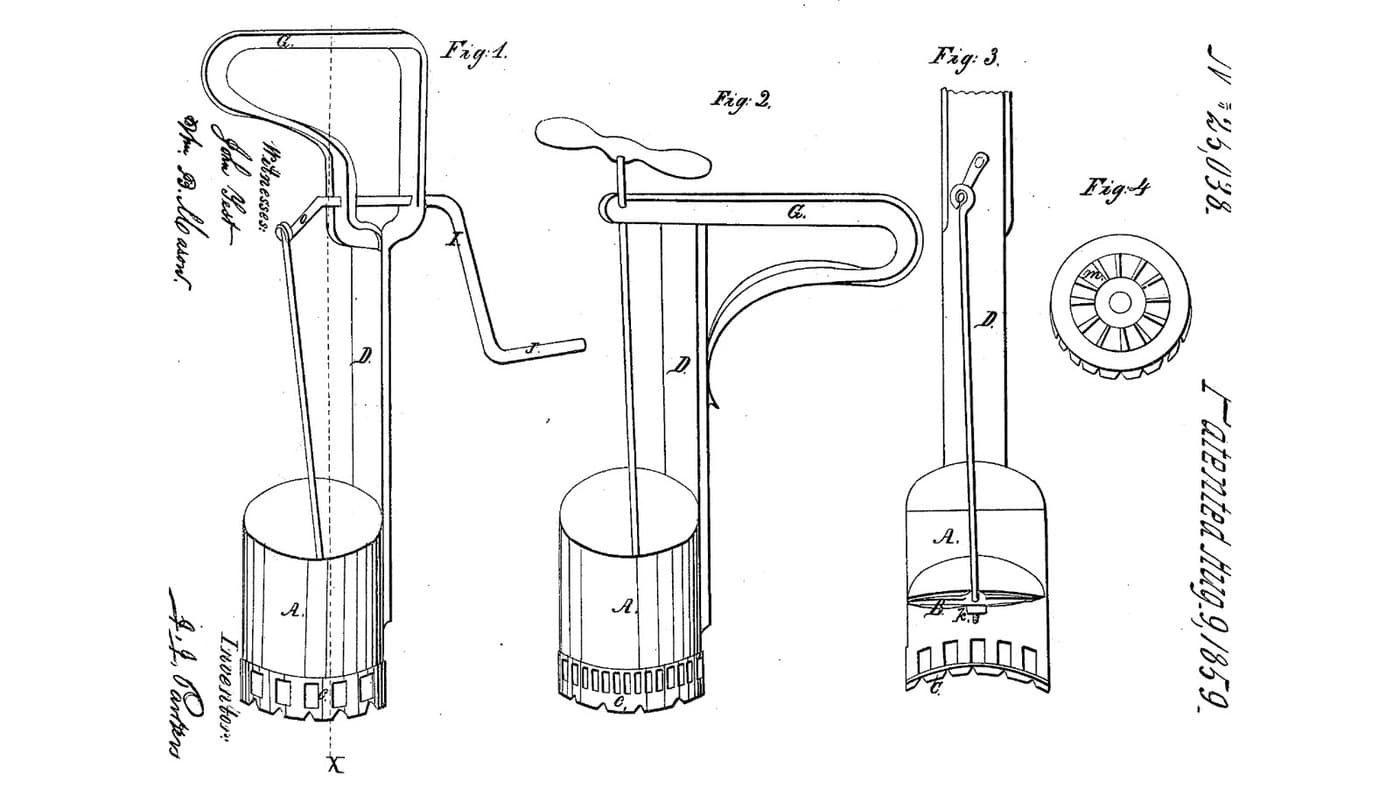
A piston that draws through a grate, the week before
A piston that draws through a grate, the week before
Parker's beater pumped eggs through fixed openings. Lehaye's openings close a little more as the cream thickens.
3
3
Read US 25,162
Read US 25,162
"By causing the cream to pass and repass through contracted openings, and with considerable force, the friction of the cream against the edges of the openings has the effect of rapidly separating the butter from the whey at the same time the constant change in the course of the cream agitates the latter as effectually as the ordinary dashers."
4
4
Print the plate I
Print the plate I
The 200 mm lower plate on four 20 mm legs i, with six 8 x 50 mm openings 18 mm apart and two guide flanges for plate J. Print it legs up. PETG, 0.2 mm layers, 30 % infill, 4 walls.
5
5
Print the plate J
Print the plate J
The 116 x 64 mm sliding plate with six openings matching plate I's and a boss at one end for rod K's nut. PETG, 0.2 mm layers, 30 % infill, 4 walls.
6
6
Print the cylinder rings
Print the cylinder rings
One 86.5 mm ring of the cylinder C, 160 mm across with a 3 mm wall and a spigot on top. Print three. PETG, 0.2 mm layers, 30 % infill, 4 walls.
7
7
Print the bottom cylinder ring
Print the bottom cylinder ring
The bottom ring, with an 18 mm notch in its lower edge for rod K. PETG, 0.2 mm layers, 30 % infill, 4 walls.
8
8
Print the plunger's upper plate
Print the plunger's upper plate
A 152 mm plate with a hub bored 6.4 mm across for rod F's pin. PETG, 0.2 mm layers, 30 % infill, 4 walls.
9
9
Print the plunger's lower plate
Print the plunger's lower plate
The plain 152 mm plate with a 6.4 mm hole in the middle. PETG, 0.2 mm layers, 30 % infill, 4 walls.
10
10
Print the stuffing box's inner half
Print the stuffing box's inner half
The flanged boss that sits inside the bucket, with an O-ring groove in its face and two 4.4 mm screw holes. PETG, 0.2 mm layers, 30 % infill, 4 walls.
11
11
Print the stuffing box's outer half
Print the stuffing box's outer half
The flanged boss outside the bucket, with a groove in its bore for a 6 mm O-ring round rod K. PETG, 0.2 mm layers, 30 % infill, 4 walls.
12
12
Print the vent tube
Print the vent tube
The 20 mm tube through the flange that lets the gases out. PETG, 0.2 mm layers, 30 % infill, 4 walls.
13
13
Print the vent's cover k
Print the vent's cover k
The push-on cover for the vent tube. PETG, 0.2 mm layers, 30 % infill, 4 walls.
14
14
Base A and column H
Base A and column H
Cut an 18 mm plywood base 750 x 400 mm. Stand a hardwood column 70 x 70 mm, 643 mm tall, on it 290 mm from where the bucket's middle will be, glued and screwed from under the base. Saw a slot 24 mm wide and 100 mm deep in its top and bore it 12.4 mm across 40 mm below the top for the pin h.
วัสดุสำหรับขั้นตอนนี้:
 แผ่นไม้อัด1 ชิ้น
 แผ่นไม้เนื้อแข็ง1 ชิ้น
 กาวไม้1 ชิ้น
 สกรูไม้6 ชิ้น
เครื่องมือที่ต้องใช้:
 เลื่อยจิ๊กซอว์
 เลื่อยมือ
 สิ่ว
 สว่านไร้สาย
 ชุดดอกสว่านใบพาย
 ชุดดอกสว่าน
 ฉากตาย
 ตลับเมตร
15
15
Bucket B and the stuffing box
Bucket B and the stuffing box
Screw the bucket's floor to the base. Drill a 20.4 mm hole in its side 30 mm above the floor, facing away from the column, and two 4.4 mm holes 19 mm either side of it. Lay a 30 x 2 mm O-ring in the inner half's groove, fit the halves inside and outside the wall and draw them together with two stainless M4 screws and lock nuts. Fill the bucket with water to check the box does not leak, then empty it.
วัสดุสำหรับขั้นตอนนี้:
 ถังขนาด 20 ลิตร1 ชิ้นสกรูไม้4 ชิ้น
 โอริง2 ชิ้น
 สกรูเกลียวมิล2 ชิ้น
 นอตล็อกไนลอน2 ชิ้น
 เส้นใย PETG1 ชิ้น
เครื่องมือที่ต้องใช้:
 เครื่องพิมพ์สามมิติแบบเส้นใย (FDM)สว่านไร้สายชุดดอกสว่านใบพายชุดดอกสว่าน
 ชุดไขควง
 ประแจเลื่อน
 น้ำ
16
16
Plates I and J, and rod K
Plates I and J, and rod K
Press an M6 nut into plate J's boss. Lay J on plate I between its flanges and stand I on its legs in the middle of the bucket's floor. Cut 170 mm of M6 stainless threaded rod, bend 40 mm of one end to an L for a handle, push the straight end in through the stuffing box with a 6 mm O-ring in its bore and screw it into J's nut. Turn K both ways: J slides until its openings line up with I's, and closes them after 8 mm.
วัสดุสำหรับขั้นตอนนี้:
 น็อตหกเหลี่ยม1 ชิ้น
 เพลาเกลียว1 ชิ้นโอริง1 ชิ้น
เครื่องมือที่ต้องใช้:
 เลื่อยตัดเหล็ก
 ปากกาจับชิ้นงานหน้าโต๊ะประแจเลื่อน
17
17
Cylinder C, flange c, staples and wedges
Cylinder C, flange c, staples and wedges
Stack the four rings on plate I, the notched one at the bottom over rod K. Cut the flange from 12 mm plywood, a ring 304 mm across with a 154 mm hole, and bore a 16 mm hole 125 mm from its middle for the vent. Set it on the bucket's rim over the cylinder's top. Fit four stainless U-bolts through the bucket wall just under the rim, two each side, and drive two tapered hardwood wedges, 340 x 30 mm and 16 mm at their thick end, through them over the flange so it presses the cylinder down on the plates. Push the vent tube into its hole and its cover on top.
วัสดุสำหรับขั้นตอนนี้:
แผ่นไม้อัด1 ชิ้น ยูโบลต์4 ชิ้นแผ่นไม้เนื้อแข็ง1 ชิ้นเส้นใย PETG1 ชิ้น
เครื่องมือที่ต้องใช้:
เลื่อยจิ๊กซอว์ชุดดอกสว่านใบพายสว่านไร้สายชุดดอกสว่านเลื่อยมือประแจเลื่อน18
18
Plunger E, rod F and arm G
Plunger E, rod F and arm G
Cut two 153.9 mm discs of 3 mm food-grade silicone sheet and bolt them between the plunger plates through the middle, hub up; the silicone's edge is the packing e and should slide in the cylinder with a light drag. Saw a slot in each end of a 22 mm hardwood dowel 470 mm long between pin centres and pin its lower end to the plunger's hub with a 6 mm stainless bolt. Make the arm G from hardwood 40 x 22 mm, 930 mm long, bore it 12.4 mm 30 mm from one end for the pin h and 6.4 mm 290 mm from that for rod F, then bolt it into the column's slot with a 12 mm bolt and pin rod F to it.
วัสดุสำหรับขั้นตอนนี้:
 แผ่นยางซิลิโคน1 ชิ้น
 ชุดสลักเกลียวหกเหลี่ยมคละขนาด4 ชิ้นนอตล็อกไนลอน4 ชิ้น
 แหวนรองแบน4 ชิ้น
 เดือยไม้เนื้อแข็ง1 ชิ้นแผ่นไม้เนื้อแข็ง1 ชิ้น
เครื่องมือที่ต้องใช้:
 กรรไกรเลื่อยมือสว่านไร้สายชุดดอกสว่านประแจเลื่อนตลับเมตร
19
19
The build in 3D
The build in 3D
FreeCAD model of this build, cut open: the bucket on its base, the slotted plates I and J with rod K through the stuffing box, the cylinder of four rings under the flange, the wedges and staples, the vent, and the plunger on rod F worked by the arm G from the column H. Checked over the lever's whole travel and with plate J slid fully.
20
20
Churn
Churn
With plate J slid so all the openings are open, pour about 10 litres of heavy cream at about 15 °C into the bucket, checked with the thermometer. Work the arm about once a second, timing it. As the cream thickens, give rod K a turn now and then to close the openings a little. Lift the vent's cover now and then to let the gas out. When the butter comes, knock the wedges out, lift out the flange, the cylinder and the plunger, pour off the buttermilk, wash the butter in cold water until it runs clear, work in a pinch of salt and weigh it.
วัสดุสำหรับขั้นตอนนี้:
 ครีมสด10 l
 เกลือทะเลเม็ดหยาบ1 ชิ้นน้ำ1 ชิ้น
เครื่องมือที่ต้องใช้:
 เทอร์มอมิเตอร์หัววัดแบบเสียบค้าง
 นาฬิกาจับเวลา
 เครื่องชั่งดิจิทัลสำหรับครัว
 ชามผสมสเตนเลสใบใหญ่
21
21
Troubleshooting
Troubleshooting
Friction plunger churn troubleshooting.
Flow
Loading...
22
22
History and honest limits
History and honest limits
**John J. Lehaye** of Reading, Pennsylvania, assignor to himself and John Tucker of Philadelphia, US 25,162, 16 August 1859, "Churn". He claimed the vessel B, cylinder C and plunger E in combination with means for enlarging or contracting the openings between the cylinder and the vessel. He gives no sizes, so every size here is ours; the U-bolts are his staples a, the O-ring box his stuffing box, and silicone his packing. His Fig. 4 alternative, projections on the cylinder's foot and on a ring in the vessel's bottom, turned to open or close the gaps, is not built. He also offered the machine as an egg beater and for mixing curds.
วัสดุ
19- 1 ชิ้นตัวยึดตำแหน่ง
- 1 ชิ้นตัวยึดตำแหน่ง
- 1 ชิ้นตัวยึดตำแหน่ง
- 10 ชิ้นตัวยึดตำแหน่ง
- 1 ชิ้นตัวยึดตำแหน่ง
- 3 ชิ้นตัวยึดตำแหน่ง
- 2 ชิ้นตัวยึดตำแหน่ง
- 6 ชิ้นตัวยึดตำแหน่ง
- 2 ชิ้นตัวยึดตำแหน่ง
- 1 ชิ้นตัวยึดตำแหน่ง
- 1 ชิ้นตัวยึดตำแหน่ง
- 4 ชิ้นตัวยึดตำแหน่ง
- 1 ชิ้นตัวยึดตำแหน่ง
- ตัวยึดตำแหน่ง
- 4 ชิ้นตัวยึดตำแหน่ง
- 1 ชิ้นตัวยึดตำแหน่ง
- 10 lตัวยึดตำแหน่ง
- 1 ชิ้นตัวยึดตำแหน่ง
- 1 ชิ้นตัวยึดตำแหน่ง
เครื่องมือที่จำเป็น
19- 1 vendor sell this, none ship to you yetตัวยึดตำแหน่ง
- ตัวยึดตำแหน่ง
- ตัวยึดตำแหน่ง
- 1 vendor sell this, none ship to you yetตัวยึดตำแหน่ง
- ตัวยึดตำแหน่ง
- ตัวยึดตำแหน่ง
- ตัวยึดตำแหน่ง
- 1 vendor sell this, none ship to you yetตัวยึดตำแหน่ง
- ตัวยึดตำแหน่ง
- ตัวยึดตำแหน่ง
- ตัวยึดตำแหน่ง
- ตัวยึดตำแหน่ง
- ตัวยึดตำแหน่ง
- ตัวยึดตำแหน่ง
- ตัวยึดตำแหน่ง
- ตัวยึดตำแหน่ง
- ตัวยึดตำแหน่ง
- ตัวยึดตำแหน่ง
- ตัวยึดตำแหน่ง
ไฟล์ออกแบบ
11พิมพ์เขียวนี้สร้าง


บลูพริ้นท์ที่เกี่ยวข้อง
บลูพริ้นท์เหล่านี้แบ่งปันความรู้ — เทคนิค วัสดุ หรือหลักการ
Pump Egg Beater: A Piston Draws the Eggs In and Out Through a Grate
โดย TheChef
อาหารและเครื่องดื่ม
12
0
0
0
0
0
Water-Chamber Box Churn: A Turning Box With a Dash-Frame You Lower to Free the Butter
โดย Buttercup
งานไม้
14
0
0
0
0
0
Valved Hollow-Staff Plunger Churn: A Valve at the Top, Air Forced Out at the Foot
โดย TheChef
อาหารและเครื่องดื่ม
44
0
0
0
0
0

Churning Butter from Cream — The 5,000-Year-Old Fat Separation
โดย TheChef
งานฝีมือ
63
0
0
0
0
0
CC0 สาธารณสมบัติ
พิมพ์เขียวนี้เผยแพร่ภายใต้ CC0 คุณสามารถคัดลอก แก้ไข แจกจ่าย และใช้งานผลงานนี้เพื่อวัตถุประสงค์ใดก็ได้ โดยไม่ต้องขออนุญาต
สนับสนุนเมกเกอร์โดยซื้อสินค้าผ่านพิมพ์เขียวของพวกเขา ซึ่งพวกเขาจะได้รับ ค่าคอมมิชชันเมกเกอร์ ที่ผู้ขายกำหนด หรือสร้างเวอร์ชันใหม่ของพิมพ์เขียวนี้และรวมเป็นการเชื่อมต่อในพิมพ์เขียวของคุณเพื่อแบ่งรายได้