ศิลปะ
ความงามและสุขภาพ
งานฝีมือ
วัฒนธรรมและประวัติศาสตร์
ความบันเทิง
สิ่งแวดล้อม
อาหารและเครื่องดื่ม
วิศวกรรมย้อนรอย
วิทยาศาสตร์
กีฬา
เทคโนโลยี
อุปกรณ์สวมใส่
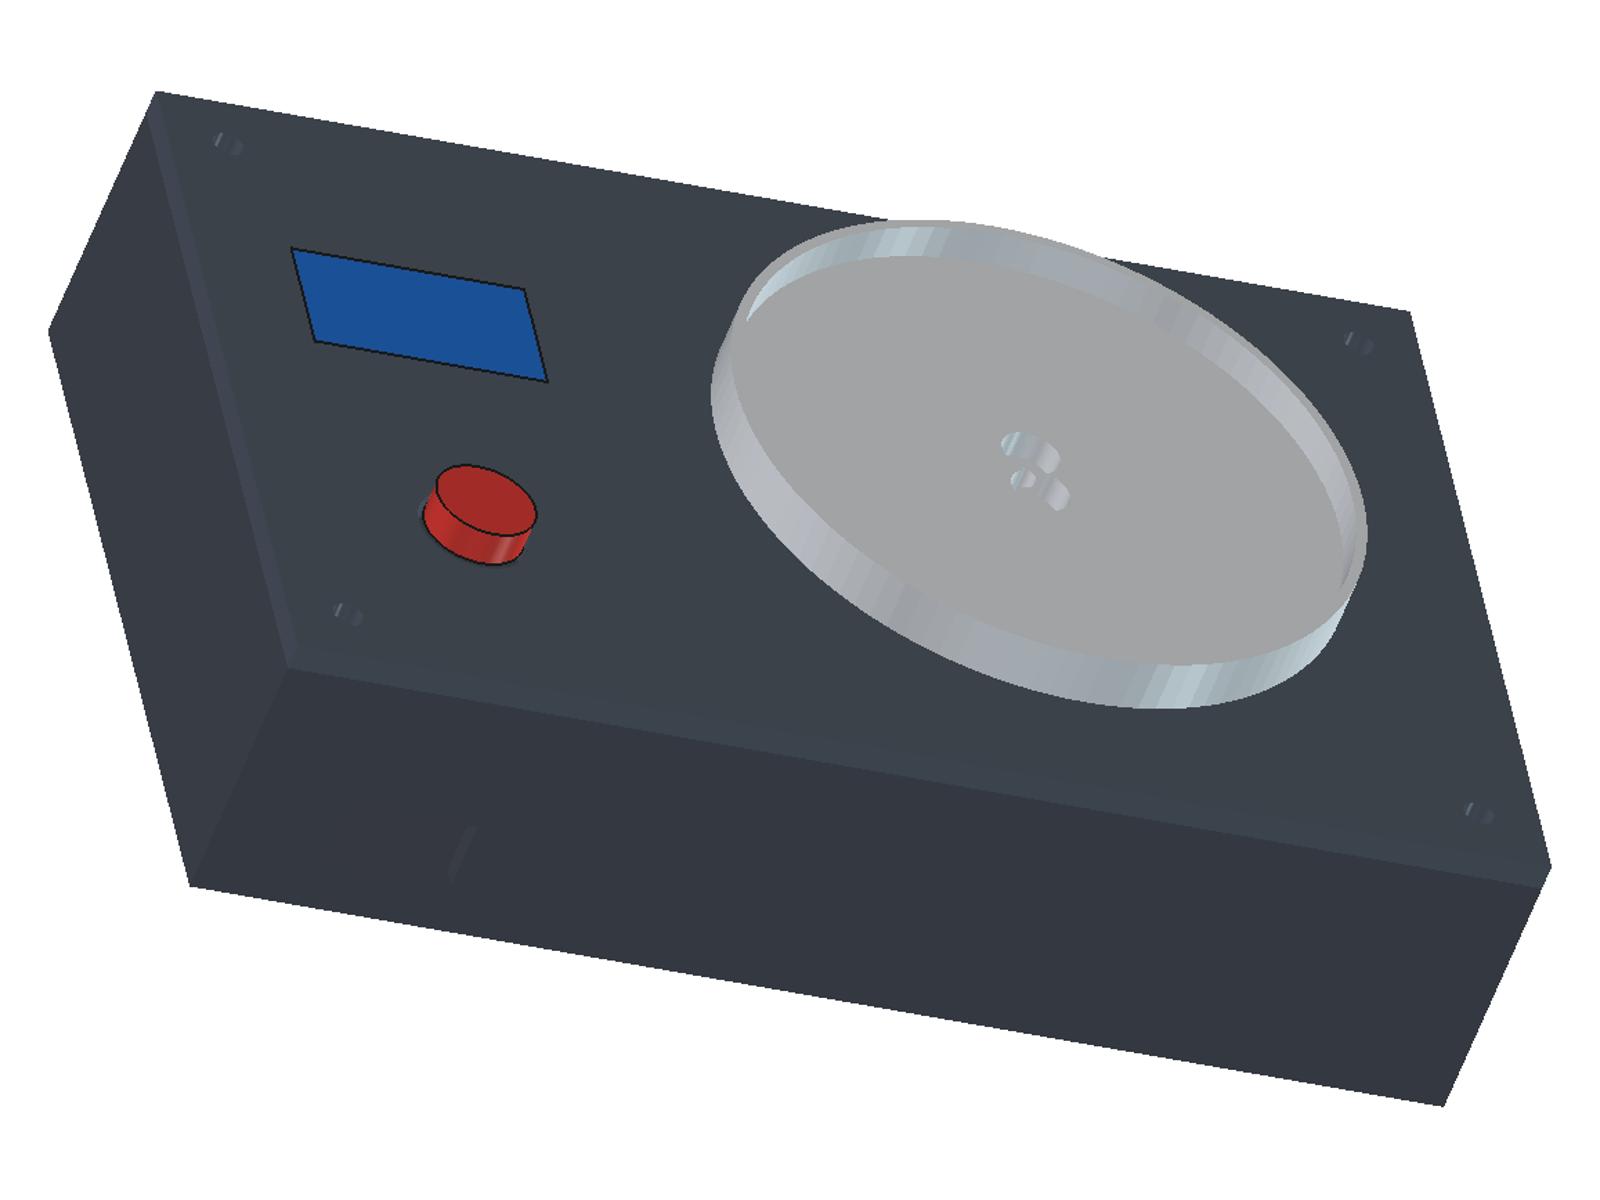
Precision Digital Scale, 0.01 g: Parallel-Beam Load Cell, HX711 and ESP32 (after Laimins, 1961)
Ed

สร้างโดย

Ed

22. พฤศจิกายน 2026FI
0
0
0
0
0

Precision Digital Scale, 0.01 g: Parallel-Beam Load Cell, HX711 and ESP32 (after Laimins, 1961)

A small precision scale that reads in 0.01 g steps up to 80 g. A 100 g parallel-beam load cell, the shape Eric Laimins patented in 1961, bends a little under the pan; a 24-bit HX711 reads its bridge, an ESP32 averages and shows grams on an OLED. One button tares and calibrates. The case and pan are printed in PETG.
ระดับกลาง
About 1 day, mostly printing

คำแนะนำ

1

Watch it built

An ESP32, an HX711 board and a load cell made into a scale with an OLED, including calibration (Electronic Clinic). Ours uses a smaller, finer cell.
2

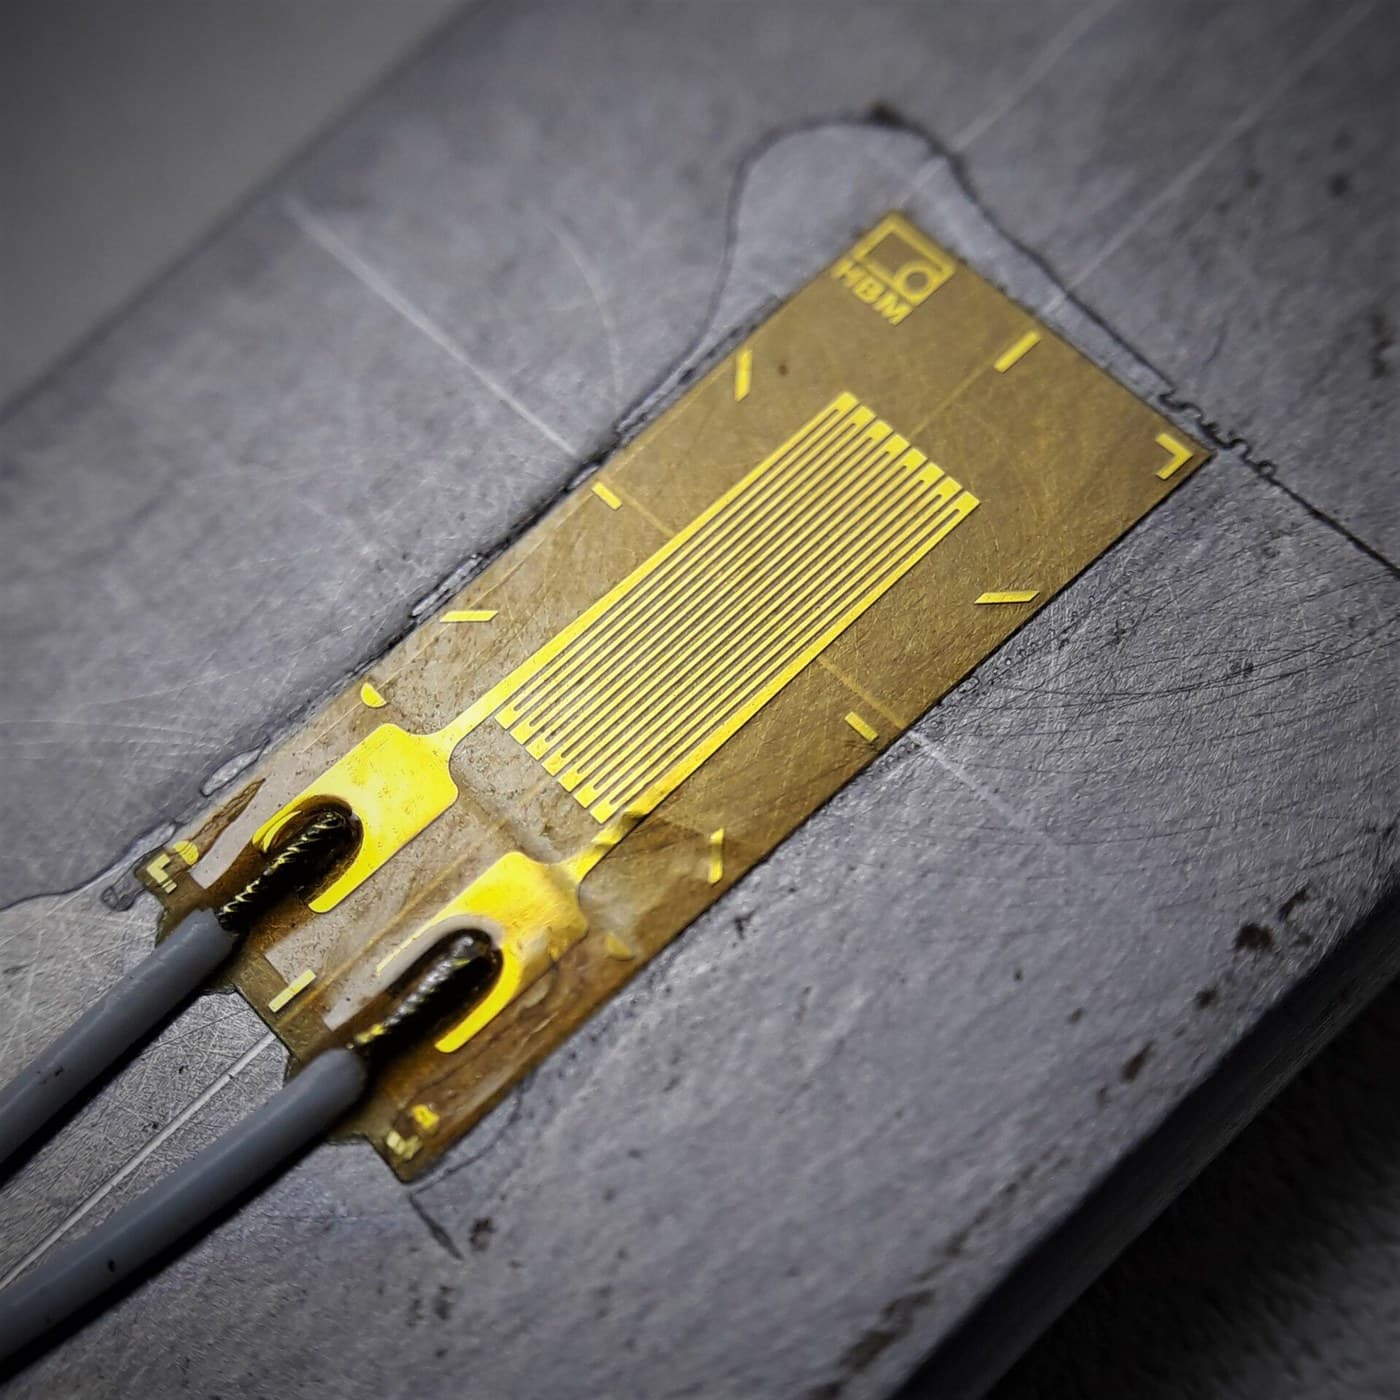
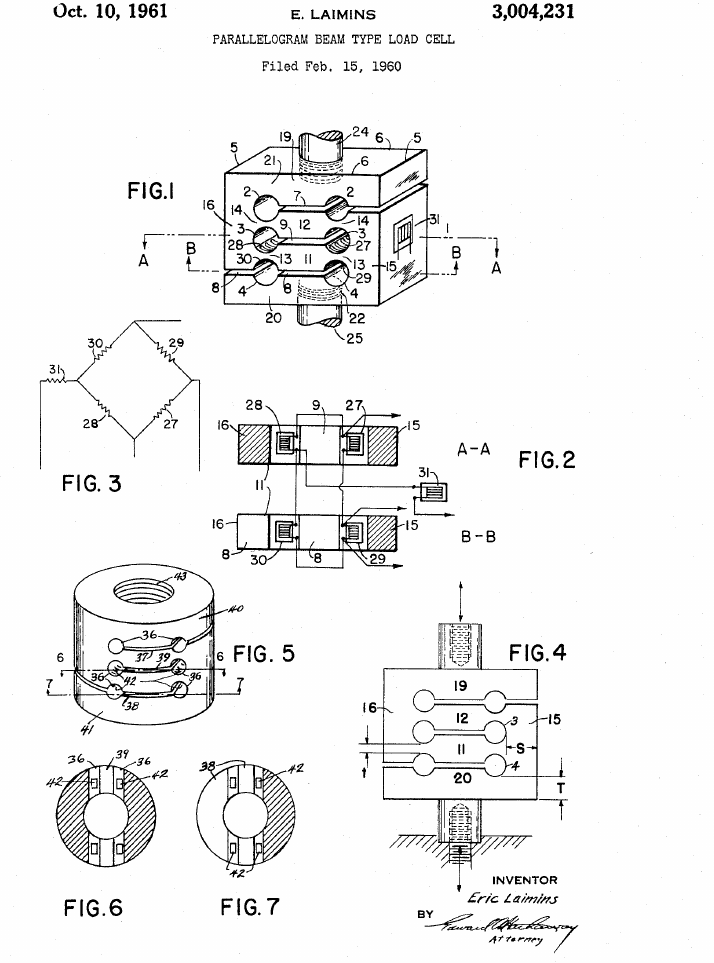
The load cell: Laimins, 1961

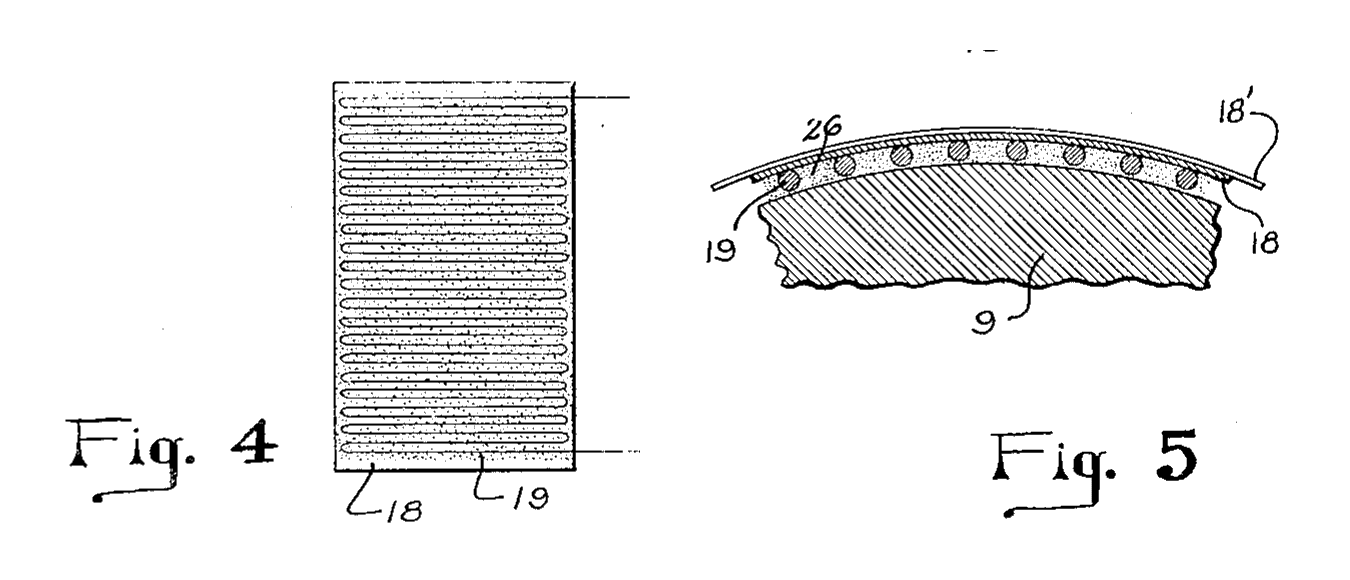
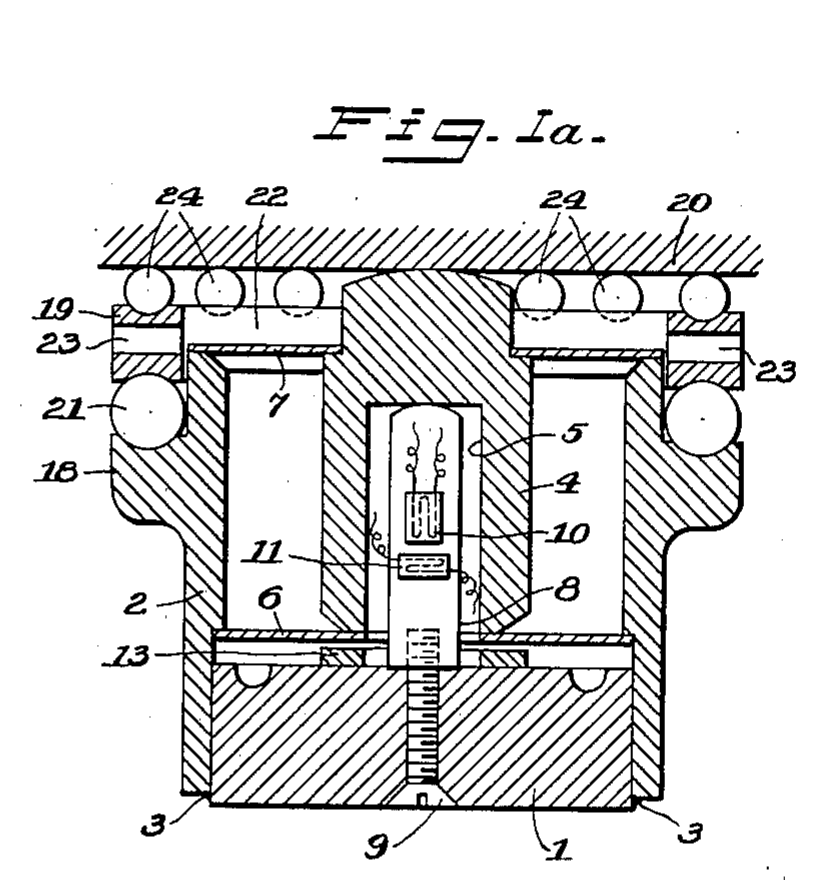
US 3,004,231 (Eric Laimins, 1961): one block with three pairs of cross holes joined by slots makes two parallel beams with thin flexures, so the ends stay parallel under load and the reading hardly depends on where the load sits. Bonded strain gauges on the hole walls form a bridge (his Fig. 3). He found S/t 40:1 and T/t 20:1 gave excellent results. The bar cells sold today have this shape.
ขั้นตอนที่ 2 - Image 1
3

How fine can it read?

กำลังโหลดสมุด Jupyter…

เครื่องมือที่ต้องใช้:

มัลติมิเตอร์มัลติมิเตอร์
4

Print the base

Floor down, no supports, PETG, 0.2 mm layers, 3 walls. The boss carries the cell's fixed end; the slot in the front wall is for the USB lead.
ไฟล์แบบSTLCC0 - Free

วัสดุสำหรับขั้นตอนนี้:

เส้นใย PETGเส้นใย PETG95 ก.

เครื่องมือที่ต้องใช้:

เครื่องพิมพ์สามมิติแบบเส้นใย (FDM)เครื่องพิมพ์สามมิติแบบเส้นใย (FDM)
5

Print the lid

Flat, no supports. Windows for the OLED and the 12 mm button, and a hole for the pan's post.
ไฟล์แบบSTLCC0 - Free

วัสดุสำหรับขั้นตอนนี้:

เส้นใย PETGเส้นใย PETG45 ก.

เครื่องมือที่ต้องใช้:

เครื่องพิมพ์สามมิติแบบเส้นใย (FDM)เครื่องพิมพ์สามมิติแบบเส้นใย (FDM)
6

Print the pan

Print it upside down: dish face on the bed, post up. It is the pan, and everything on the cell counts against its 100 g, so do not make it heavier.
ไฟล์แบบSTLCC0 - Free

วัสดุสำหรับขั้นตอนนี้:

เส้นใย PETGเส้นใย PETG15 ก.

เครื่องมือที่ต้องใช้:

เครื่องพิมพ์สามมิติแบบเส้นใย (FDM)เครื่องพิมพ์สามมิติแบบเส้นใย (FDM)
7

Change the case (optional)

The FreeCAD script that made the three parts; change sizes at the top and run: OUT=. freecadcmd build_all.py
build_all.pypython
"""Batch 2524 -- printed case for a 100 g precision scale: a TAL221-type parallel-beam bar load cell (47 x 12 x 6 mm, holes 40 mm
apart, 2 x M3 tapped at one end, 2 x 3.2 mm through at the other, 6 mm apart; HTC-Sensor datasheet), an HX711 board, an ESP32
DevKit and a 0.96 in I2C OLED. ALL sizes ours. Three parts, each printed flat face down, no supports:
  scale-base   tray 140 x 90 x 30 mm, boss under the cell's fixed end (counterbored for 2 x M3 x 14 from below), USB slot,
               4 corner posts with 2.8 mm pilot holes for the lid screws
  scale-lid    3 mm plate: OLED window, 12 mm button hole, clearance hole for the carrier post, 4 x 3.4 mm screw holes
  scale-carrier  70 mm dish (2 mm floor, 6 mm rim) on a 12 x 14 mm post, bolted to the cell's free end (2 x M3 x 30, nuts
               under the cell). It is the pan: everything resting on the cell counts against its 100 g, so it is kept light.
Run: OUT=<dir> freecadcmd build_all.py   (mm, z up; the base floor sits on the bed)."""
import os
import FreeCAD as App, Part, MeshPart
OUT = os.environ["OUT"]
V = App.Vector
L, W, H = 140.0, 90.0, 30.0            # tray outside; walls to z = 30
FLOOR, WALL = 3.0, 2.4
CELL_L, CELL_W, CELL_T = 47.0, 12.0, 6.0
HOLE_INSET, HOLE_PITCH = 3.5, 6.0      # holes 3.5 mm from each end (47 - 40) / 2, 6 mm apart across the bar
CELL_X0, CELL_YC = 45.0, 45.0          # fixed end of the cell at x = 45, cell centred across the tray
BOSS_TOP = 12.0                        # cell underside sits at z = 12
LID_T = 3.0
POST_W, POST_D = 12.0, 14.0            # carrier post along x, y
DISC_D, DISC_T, DISC_GAP = 70.0, 2.0, 3.0
RIM_H, RIM_T = 6.0, 1.2
CB_D, CB_H = 6.5, 3.2                  # counterbore for an M3 socket head (5.5 mm head, 3 mm high)

def save(sh, name):
    sh = sh.removeSplitter()
    bb = sh.BoundBox
    print(name, "valid", sh.isValid(), "solids", len(sh.Solids), "bbox", [round(v, 1) for v in (bb.XLength, bb.YLength, bb.ZLength)],
          "volume_cm3", round(sh.Volume / 1000, 1))
    MeshPart.meshFromShape(Shape=sh, LinearDeflection=0.03, AngularDeflection=0.12).write(os.path.join(OUT, name + ".stl"))
    return sh

fx = CELL_X0 + HOLE_INSET                       # fixed-end hole line
gx = CELL_X0 + CELL_L - HOLE_INSET              # free-end hole line (40 mm on)
ys = (CELL_YC - HOLE_PITCH / 2, CELL_YC + HOLE_PITCH / 2)
cell_top = BOSS_TOP + CELL_T                    # 18
lid_top = H + LID_T                             # 33

# ---- base tray
base = Part.makeBox(L, W, H).cut(Part.makeBox(L - 2 * WALL, W - 2 * WALL, H, V(WALL, WALL, FLOOR)))
boss = Part.makeBox(14.0, 16.0, BOSS_TOP - FLOOR, V(CELL_X0, CELL_YC - 8.0, FLOOR))
base = base.fuse(boss)
for y in ys:
    base = base.cut(Part.makeCylinder(1.7, BOSS_TOP + 1, V(fx, y, -0.5)))          # 3.4 mm clearance
    base = base.cut(Part.makeCylinder(CB_D / 2, CB_H + 0.5, V(fx, y, -0.5)))     # head counterbore from below
POSTS = [(WALL + 4.5, WALL + 4.5), (L - WALL - 4.5, WALL + 4.5), (WALL + 4.5, W - WALL - 4.5), (L - WALL - 4.5, W - WALL - 4.5)]
for (x, y) in POSTS:
    p = Part.makeCylinder(4.0, H - FLOOR, V(x, y, FLOOR)).cut(Part.makeCylinder(1.4, H, V(x, y, FLOOR + 6)))   # 2.8 mm pilot, 21 mm deep
    base = base.fuse(p)
base = base.cut(Part.makeBox(14.0, WALL + 2, 8.0, V(13.0, -1, FLOOR + 3)))        # USB slot in the front wall (ESP32 at the left)
base = save(base, "scale-base")

# ---- lid
lid = Part.makeBox(L, W, LID_T, V(0, 0, H))
lid = lid.cut(Part.makeBox(26.0, 15.0, LID_T + 2, V(11.0, 52.0, H - 1)))          # OLED window (active area 0.96 in, 128 x 64)
lid = lid.cut(Part.makeCylinder(6.1, LID_T + 2, V(24.0, 25.0, H - 1)))           # 12 mm panel push button
lid = lid.cut(Part.makeBox(POST_W + 4, POST_D + 4, LID_T + 2, V(gx - POST_W / 2 - 2, CELL_YC - POST_D / 2 - 2, H - 1)))
for (x, y) in POSTS:
    lid = lid.cut(Part.makeCylinder(1.7, LID_T + 2, V(x, y, H - 1)))
lid = save(lid, "scale-lid")

# ---- pan carrier (modelled in place: post from the cell top to the disc, disc DISC_GAP above the lid)
disc_z = lid_top + DISC_GAP
car = Part.makeBox(POST_W, POST_D, disc_z - cell_top, V(gx - POST_W / 2, CELL_YC - POST_D / 2, cell_top))
car = car.fuse(Part.makeCylinder(DISC_D / 2, DISC_T, V(gx, CELL_YC, disc_z)))
car = car.fuse(Part.makeCylinder(DISC_D / 2, RIM_H, V(gx, CELL_YC, disc_z)).cut(Part.makeCylinder(DISC_D / 2 - RIM_T, RIM_H + 1, V(gx, CELL_YC, disc_z + DISC_T))))
for y in ys:
    car = car.cut(Part.makeCylinder(1.7, disc_z + DISC_T, V(gx, y, cell_top - 1)))
    car = car.cut(Part.makeCylinder(CB_D / 2, CB_H + 0.5, V(gx, y, disc_z + DISC_T - CB_H)))
car = save(car, "scale-carrier")

# checks (our numbers)
print("cell underside z", BOSS_TOP, "top", cell_top, "; free end clears the floor by", BOSS_TOP - FLOOR, "mm")
print("fixed-end screw: from the counterbore seat to the cell top", round(cell_top - CB_H, 1), "mm -> M3 x 14 leaves",
      round(14 - (BOSS_TOP - CB_H), 1), "mm in the 6 mm thread")
grip = disc_z + DISC_T - CB_H - BOSS_TOP
print("carrier screw: seat z", round(disc_z + DISC_T - CB_H, 1), "to cell underside", BOSS_TOP, "=", round(grip, 1),
      "mm -> M3 x 30 leaves", round(30 - grip, 1), "mm below the cell for the 2.4 mm nut")
print("carrier volume", round(car.Volume / 1000, 2), "cm3 -> solid PETG at 1.27 g/cm3:", round(car.Volume / 1000 * 1.27, 1), "g (the most it can weigh)")
print("disc underside", disc_z, "lid top", lid_top, "post clearance in the lid hole 2 mm each side")
print("disc spans x", gx - DISC_D / 2, "to", gx + DISC_D / 2, "(tray 0 to", L, ")")

เครื่องมือที่ต้องใช้:

เวอร์เนียร์ดิจิทัล 6 นิ้วเวอร์เนียร์ดิจิทัล 6 นิ้ว
8

Bolt the pan to the cell

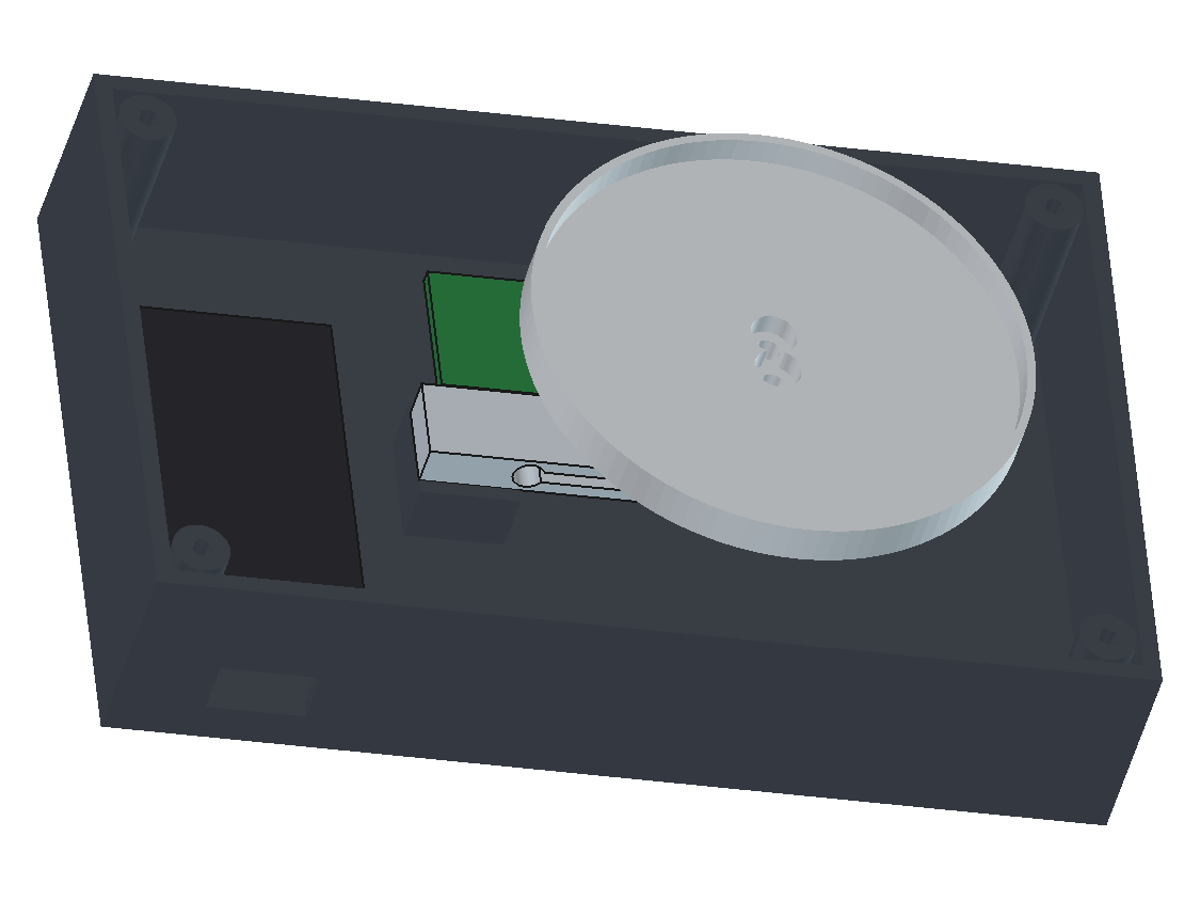
Push the pan's post down through the lid's hole. Under the lid, bolt the post to the cell end with the two 3.2 mm holes: 2 x M3 x 30 socket screws from the pan side, 2 x M3 nuts under the cell. The cell lies flat (load through its mounting holes); its cable leaves the other, M3 end, which goes on the boss.
ขั้นตอนที่ 8 - Image 1

วัสดุสำหรับขั้นตอนนี้:

โหลดเซลล์โหลดเซลล์1 piece (100 g bar, parallel beam, 0.6 mV/V)

สกรูหัวจมหกเหลี่ยมสกรูหัวจมหกเหลี่ยม2 piece (M3 x 30)
น็อตหกเหลี่ยมน็อตหกเหลี่ยม2 piece (M3)

เครื่องมือที่ต้องใช้:

ชุดประแจหกเหลี่ยมชุดประแจหกเหลี่ยม
9

Wire it

Cell to HX711: red E+, black E-, green A+, white A-. HX711: VCC and GND to the ESP32's 3V3 and GND, DT to GPIO16, SCK to GPIO4. OLED: VCC 3V3, GND, SDA GPIO21, SCL GPIO22. Button: one leg to GPIO27, the other to GND. Solder the cell's fine wires and cover each joint with heat-shrink; keep the cell's wires slack so they do not pull on it.

วัสดุสำหรับขั้นตอนนี้:

วงจรขยายสัญญาณโหลดเซลล์วงจรขยายสัญญาณโหลดเซลล์1 ชิ้น
บอร์ดพัฒนา ESP32บอร์ดพัฒนา ESP321 ชิ้น
จอแสดงผล OLEDจอแสดงผล OLED1 piece (0.96 in, I2C, SSD1306)
ปุ่มกดปุ่มกด1 piece (12 mm panel, momentary)
สายจัมเปอร์สายจัมเปอร์12 ชิ้น
สายไฟต่อวงจรสายไฟต่อวงจร0.5 m
ลวดตะกั่วบัดกรีลวดตะกั่วบัดกรี2 ก.
ท่อหดความร้อนท่อหดความร้อน8 ซม.

เครื่องมือที่ต้องใช้:

หัวแร้งบัดกรีหัวแร้งบัดกรี
คีมปอกสายไฟคีมปอกสายไฟ
10

Load the firmware

Install Adafruit SSD1306 and Adafruit GFX from the Library Manager, choose ESP32 Dev Module, upload. Short press = tare; hold 3 s = calibrate.
precision_scale.inocpp
// Precision scale, 100 g by 0.01 g: HX711 + parallel-beam bar load cell + ESP32 + 0.96 in SSD1306 OLED (I2C, address 0x3C).
// CC0. Pins (ours): HX711 DT -> GPIO16, SCK -> GPIO4; OLED SDA -> GPIO21, SCL -> GPIO22; button GPIO27 to GND.
// The HX711 is read as its datasheet says: wait for DOUT low, 25 clock pulses (24 data bits MSB first, the 25th selects
// channel A, gain 128 for the next reading), 24-bit two's complement. A clock pulse held high for over 60 us powers the
// chip down, so the pulses run with interrupts off.
// Weighs up to 80 g: the cell carries 100 g, and the printed pan, its screws and nuts rest on it all the time.
// Short press: tare. Press and hold 3 s with the pan empty, then put the 50.00 g weight on when asked: calibration.
// Libraries: Adafruit SSD1306 and Adafruit GFX (Arduino Library Manager). Board: ESP32 Dev Module.
#include <Wire.h>
#include <Adafruit_GFX.h>
#include <Adafruit_SSD1306.h>
#include <Preferences.h>

const int PIN_DT = 16, PIN_SCK = 4, PIN_BTN = 27;
const float CAL_MASS_G = 50.00;   // the calibration weight you use
const int N_AVG = 8;              // readings averaged (10 per second at RATE = 0)

Adafruit_SSD1306 oled(128, 64, &Wire, -1);
Preferences prefs;
portMUX_TYPE mux = portMUX_INITIALIZER_UNLOCKED;
long tareRaw = 0;
float countsPerGram = 0;          // set by calibration, kept in flash

long readRaw() {
  while (digitalRead(PIN_DT) == HIGH) delay(1);       // DOUT low = data ready
  long v = 0;
  portENTER_CRITICAL(&mux);
  for (int i = 0; i < 24; i++) {
    digitalWrite(PIN_SCK, HIGH); delayMicroseconds(1);
    v = (v << 1) | digitalRead(PIN_DT);
    digitalWrite(PIN_SCK, LOW); delayMicroseconds(1);
  }
  digitalWrite(PIN_SCK, HIGH); delayMicroseconds(1);   // 25th pulse: channel A, gain 128
  digitalWrite(PIN_SCK, LOW); delayMicroseconds(1);
  portEXIT_CRITICAL(&mux);
  if (v & 0x800000) v |= 0xFF000000;                   // sign-extend the 24-bit two's complement
  return v;
}

long readAvg(int n) {
  long long s = 0;
  for (int i = 0; i < n; i++) s += readRaw();
  return (long)(s / n);
}

void show(const char* top, const char* big) {
  oled.clearDisplay();
  oled.setTextColor(SSD1306_WHITE);
  oled.setTextSize(1); oled.setCursor(0, 0); oled.print(top);
  oled.setTextSize(2); oled.setCursor(0, 28); oled.print(big);
  oled.display();
}

void calibrate() {
  show("Calibrate: pan empty", "wait...");
  delay(1500);
  long empty = readAvg(32);
  char msg[24]; snprintf(msg, sizeof msg, "%.2f g", CAL_MASS_G);
  show("Put on the weight:", msg);
  while (digitalRead(PIN_BTN) == HIGH) delay(10);      // press when the weight is on and still
  delay(1500);
  long loaded = readAvg(32);
  countsPerGram = (loaded - empty) / CAL_MASS_G;
  prefs.putFloat("cpg", countsPerGram);
  tareRaw = empty;
  show("Saved. Remove weight", "done");
  delay(2000);
}

void setup() {
  pinMode(PIN_SCK, OUTPUT); digitalWrite(PIN_SCK, LOW);   // low = HX711 running
  pinMode(PIN_DT, INPUT);
  pinMode(PIN_BTN, INPUT_PULLUP);
  Wire.begin(21, 22);
  oled.begin(SSD1306_SWITCHCAPVCC, 0x3C);
  prefs.begin("scale", false);
  countsPerGram = prefs.getFloat("cpg", 0);
  delay(500);                                             // datasheet settling time 400 ms at 10 SPS
  tareRaw = readAvg(16);
  if (countsPerGram == 0) calibrate();
}

void loop() {
  if (digitalRead(PIN_BTN) == LOW) {
    unsigned long t0 = millis();
    while (digitalRead(PIN_BTN) == LOW && millis() - t0 < 3000) delay(10);
    if (millis() - t0 >= 3000) { while (digitalRead(PIN_BTN) == LOW) delay(10); calibrate(); }
    else { show("Tare", "..."); tareRaw = readAvg(16); }
  }
  float g = (readAvg(N_AVG) - tareRaw) / countsPerGram;
  if (fabs(g) < 0.005) g = 0;                             // no "-0.00"
  char big[16]; snprintf(big, sizeof big, "%7.2f g", g);
  show(g > 80.0 ? "OVER 80 g - unload" : "Precision scale", big);
}

วัสดุสำหรับขั้นตอนนี้:

สาย USB-Cสาย USB-C1 ชิ้น

เครื่องมือที่ต้องใช้:

คอมพิวเตอร์ที่ติดตั้ง Arduino IDEคอมพิวเตอร์ที่ติดตั้ง Arduino IDE
11

Close the case

Stick the ESP32 (USB to the front slot) and the HX711 to the floor with double-sided tape, the OLED behind its window, the button through its hole. Lower lid, cell and pan onto the base so the cell's tapped end sits on the boss; from underneath, 2 x M3 x 14 into the cell's M3 holes. Lid: 4 x M3 x 10 into the corner posts. The pan must not touch the lid anywhere.

วัสดุสำหรับขั้นตอนนี้:

สกรูหัวจมหกเหลี่ยมสกรูหัวจมหกเหลี่ยม6 piece (2 x M3 x 14, 4 x M3 x 10)

เทปกาวสองหน้าเทปกาวสองหน้า0.2 m

เครื่องมือที่ต้องใช้:

ชุดประแจหกเหลี่ยมชุดประแจหกเหลี่ยม

มีดคัตเตอร์งานประดิษฐ์มีดคัตเตอร์งานประดิษฐ์
12

Calibrate and check

Stand it level on a steady table out of draughts and let it warm up 10 minutes. Empty pan: short press to tare. Hold the button 3 s, put the 50 g weight on when asked, press again. Check 10 g, 20 g and 50 g, and put the 50 g on and off five times: the readings should agree within about 0.05 g.

เครื่องมือที่ต้องใช้:

ชุดตุ้มน้ำหนักสอบเทียบชุดตุ้มน้ำหนักสอบเทียบ
ระดับน้ำระดับน้ำ
13

Troubleshooting

Scale problems and fixes.

Flow

Loading...
14

History and honest limits

Eric Laimins, Cambridge, Mass., assignor to Baldwin-Lima-Hamilton Corporation: US 3,004,231, "Parallelogram Beam Type Load Cell", filed 15 Feb 1960, granted 10 Oct 1961. His block floats on two load rods instead of being clamped, so clamping does not strain the gauges. Ours: the bought cell, the case, the pins, the firmware and every size. The display shows 0.01 g, but the cell's datasheet allows about +/- 0.05 g (repeatability, hysteresis, creep); weigh up to 80 g. Not built or tested by us yet.

วัสดุ

14

เครื่องมือที่จำเป็น

10

ไฟล์ออกแบบ

3

บลูพริ้นท์ที่เกี่ยวข้อง

บลูพริ้นท์เหล่านี้แบ่งปันความรู้ — เทคนิค วัสดุ หรือหลักการ
CC0 สาธารณสมบัติ

พิมพ์เขียวนี้เผยแพร่ภายใต้ CC0 คุณสามารถคัดลอก แก้ไข แจกจ่าย และใช้งานผลงานนี้เพื่อวัตถุประสงค์ใดก็ได้ โดยไม่ต้องขออนุญาต

สนับสนุนเมกเกอร์โดยซื้อสินค้าผ่านพิมพ์เขียวของพวกเขา ซึ่งพวกเขาจะได้รับ ค่าคอมมิชชันเมกเกอร์ ที่ผู้ขายกำหนด หรือสร้างเวอร์ชันใหม่ของพิมพ์เขียวนี้และรวมเป็นการเชื่อมต่อในพิมพ์เขียวของคุณเพื่อแบ่งรายได้

การสนทนา

(0)

เข้าสู่ระบบ เพื่อร่วมการสนทนา

กำลังโหลดความคิดเห็น...